Storage, Yard vacuum, Engine – Bolens 247.77010 User Manual
Page 14: Other
Attention! The text in this document has been recognized automatically. To view the original document, you can use the "Original mode".
7
.
8
Apply lubricant to the threads of impeller
removal tool and then thread the tool into the
crankshaft. Stop when the impeller assembly
can move on the crankshaft.
Remove the impeller assembly from the crank
shaft. Unthread the impeller removal tool from
the impeller assembly.
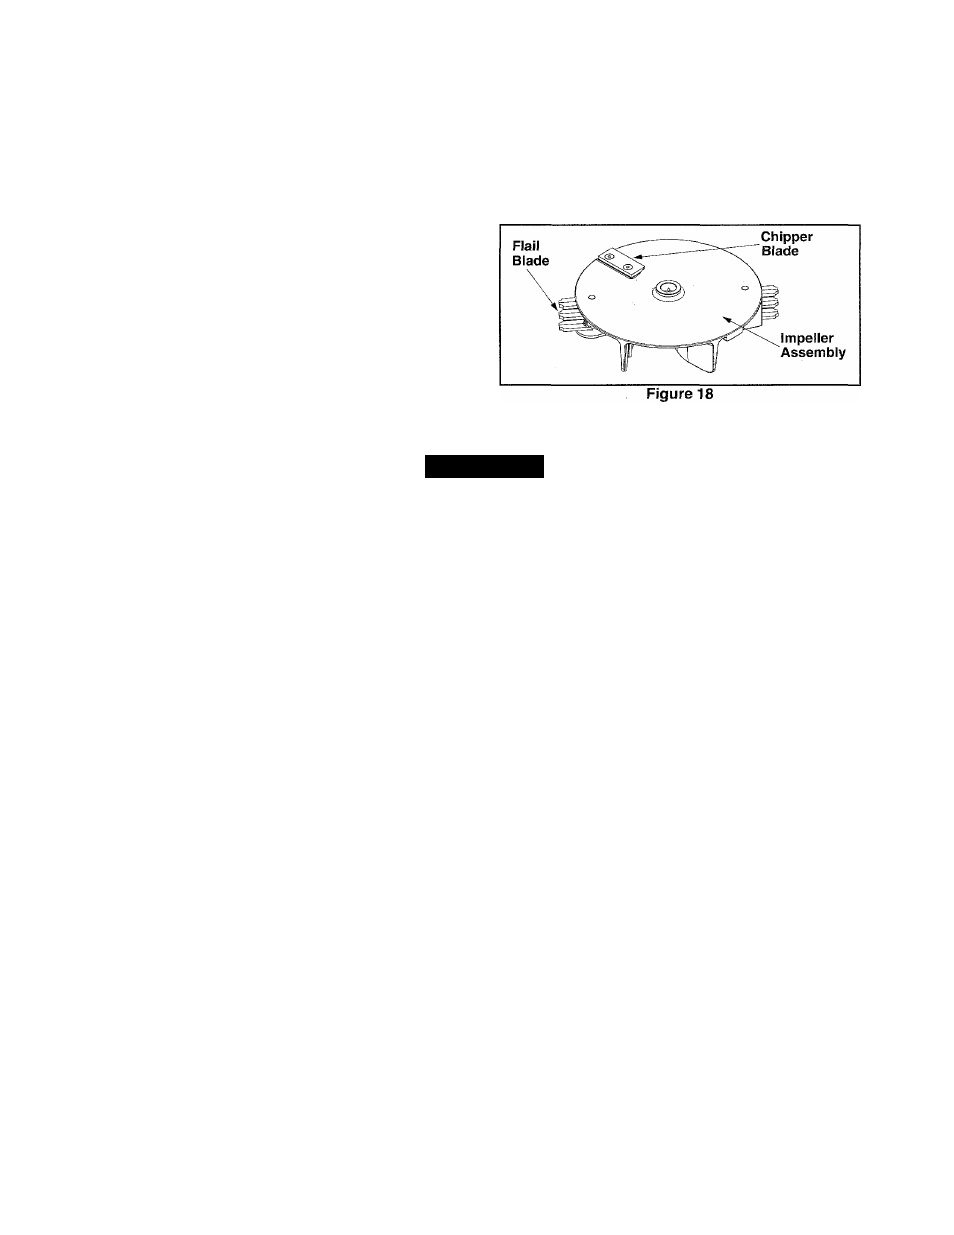
9. Remove the chipper blade using a 3/16" alien
wrench on the outside of the blade and 1/2"
wrench on the underside of impeller assembly.
10. Replace or sharpen chipper blade.
11. When sharpening blade, protect hands by using
gloves and follow the original angle of grind.
12. Reassemble by performing steps 1 through 9 in
reverse order.
• Tighten blade screws to 210 - 250 in-lbs.
• Tighten impeller bolt to 375 - 425 in-lbs.
NOTE:
Make certain chipper blade is reassembled
with the sharp edge facing upward. See Figure 18.
STORAGE
Prepare your Craftsman Yard Vacuum for storage at
the end of the season or if the unit will not be used for
30 days or longer. A yearly check-up by your local
Sears Service Center is a good way to ensure that the
unit runs properly next season.
Yard Vacuum
•
Clean the equipment thoroughly.
•
Wipe equipment with an oiled rag to prevent rust.
Use a light oil or silicone to wipe.
•
Service the engine following instructions below.
•
Store unit in a clean, dry area. Do not store next
to corrosive materials such as fertilizer.
Engine
IMPORTANT: It is important to prevent gum deposits
from forming in essential fuel system parts such as
the carburetor, fuel filter, fuel hose, or tank during
storage. Also, alcohol blended fuels (called gasohol or
using ethanol or methanol) can attract moisture which
leads to separation and formation of acids during stor
age. Acidic gas can damage the fuel system of an
engine while in storage.
To avoid engine problems, the fuel system should be
emptied before storage of 30 days or longer. Follow
these instruction:
•
Drain the fuel tank.
•
Start the engine and let it run until the fuel lines
and carburetor are empty.
•
Drain carburetor.
•
Never use engine or carburetor cleaner products
in the fuel tank or permanent damage may
occur.
NOTE: Fuel stabilizer is an acceptable alternative in
minimizing the formation of fuel gum deposits during
storage.
•
Add stabilizer to gasoline in fuel tank or storage
container.
•
Always follow the mix ratio found on stabilizer
container.
•
Run engine at least 10 minutes after adding
stabilizer to allow the stabilizer to reach the car
buretor.
•
Do not drain the gas tank and carburetor if
using fuel stabilizer. Drain all the oil from the
crankcase (this should be done after the engine
has been operated and is still warm) and refill
the crankcase with fresh oil.
•
If you have drained the fuel tank, protect the
inside of the engine as follows:
• Remove spark plug, pour approximately 1/2
ounce
(approximately one tablespoon)
of
engine oil into cylinder and crank slowly to
distribute oil.
® Replace spark plug.
Other
•
Do not store gasoline from one season to
another.
•
Replace the gasoline can if it starts to rust. Rust
and/or dirt in the gasoline will cause problems.
•
Store unit in a clean, dry area. Do not store next
to corrosive materials, such as fertilizer.
NOTE: If storing in an unventilated or metal storage
shed, be certain to rustproof the equipment by coat
ing with a light oil or silicone.
14