Torque specifications 46" deck, 50" deck, Figure 23.—units with adjustabie tie rods – Bolens 840 thru 849 User Manual
Page 19: Check fluid level, Removing / installing / jump starting
Attention! The text in this document has been recognized automatically. To view the original document, you can use the "Original mode".
TORQUE SPECIFICATIONS
46" Deck:
Blade
Hex Flange Nut: 70 ft.-lbs., 90 ft.-lbs.
Blade Spindle Screws
If disassembled for any reason, tighten the blade spin
dle screws between 200 and 275 inch pounds.
50" Deck:
Blade
3/8" Dia. Bolt: 450 in. lb. min., 600 in. lb. max.
5/16" Dia. Bolt: 200 in. lb. min., 350 in. lb. max.
Blade Spindle Nuts
If disassembled for any reason, tighten the blade spin
dle nuts between 200 and 350 in. lbs.
To ensure safe operation of your unit, all nuts and
bolts must be checked periodically for correct tight
ness.
WHEEL ADJUSTMENT
The caster (forward slant of the king pin) and the cam
ber (tilt of the wheels out at the top) require no adjust
ment. Automotive steering principles have been used
to determine the caster and camber on the tractor. The
front wheels should toe-in 1/8 inch.
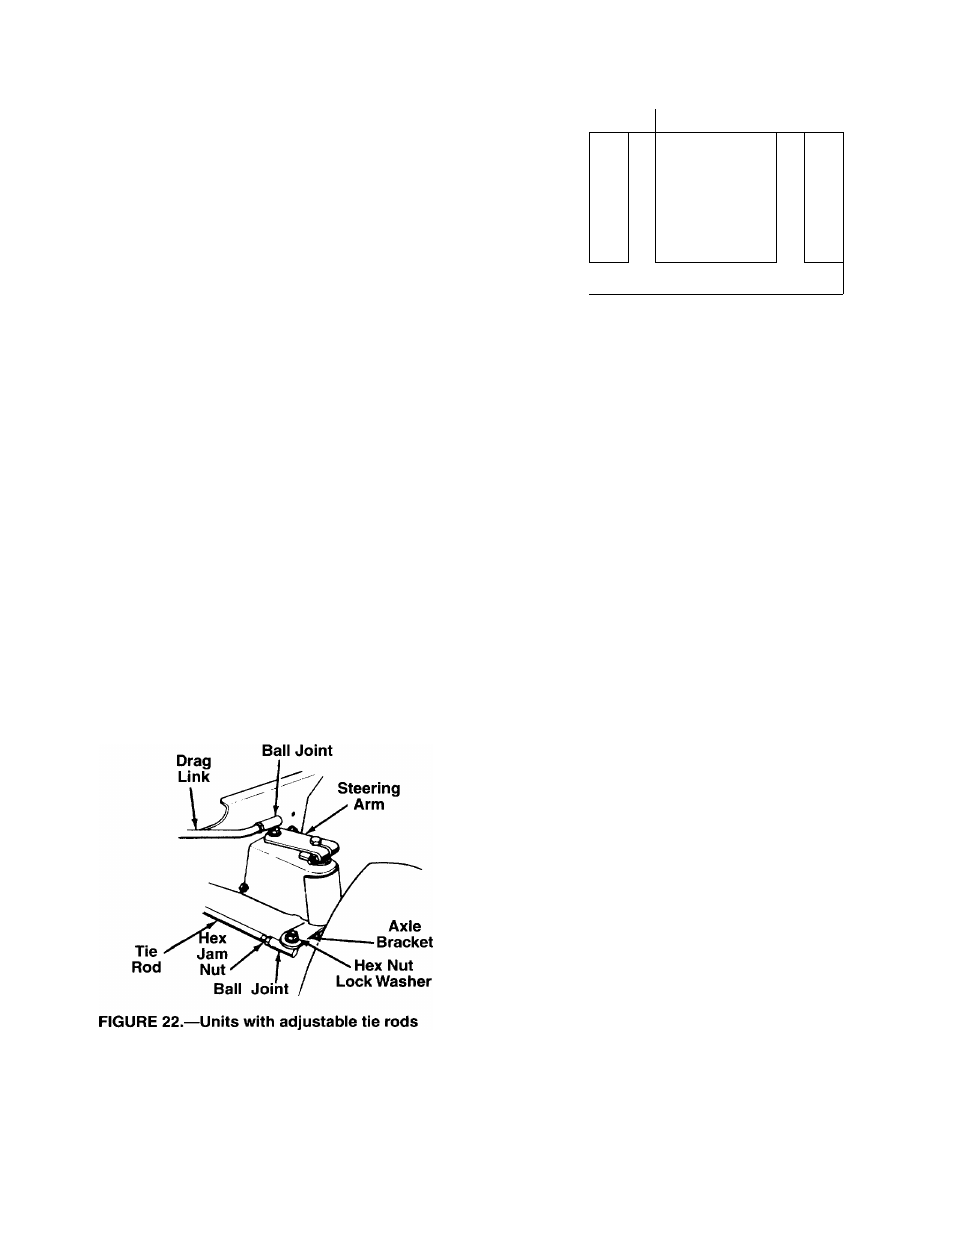
Some units have adjustable tie rods so the toe-in can
be adjusted. To adjust the toe-in on these units, follow
these steps.
1. Remove the hex nut and lock washer, and drop
the end of the tie rod from the axle bracket. See
figure 22.
2. Loosen the hex jam nut on tie rod.
3. Adjust the tie rod assembly for correct toe-in.
—1
-
e
Front
L-
(1/8" less than A)
FIGURE 23.—Units with adjustabie tie rods
BATTERY CARE AND MAINTENANCE
(TYPE “A ” BAHERY)
Type “A” batteries are sealed and are maintenance
free.
BATTERY CARE AND MAINTENANCE
(TYPE “B” BAHERY)
CHECK FLUID LEVEL
Check fluid level inside each cell of the battery every
two weeks and before and after charging. Always keep
level just below the split rings.
Add only distilled water. Never add additional acid
or any other chemicals to the battery after initial activa
tion.
NOTE: After operating the tractor for a long period of
time, check the fluid level in the battery as it can over
heat and lose fluid.
CHARGING THE BATTERY (All Batteries)
The engine is equipped with an alternator which
charges battery when tractor is operated. Linder nor
mal conditions, the battery only needs to be charged
before, during and after off-season storage. Foliow the
instructions under “Off-Season Storage.”
To charge the battery: Battery P/N 725-1705B—
Charge at 2-3 amps for one hour. Battery P/N 725-1707B
and 725-0453E—Charge at 8 amps for one hour.
REMOVING / INSTALLING / JUMP STARTING
A
WARNING: When removing or instailing
the battery, foiiow these instructions to
prevent the screwdriver from shorting
against the frame.
Dimension “B” should be approximately 1/8" less than
Dimension "A.” See figure 23. To increase Dimension
“B,” screw tie rod into tie rod end. To decrease Dimen
sion “B,” unscrew tie rod from tie rod end. Reassemble
tie rod. Check dimensions. Readjust if necessary.
Removing the Battery: Disconnect negative cable
first, then positive cable.
Instailing the Battery: Connect positive cable first,
then negative cable.
19