Air filter (see fig. 14a), Clean air screen (see fig. 14a), Engine cooling fins (see fig. 15) – Poulan 160464 User Manual
Page 18: Engine oil filter (see fig. 14b)
Attention! The text in this document has been recognized automatically. To view the original document, you can use the "Original mode".
r I
r* iCif
K, , '- ¡'I. V
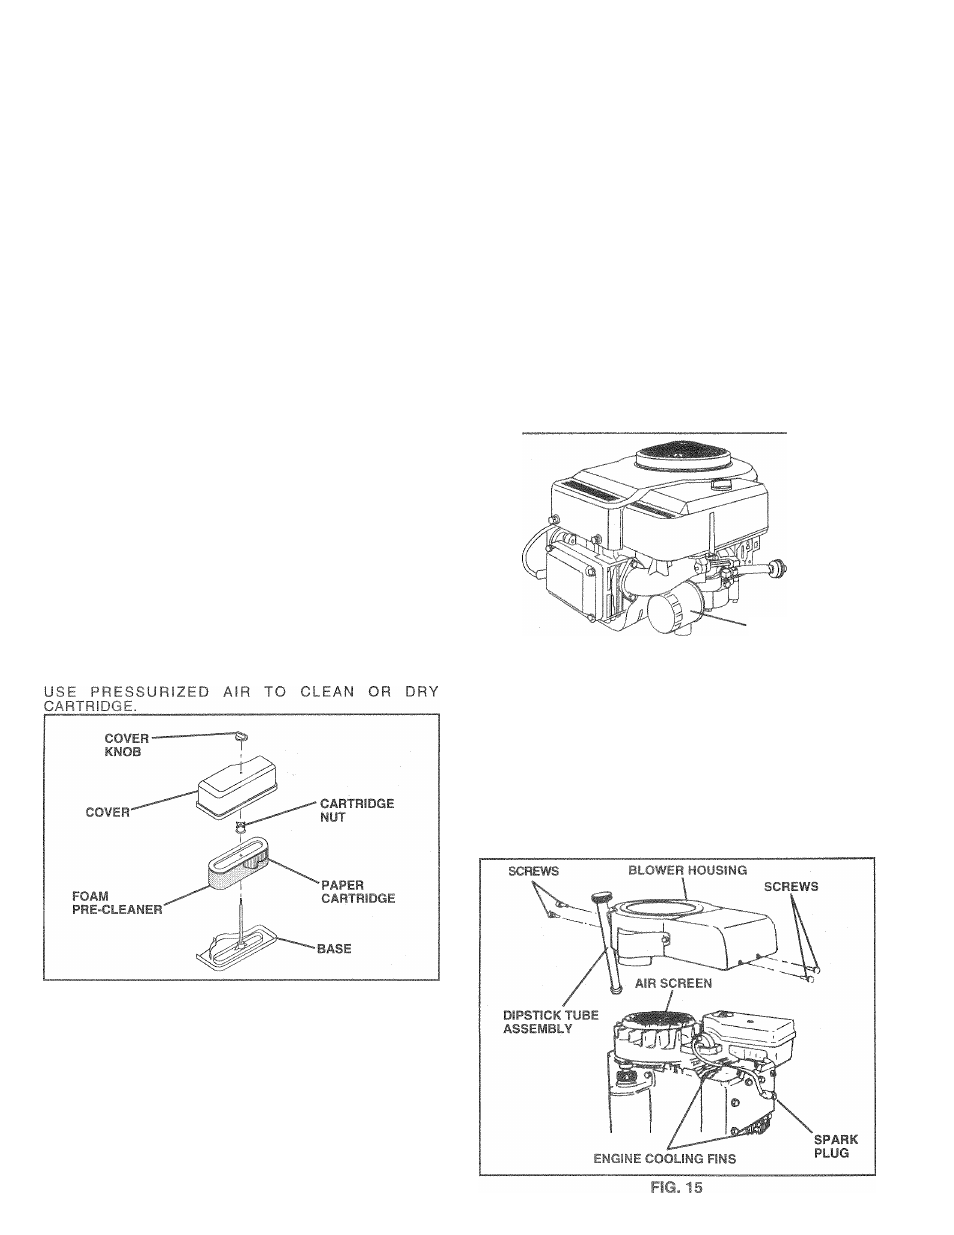
AIR FILTER (See Fig. 14A)
Your engine will not run properly using a dirty air filter.
Clean the foam pre-cleaner after every 25 hours of opera
tion or every season. Service paper cartridge every 100
hours of operation or every season, whichever occurs first.
Service air cleaner more often under dusty conditions.
•
Remove knob(s) and cover.
TO: LF .-I t “'HL-.O ! / M'
h
•
Slide foam pre-cleaner off cartridge.
® Vv'rti ii i.i inoiid Orr iQf-n! si. p'f.i' I.
/ l y ' ( - . > H J i " ' l l - ' O j h c 1 1 1
‘
. a;ui
/ 1 T i>i > nu" L il .'V 4 !■ < luih rd - f' ■ * t i t . ( ii ^ P " t J l i y U On *1- ISpL-Li- t “ " C i - c - F I . ® HeinOai! iirt-^l'-ona o/c-r cattiidyr • ric.Fisr.gi 1 ..0 / 0 and cm urc with knob(^). TO SERVICE CARTRIDGE • Remove cartridge nut. • Carefully remove cartridge to prevent debris from en tering carburetor. Clean base carefully to prevent • Clean cartridge by tapping gently on flat surface. If very dirty or damaged, replace cartridge. • Reinstall cartridge, nut, precleaner, cover and secure with knob(s). IMPORTANT: PETROLEUM SOLVENTS, SUCH AS KEROSENE, ARE NOT TO BE USED TO CLEAN THE FIG. 14A CLEAN AIR SCREEN (See Fig. 14A) Air screen must be kept tree of dirt and chaff to prevent ENGINE OIL FILTER (See Fig. 14B) Replace the engine oil filter every season or every other oil ‘ ‘ I t I ' ■ ‘ I . . , ( f I , ( WJ ibl } counterclockwise. Use a !;S »ii I ■ ' l i b b e r pdol-et Apply a thin coating of r In rtrif ^ F r - . t i 1 . 1 Til - • ‘ ; n.iiiii g do( kwise until r.jbl V ' o r - C I " iii i ; (ii-tivj ".ii'-Gre then tighten filter an additional 1/2 to 3/4 turn. i ill i! - r>i i • 'I , — V . 1 . 1 l O (-RANGE EN- 1 i « i [ JIL .1 , ir . .1 . , • rt. .i.jiiLwi) Forapprovi- 1 . 1 . i SPECIF If. ATIONS’ on f ) O ' i i f d , I i i w ' ' . h ‘ I. r . Cjtrecionvleaks bt futt p!r U t I'.T • t'j'l "OOMlnri OIL FILTER FIG. 14B ENGINE COOLING FINS (See Fig. 15) Remove any dust, dirt or oil from engine cooling fins to • Remove sroews fiom bcwet housing and lift housing and dipstick tube assembly off engine. • Cover oil fill opening to prevent entry of dirt. • Use compresseo air or stiff bristle brush to thoroughly clean engine cooling tins • To reassemble, reverse above procedure. 18
debris from entering carburetor.
CARTRIDGE. THEY MAY CAUSE DETERIORATION OF
THE CARTRIDGE. DO NOT OIL CARTRIDGE. DO NOT
engine damage from overheating. Clean with a wire brush
or compressed air to remove dirt and stubborn dried gum
fibers.
on replacement oil filtei
mar- (ir.i t, , i'H
prevent engine dan.age from overheating.