Blade removal (see fig. 11), Battery, Brakec – Poulan 160464 User Manual
Page 16: Tires, Blade care, Sharpen, Blac
Attention! The text in this document has been recognized automatically. To view the original document, you can use the "Original mode".
TRACTC
Always obsí
5R
3rve safety rules when performing a
BRAKEC
JPERATION
It tractor recjuires more than six (6) feet stoppir
at high spee
(See “TO A
j 1 •!(I'ji 1 -.1 4« ii i i 11 1 ‘1 i ,.i ) ' b
iDJUST BRAKE” in the Service a
ments sectil on of this manual).
TIRES
nv rr
ance
> S/'.n ii I p’i’i
1 -r II fr u' ' r _il t:r - ( ' ' - t ‘PP 'L‘-
UCT SPECIFICATIONS” on page 3 of this manual).
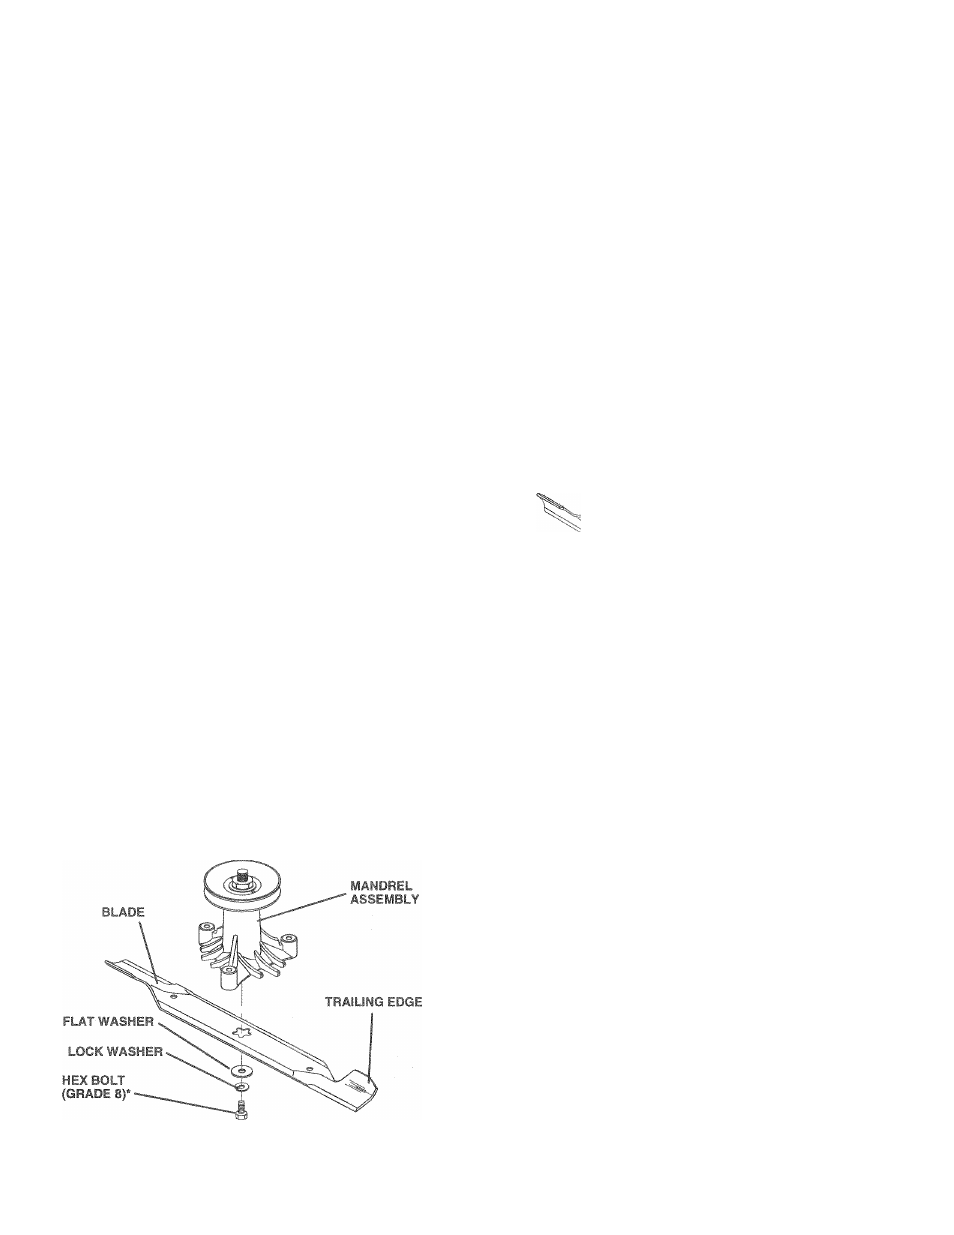
» i * « ' f i II ‘ < q '^lií! ' C d l ' Í ( I ‘ l i ' h i f i l l T - • fii-jih <'r' ■dri* I h-/srr|' ihjT n >v ' 5‘i;'F [,r- daf'iape NOTE, T i sea! tire punctures and prevent flat tires due to 'Way oe purchased from your local parts rieaiei Tire se-aiant also prevents tire dry rot and BLADE CARE For test msults mcwer blades must be kept sharp. Re BLADE REMOVAL (See Fig. 11) • Raise mower to highest position to allow access to ^ blades, • Remove hex bolt, lock washer and flat washer securing ® Install new or re harpti i. d blade with trailing edge up towards der I* a- -hown • Reassemble hex belt lock we->her and flat washer in exact order a- ,-howii • Tighten boft sef urel/ (30 35 Ft, Lbs. torque). IMPORTANT: HI Aü¡- B"'L T IS GRADE 8 HEAT TREATED. NOTE: Wedonc-i -mmend sharpening blade - but if you do, be sure the biant, is baianceu *A GRADE 8 HEAT TREATED BOLT CAN BE IDENTIFIED BY SIX LINES ON THE BOLT HEAD. ~ ^ RGm ) SHARPEN 1 BLAC ,re should be f balanced blade ! vvill CSÜ' The blade car1 be she! To check blac le balan. li ( '• 1 f( Ч or a cor ow the '3- 12 ) u engii •pened le blade balanced. An iSive vibration and even- iiith a file or on a grinding narpen while on the mower. v ou Will Hoed 0 5/8 diameter ancer. (When using a cone i isu Ljctions supplied with bal- ar A. >• ‘ 1 ! j .'f ., 1 1 ' -3, uil'Cr. t,' ( . 1 , 1 I . .If t ill I |j|! p S i - i l v I viltti the gruind. if ! I d( I h.l • d I? h'luid lomain in e hfiisontal . u, 'iuii I.. " I end ' j fht t latJe mo/es downward, n -rp.-r, F." t,i M I iTtii th<- blade I- bcthriitd IJCJIF iJf.ii.d'W- iviinji bjileoi my blade ihtloDesof ihe . e.ite hul' tf bv centered but are not. CENTER HOLE \ \ / 5/8" BOLT OR PIN BLADE FIG. 12 BATTERY Your tractor has a battery charging system which is suffi • Keep battery and terminals clean. • Keep battery bolts tight. • Keep small vent holes open. • Recharge at 6-10 amperes for 1 hour. TO CLEAN BATTERY AND TERMINALS Corrosion and dirt on the battery and terminals can cause the battery to “leak” power. • Open battery box door. • Disconnect BLACK battery cable first then RED bat tery cable and remove battery from tractor. • Rinse the battery with plain water and dry. • Clean terminals and battery cable ends with wire brush • Coat terminals with grease or petroleum jelly. • Reinstall battery (See “CONNECT BATTERY” in the Assembly section of this manual). 16
slow is-sks. Tire sealant
corrosion
place bent or damaged blades.
blade.
wheel. Do no ! attemp
steel bolt, pin,
cient for normal use. However, periodic charging of the
battery with an automotive charger will extend its life.
until bright.