I ill, Assemb, How to set up your tractor – Poulan XC1182B User Manual
Page 8
Attention! The text in this document has been recognized automatically. To view the original document, you can use the "Original mode".
ASSEMB
l
-V
HOW TO SET UP YOUR TRACTOR
PREPARE BATTERY (See F!G. 3)
CAUTION: Wear eye and face shield.
Wash hands or clothing immecliately if ac-
cidentaiSy in contact with battery acid.
not into -upies irt,m charged battery
-'‘i*.
1 fe
R t' the H v n i j .fiurib included with the
c ‘ vent c'''- № th- bag of parts. A!-
'rn/. c ' ‘fec ciotHng and goggles to
y^ul hnndc snd eyes.
Your unit has a battery charging system which is sufficient
for normal use. However, periodic charging of the battery
with an automotive charger will extend its life.
• See instructions packed with vent caps in parts bag.
• Fill battery with acid. Fill each
cell
until it reaches the bot
tom of the vent wells. Do not over fill.
• Allow battery to
stand
and settle for at least thirty minutes.
After standing, check the level of acid. If below the vent
wells,
add more acid
until
the correct level is reached.
While battery is standing (after adding acid) and later, while
battery is being charged, continue with assembly of unit.
“ To maximize the
life
of your
battery,
it is necessary that
the battery be charged
before
use.
Use
a 12 volt
battery
charger.
Charge
battery at a rate of 6 amperes for 1 hour.
Observe
all safety
precautions
required
for battery charg
ing.
Failure to charge battery can result in a shortened
battery
life.
• Check the acid level after the battery is charged. If the acid
has fallen beiow the correct level, add distilled or iron free
water.
• Install the vent caps to cover the vent wells. Wash the top
of the
battery
with water to remove any
acid,
then wipe
drv.
dye lie
OiSDO'-
posal
I
plastic
while
c
y case
fo!
jrred in h
xcess
ba
frig it to f
iner.
Stir
jilow
insta
QMimm,
)amifig.
5 on hov
e ‘ -m v'esui- t r a t ' < > n.,rr>-
acid. Neutralize acid for dis-
iches of water in a five gaiion
a 0 > •
intil the addition of more soda
to instsll bHttsrv.
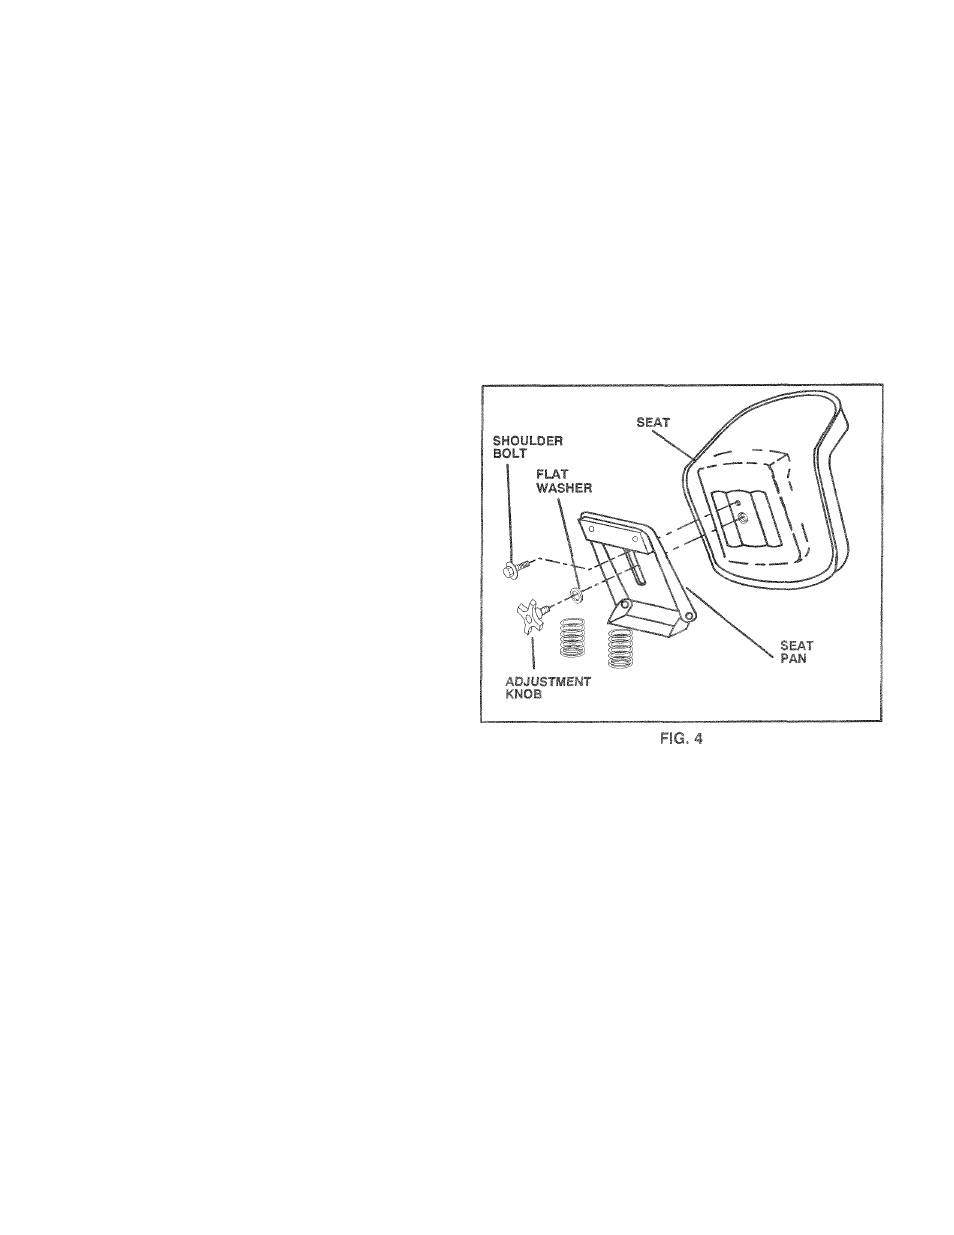
INSTALL SEAT (See FIG. 4)
Adjust seat before tightening adjustment knob.
• Remove cardboard packing on seat pan.
• Place seat on pan and assemble shoulder bolt.
• Assemble adjustment knob and flat washer loosely. Do
not tighten.
• Tighten shoulder bolt securely.
• Lower seat into operating position and sit on seat.
• Slide seat until a comfortable position is reached which al
lows you to press clutch/brake pedal all the way down.
» Get off seat without moving its adjusted position.
• Raise seat and tighten adjustment knob securely.
CHE3A TIRE A* Ac TAUPE
wevr -.vrint „"ed
at
the factory
for
vreci
~irc
prasc.re
is important for
^he L'eiz on -wu' >r.
■hicp.uc f'jrp.ses
er' cut pp—-rr-i'
• Aeduce jre '".'surv lO PS show:, in ‘ PRODUCTSPECi-
Fi'.-ATIC v.F : p a g e 3 o. tuis narueJ,
CHECK
BRAKE SYSTEM
After
you
learn how to operate
your tractor, check
to see
that
the brake is properly adjusted. See “TO ADJUST BRAKE” in
the Service and Adju.stments section of this manual.
&
I
ill
H
0.1 'seY
TUBE
f
E L L
FIG. 3