Tiller lubrication, Check for gear oil leaks, Check hardware – Troy-Bilt 12214-5.5HP User Manual
Page 19: Transmission gear oil service, A. to check the transmission gear oil level, Check for oil leaks check hardware, Warning
Attention! The text in this document has been recognized automatically. To view the original document, you can use the "Original mode".
Sections: Maintenance
WARNING
Before inspecting, cleaning or servicing the unit, shut off engine, wait for all ^
parts to come to a complete stop, disconnect spark plug wire and move wire away from spark
plug. Failure to follow these instructions can result in serious personal injury or
property damage.
TILLER LUBRICATION
Proper lubrication of the tiller is an
essentia! part of maintenance. After
every 10 operating hours, oil or grease
the lubrication points shown in Figures 5-
1 and 5-1A and described below.
Use general purpose lubricating oil (#30
weight motor oil Is suitable) and general
purpose grease (grease that contains a
metal lubricant is preferred, if available).
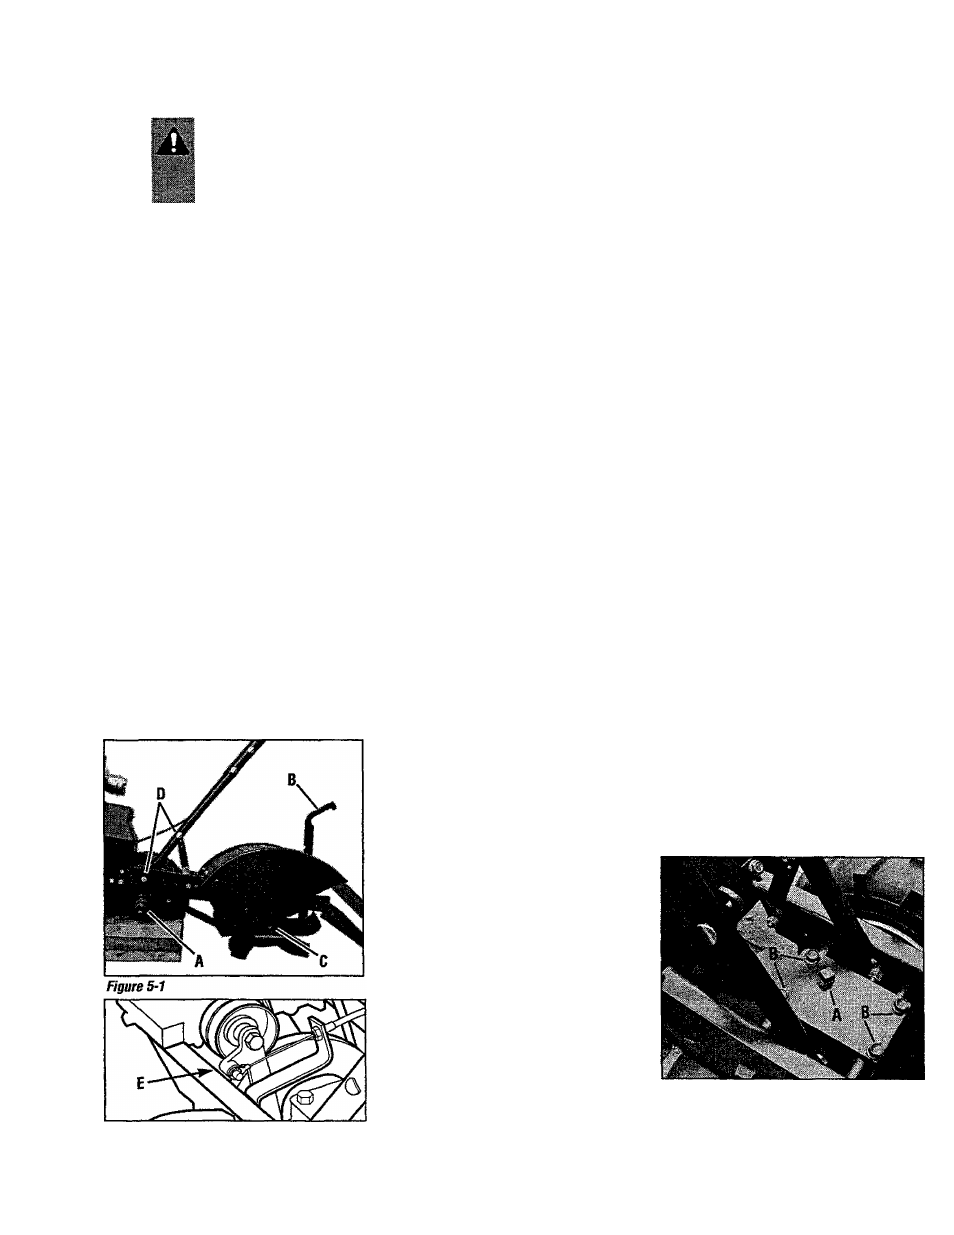
• Remove wheels, clean wheel shaft (A,
Fig. 5-1) and apply light coating of
grease to shaft.
• Grease back, front and sides of Depth
Regulator Lever (B, Fig. 5-1).
• Remove tines, clean tine shafts (C, Fig.
5-1) and apply light coating of grease to
shaft.
• Oil the handlebar height adjustment
screws and the handlebar attaching
screws (D, Fig. 5-1).
• Lightly oil the shifting mechanism pivot
points (E, Fig. 5-1 A). Do not get oil on
the belt or belt groove of the pulley.
Figure 5-1A
CHECK FOR GEAR OIL LEAKS
Before each use, check the transmission
housing (and the ground beneath the
unit) for any sign of a pear oil leak.
A little seepage around a cover or an oil
seal is usually harmless. However, it oil
drips overnight, then immediate attention
is needed as ignoring a leak can result in
severe transmission damage.
If a cover is leaking, try tightening any
loose screws. If the screws are tight, a
new gasket or oil seal may be needed. If
the leak is from around a shaft and oil
seal, the oil seal probably needs to be
replaced. See your authorized dealer or
contact the factory for service or advice.
IMPORTANT:
Never operate the tiller if
the transmission is low on gear oil.
Check the oil level after every 30 hours of
operation and whenever there is any oil
leakage.
CHECK HARDWARE
After every 10 operating hours, thor- ,
oughly inspect the unit for any loose or
missing screws, bolts and other fasteners.
Tighten or replace the fasteners as
needed. Be sure to check the screws
underneath the tine hood that secure the
transmission cover and the Depth
Regulator Lever to the transmission.
CHECK TIRE PRESSURE (on units
equipped with pneumatic tires)
Check the air pressure in both tires.
Deflate or inflate both tires evenly to15-20
PSI (pounds per square inch). Be sure
that both tires have the same air pressure
or the unit will tend to pull to one side.
TRANSMISSION GEAR OIL SERVICE
Check the transmission gear oil level after
every 30 hours of operation or whenever
you notice an oil leak.
IMPORTANT:
Operating the tiller when the transmission
is low on oil can result in severe damage.
A. To Check the Transmission
Gear Oil level:
1. The transmission must be cool (warm
operating temperatures will provide an
incorrect oil level reading).
2. The transmission must be level.
3. Remove the oil fill plug (A, Fig. 5-2)
and look into the oil fill hole. The main
drive shaft is visible inside the hole.
4.
The oil level is correct if it is approxi
mately halfway up the side of the drive
shaft
5. If the oil level is low, add gear oil as
described next. If the oil level is okay,
securely replace the oil fill plug.
6. If only a few ounces of gear oil is
needed, use API rated GL-4 or GL-5 gear
oil having a viscosity of SAE140, SAE
85W-140 or SAE 80W-90. If refilling an
empty transmission, use only GL-4
transmission gear oil having a viscosity of
SAE 85W-140 or SAE 140.
IMPORTANT:
Do not use automatic
transmission fluid or motor oil in the
transmission.
7. Slowly pour gear oil into the oil fill
hole until it reaches the halfway point on
the drive shaft. Check frequently while
pouring to avoid overfilling.
8. Securely replace the oil fill plug.
Figure 5-2: Remove oil fill plug (A) to check
gear oil level and to add gear oil. Remove
four cover screws (B) to drain gear oil.
19