To regulate the length of stitch, To regulate the width of bight, Instructions – SINGER 143G2 User Manual
Page 9: Adjusters and mechanics, Thread controller
Attention! The text in this document has been recognized automatically. To view the original document, you can use the "Original mode".
14
To Regulate the Length of Stitch
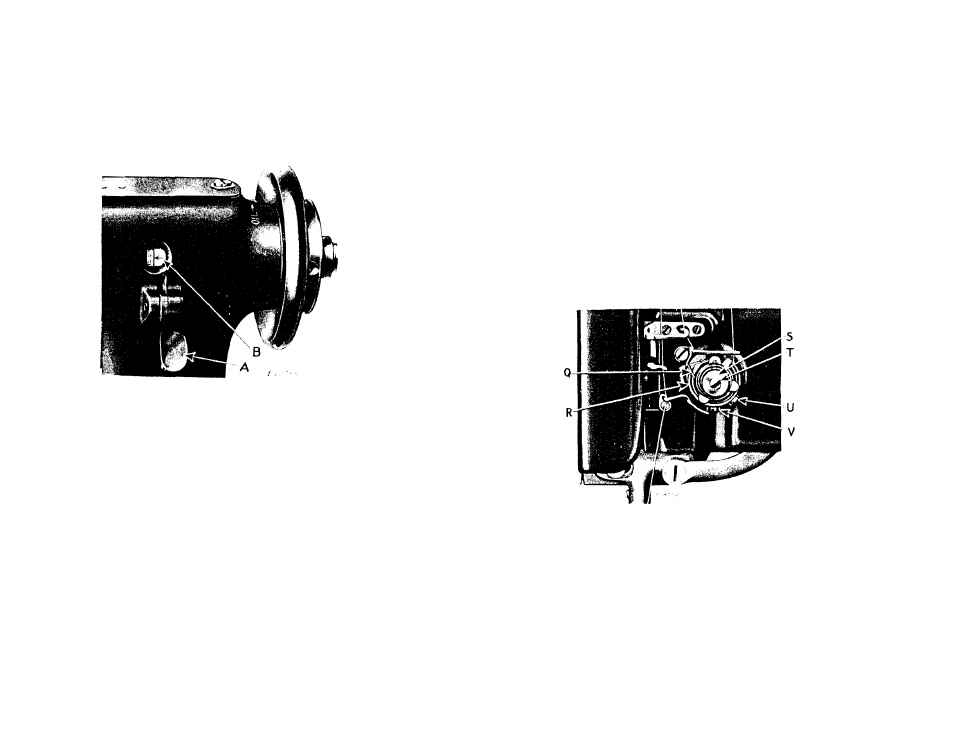
Press the stitch regulator lever (A, Fig. 17) and at the same
time turn the machine pulley over toward you until the lever (A)
Fig. 17. stitch Regulator
engages
the
notch
In
the
stitch
regulator
flange
(B,
Fig.
17).
Continue to hold the lever (A) In the notch In the flange (B)
and at the same time turn the machine pulley backward or for
ward,
as
required,
until
the
number
of
the
desired
length
of
stitch Is opposite the arrow; as shovm In Fig.
iV,
then release
the lever (A).
To Regulate the Width of Bight
The width of bight or zigzag stitch Is regulated by means of
the
needle
vibrator
regulating
spindle
head
(A,Fig.2)
at
the
front
of
the
machine.
To
Increase
the
width
of
zigzag
stitch,
turn
the
regulating
spindle
head
over
to
the
left.
To
decrease
the width of zigzag stitch, turn the regulating spindle head over
to the right. The extreme width of zigzag stitch Is 3/16 Inch
for Machine 143G2, and 5/16 Inch for Machine 143G3.
15
INSTRUCTIONS
FOR
ADJUSTERS AND MECHANICS
Thread Controller
The function of the thread controller spring (Q,Fig.18) Is to
hold back the slack of the needle thread until the eye of the
needle
nearly
reaches
the
goods
In
Its
descent,
as
without
this
controlling
action
of
the
spring,
the
slack
thread
or
silk
(more
especially silk) will sometimes be penetrated by the point of the
needle as the needle Is descending.
Fig. 18.
For more controller action on the thread, loosen the stop
screw (U,Flg.l8) and set the stop (R) lower. For less action,
set the stop higher. The position of the controller spring (Q)
shown In Fig. 18 is the best average setting for stitching fine
fabrics and light leathers.
To
strengthen
the
action
of
the
controller
spring
on
the
thread, loosen the tension stud screw (V,Fig.18), and turn the
tension
stud
(T)
slightly
to
the
left
with
a
screwdriver.
To
lighten
the
spring
action,
turn
the
stud
to
the
right,
then
tighten the tension stud screw (V).