SINGER W211 User Manual
Page 23
Attention! The text in this document has been recognized automatically. To view the original document, you can use the "Original mode".
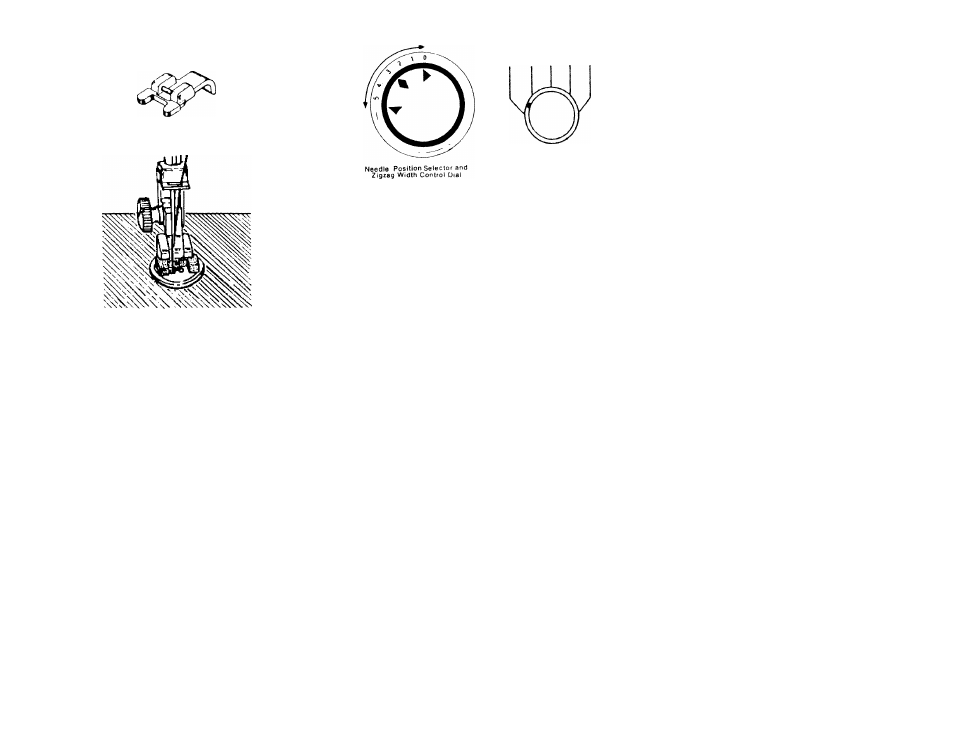
SEWING ON BUTTONS
Button Foot
^
0
Other Applications
0 a 1 •
SHlch Length
Control Dial
PROCEDURE:
position with the needle position selector
Set drop feed button
" ►" position.
Place button under button foot such that the needle is aligned
directly with the left hole in your button. Check alignment by
turning hand wheel and watching needle.
Bring the needle slightly above the button and turn stitch width
knob until needle aligns with the right hole in the button.
Run machine slowly and make 7—8 stitches.
With needle in left hole return zigzag width knob to the "0"
position and make 3-4 stitches to tie off your button.
Apply the above method to sewing on buttons with four holes, hooKs,
snaps, etc.
21
- 401A (116 pages)
- Simple 3116 (94 pages)
- 1507 (88 pages)
- 1507WC (88 pages)
- 112W140 (32 pages)
- 147-2 (30 pages)
- 114-33 (43 pages)
- 119-3 (23 pages)
- 14K1 (10 pages)
- 147-104 (34 pages)
- 116-1 (20 pages)
- 115-2 (38 pages)
- 14U286 (40 pages)
- 14U286B (21 pages)
- 114-4 (29 pages)
- 142W25 (10 pages)
- 147-81 (28 pages)
- 118 (16 pages)
- 136W105 (22 pages)
- 114-41 (20 pages)
- 147-4 (28 pages)
- 105-3 (30 pages)
- 1027 (36 pages)
- 147-26 (37 pages)
- 12W208 (25 pages)
- 128-4 (25 pages)
- 109-320 (14 pages)
- CP17 (47 pages)
- 147-6 (56 pages)
- 132B26 (9 pages)
- 114-2 (36 pages)
- 1371A3 (86 pages)
- 14CG754 (53 pages)
- 147-50 (39 pages)
- 14T967DC (3 pages)
- 109-520 (13 pages)
- 14SH654 ULTRALOCK (48 pages)
- 147-86 (30 pages)
- 105-20 (23 pages)
- W303 (13 pages)
- 147-38 (53 pages)
- 114-22 (45 pages)
- 1375A1 (33 pages)
- 107-2 (31 pages)
- 1200A (4 pages)