Coleman MAX 2000002251 User Manual
Instant shelter, Before you begin, Adjust the height
STITCH LINE
®
INSTANT SHELTER
MODEL 2000002251
(See other side for installing the screen house)
Before you begin
Read all instructions before set up.
• Select a level site clear of rocks, branches, and other hard or
sharp objects, to install your shelter.
WARNING: Keep clear of overhead power lines.
• Do not set up your shelter under trees because of potential
lightning strikes or falling tree limbs in inclement weather.
• Secure with all stakes and guylines provided to prevent property
damage or personal injury.
• For best results in windy conditions, position narrow end of
shelter into the wind.
• Do not drop shelter bag or pole.
• Do not bounce shelter bag on its end to remove shelter, as these
actions may damage the shock-cord and/or pole ends.
• THIS RECREATIONAL PRODUCT REQUIRES A MINIMUM OF
TWO PEOPLE TO ASSEMBLE.
• Under no circumstances should this product be used to cover
automobiles, marine products or similar items.
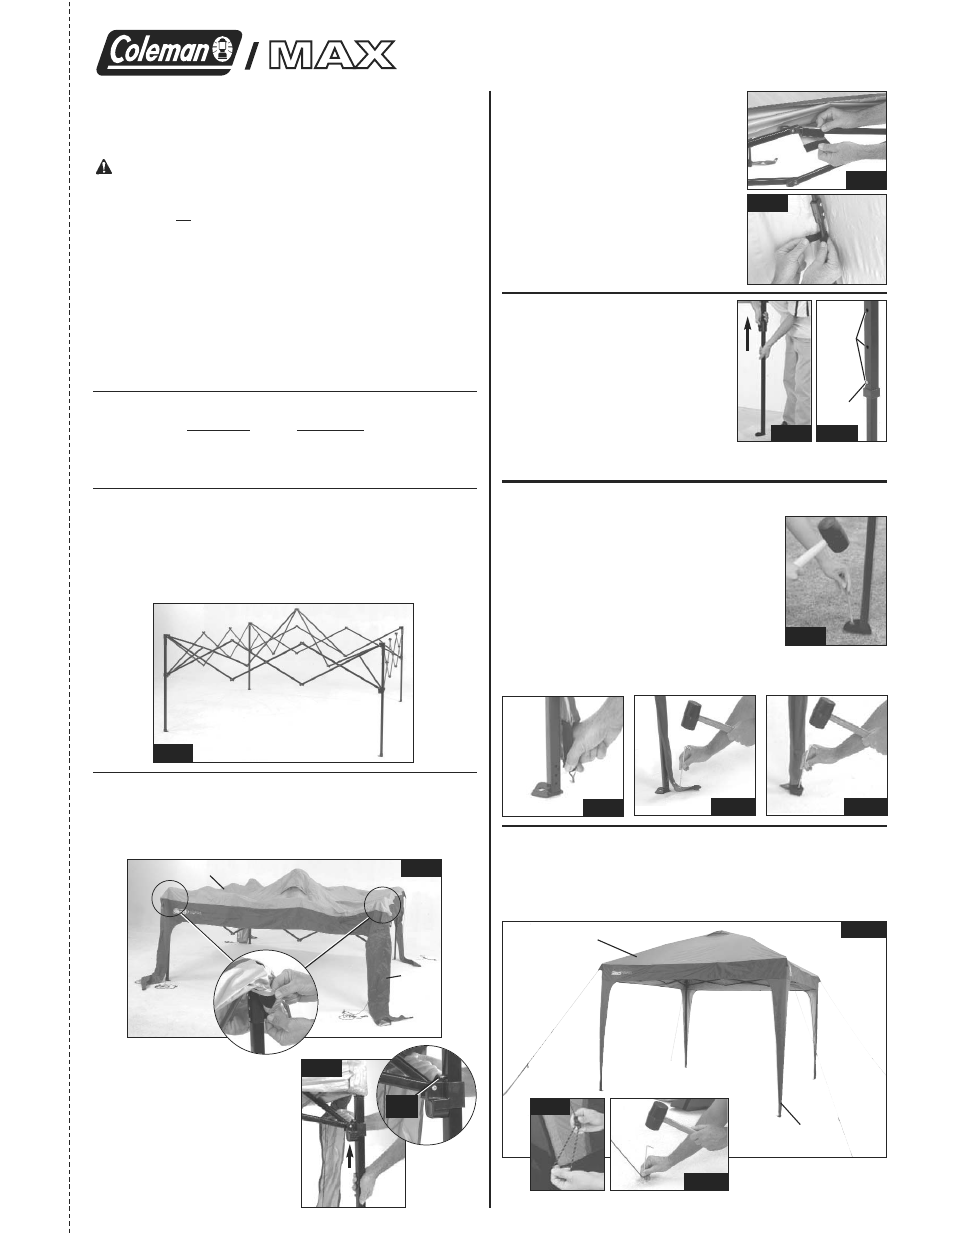
Adjust the Height
1. Adjust desired height by sliding
post upward until push button locks
into place. Raise each post one
notch at a time, making sure all four
posts are level before proceeding to
the next notch. (Fig. 6 & 7)
NOTE: If installing the screen house
panels to your shelter, skip the following
steps and proceed to “Install the Screen House”on the back page.
Extend the Shelter Frame
1. Select a smooth, level site for your shelter.
2. With two persons standing at diagonal corners of the struc-
ture, grab the leg, and pull out to unfold frame. (Fig. 1)
NOTE: Do not unfold frame completely. This will allow easier
fit for draping shelter top over frame.
Set Up the Shelter
1. Drape shelter top over frame. (Fig. 2)
2. Attach hook & loop fasteners, located on corners of shelter
top, to four corners of frame post. (Fig. 2A)
Fig. 1
Fig. 2
2A
3. After fitting each corner of
shelter top to frame, pull up
sliding mold located on
upper portion of leg until
push button snaps into
place (Fig 3 & 3A).
This will ensure fame is
fully extended.
3A
Push
Button
4. Secure sides of shelter top to frame
with large, rectangular, hook & loop
fasteners provided (2 on each side)
(Fig. 4). The shelter top has been
designed to have a tight fit over
the frame.
5. Secure all remaining hook & loop
fasteners, located on underside of
shelter top, to shelter frame. (Fig. 5)
Fig. 4
Fig. 5
Stake the Shelter
1. Secure shelter by driving nail stakes through
the holes located on the metal base of each
frame post. (Fig. 8)
2. Stretch elastic strap on shelter post cover;
then insert metal hook into hole on post.
Repeat for remaining three posts. (Fig. 9)
3. If shelter is set at shorter heights, secure
post covers with metal stake through metal
grommet on each. (Fig. 10)
If shelter is set at maximum height, secure post covers with
metal stake through web strap on end of each. (Fig. 11)
Fig. 8
Secure the Guylines
1. To secure guylines, find the guyline plastic slider and look for
the portion, forming a loop (works just like a slip knot!).
Extend guylines to ground until taut; then stake through the
loops to secure. (Fig. 12, 13, & 14).
Fig. 6
Fig. 7
Push
Button
Post
Notches
Fig. 14
Fig. 13
Fig. 12
Replacement Parts List
Description
Part Number
Shelter Top
5010000666
Screen House
5010000667
Sun Wall
5010000668
Shelter Top
Shelter
Post
Cover
Fig. 9
Fig. 10
Fig. 11
Shelter Top
Shelter Post
Cover
Fig. 3