Wrench storage area, Installing/removing cutters, Unplug your router – Sears 315.17473 User Manual
Page 5: Chip shield, Dust bag assembly, To install bag, The bag should be emptied when half full, To empty bag, Operation
Attention! The text in this document has been recognized automatically. To view the original document, you can use the "Original mode".
OPERATION
WARNING: YOUR ROUTER SHOULD NEVER BE CONNECTED TO POWER SUPPLY WHEN YOU
ARE
ASSEMBLING PARTS, MAKING ADJUSTMENTS, INSTALLING OR REMOVING CUTTERS OR WHEN NOT
«US^' sERfo'uTrNfuRY™
STARING T
h
Z
t
COULD
WRENCH STORAGE AREA
Your router has a wrench storage area located on the top
end cap portion of the motor housing. When installing or
removing cutters remove the wrench from its storage area.
Proper storage of wrench when not in use will help reduce
the possiblility of losing wrench. See F/gure 1.
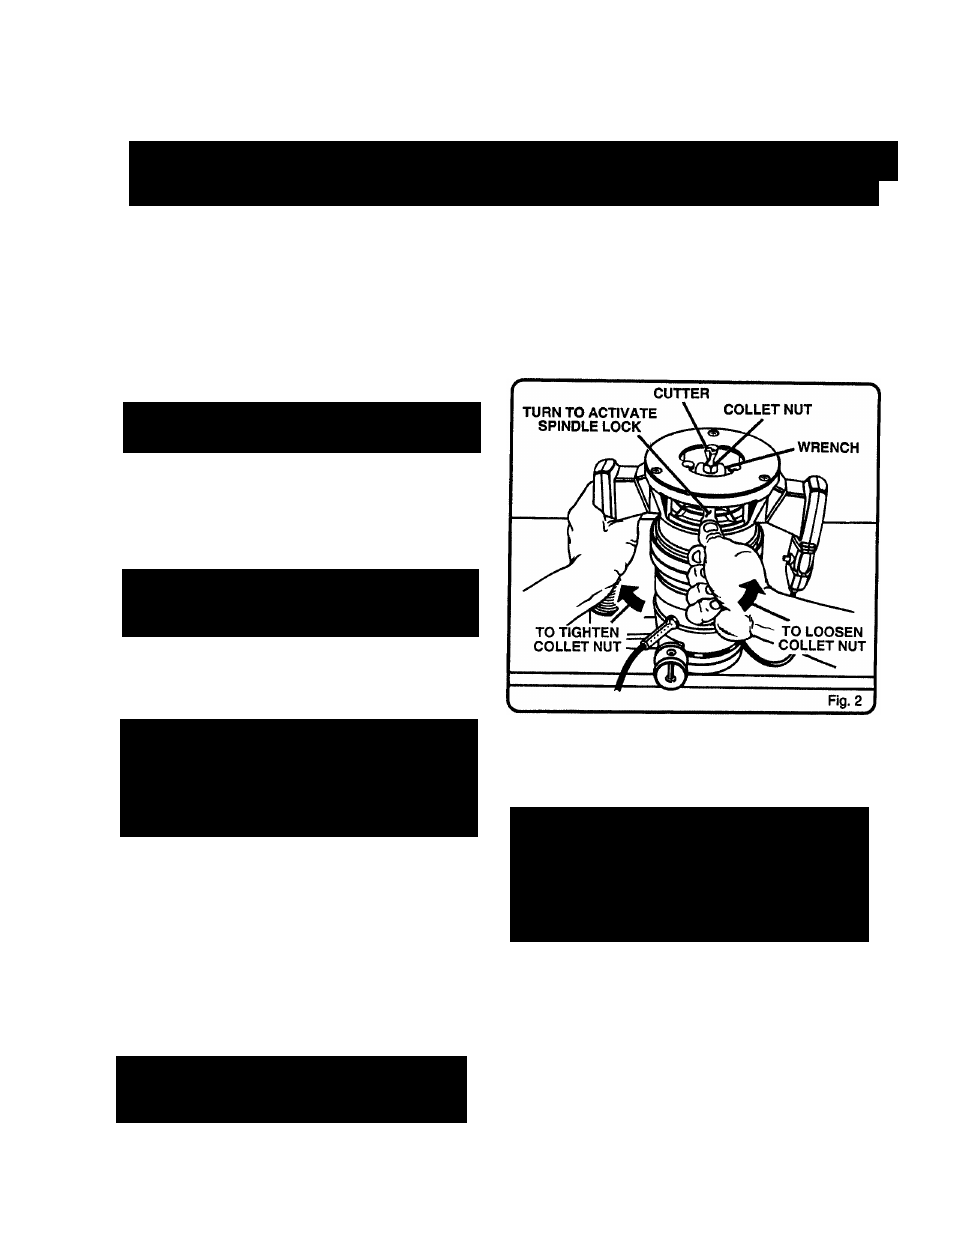
INSTALLING/REMOVING CUTTERS
See Figure 2.
1. UNPLUG YOUR ROUTER.
WARNING:
FAILURE TO UNPLUG YOUR
ROUTER COULD RESULT IN ACCIDENTAL
STARTING CAUSING SERIOUS INJURY.
2. Remove dust bag from router.
3. Remove one of the clear plastic chip shields from router.
To remove, press on tabs and pull outward.
4.
A spindle lock is located on the front of the motor
housing. See Figure 1. To activate lock, push spindle
lock In and slide into lock position.
WARNING:
TO PREVENT DAMAGE TO THE
SPINDLE OR SPINDLE LOCK, ALWAYS ALLOW
MOTOR TO COME TO A COMPLETE STOP
BEFORE ENGAGING SPINDLE LOCK.
5. Place your router upside down on table, then turn collet
nut with wrench until lock mechanism interlocks. See
Figure 2. NOTE: Spindle lock is spring loaded and will
snap into position when lock mechanism interlocks.
WARNING: IF YOU ARE CHANGING A CUTTER
IMMEDIATELY AFTER USE, BE CAREFUL NOT
TO TOUCH THE CUTTER OR COLLET WITH
YOUR HANDS OR FINGERS. THEY WILL GET
BURNED BECAUSE OF THE HEAT BUILDUP
FROM CUTTING. ALWAYS USE THE WRENCH
PROVIDED.
6.
Remove cutters by turning collet nut counterclockwise
enough to allow cutter to slip easily from collet. See
Figure 2. The collet is machined to precision tolerances
to fit cutters with 1/4 in. diameter shank size.
7. With your router still upside down on table, insert shank
of cutter into collet. The shank of your cutter should be
close to but not touching bottom of collet.
8. Tighten the collet nut securely by turning clockwise with
the wrench provided. See Figure 2. Put spindle lock
back in unlock position. Othenvise, the interlocking
mechanism of the spindle lock will not let you turn your
router on.
WARNING:
DO NOT USE CUTTERS WITH
UNDERSIZED SHANKS. UNDERSIZED SHANKS
WILL NOT TIGHTEN PROPERLY AND COULD BE
THROWN FROM TOOL CAUSING INJURY.
9. Install dust bag.
CHIP SHIELD
Clear plastic chip shields are installed on the base of your
router for protection against flying dust and chips. The chip
shields are designed to fit the front and rear openings of the
router base. See Figure
1
. If necessary to remove, squeeze
tabs on each end and pull outward. To replace, squeeze
tabs at each end, fit into the opening, then release. FOR
YOUR PROTECTION DO NOT USE ROUTER WITHOUT
CHIP SHIELDS PROPERLY IN PLACE.
DUST BAG ASSEMBLY
See Figure 1.
Do not connect router to power supply before Installing
dust bag or connecting It to a dust collection system.
WARNING: TO PREVENT THE POSSIBILITY OF
SAWDUST OR FOREIGN OBJECTS BEING
THROWrJ INTO YOUR FACE AND EYES, NEVER
ATTEMPT TO USE YOUR ROUTER WITHOUT
DUST BAG PROPERLY INSTALLED. SAWDUST
OR FOREIGN OBJECTS BEING THROWN INTO
YOUR FACE AND EYES COULD RESULT IN
POSSIBLE SERIOUS INJURY.
TO INSTALL BAG: .
The dust bag should be installed by slipping it with a twisting
motion over the blower exhaust The bag should be installed
with the zipper down when router is in upright position.
The bag should be emptied when half full.
TO EMPTY BAG:
Remove bag from router, open zipper and shake out dust.
Occasionally turn the dust bag inside out and brush the
accumulation of dust from the inside of the bag. This will
permit the air to flow through the bag better.
Page 5