Hand knob, 5/16" cupped washer, Unpacking – Sears 247 886510 User Manual
Page 5: Attaching the upper chute, Assembling the handle, Note
Attention! The text in this document has been recognized automatically. To view the original document, you can use the "Original mode".
Upper
Handle
Hand
Knob
5/16" Cupped
Washer'
Carriage
Bolts
21/2"
Long
Hand Knob
5/16" Cupped
Washer
Carriage'
Bolt 2"
Long
Left
Hand
Lower
Handle
Right
Hand
Lower
Handle
FIGURE 4
Hex Bolt 2" Long
Cupped Washer
UNPACKING
1. Cut the four corners of the carton from top to bot
tom. Lay the panels flat on the ground.
2. Remove all packing inserts. Make certain all loose
parts and literature have been removed before
discarding the inserts or carton.
3. Pull the snow thrower out of the carton.
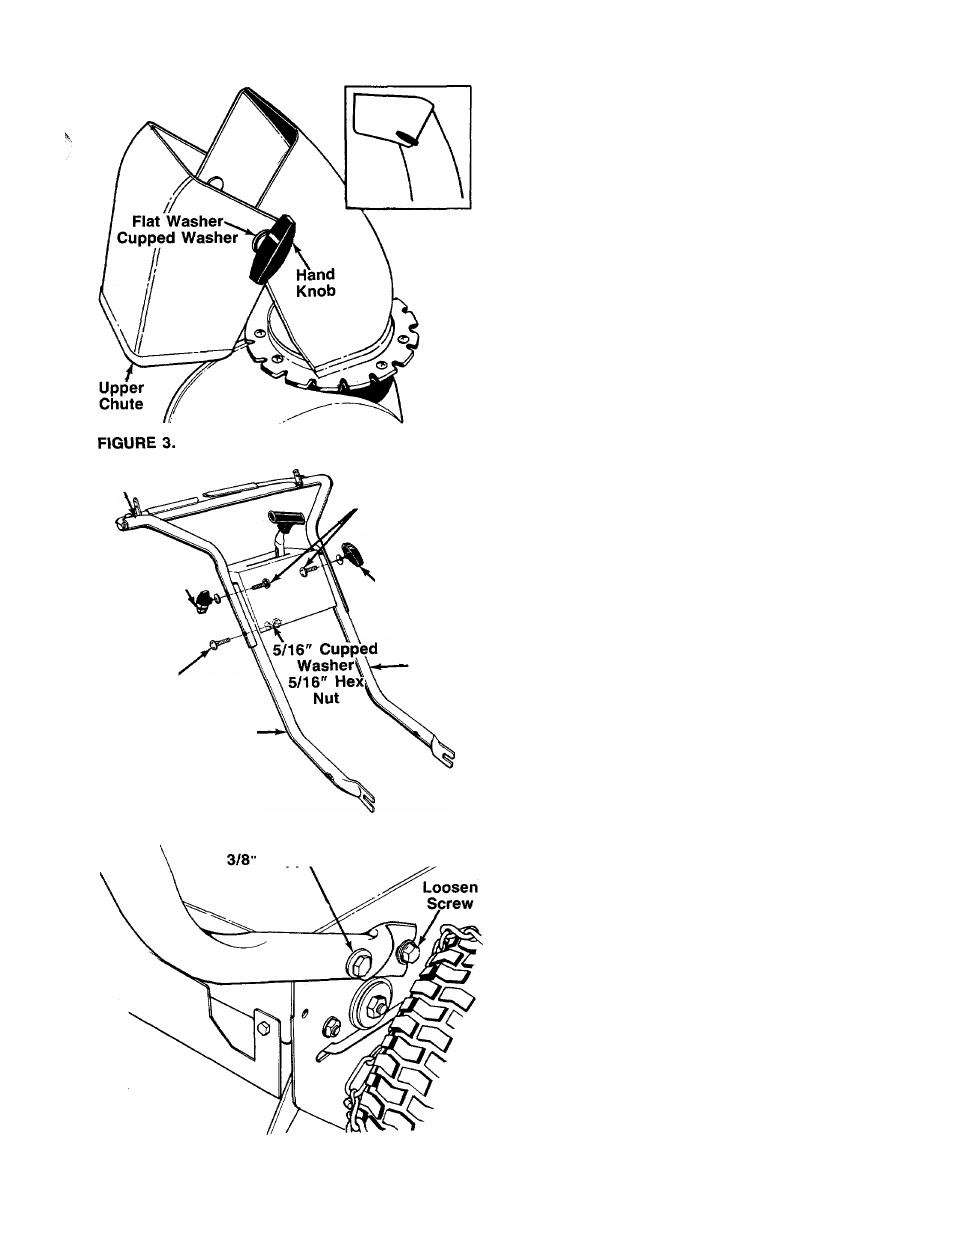
ATTACHING THE UPPER CHUTE
The snow thrower has been shipped with the upper
chute pivoted all the way down for shipping purposes.
-See figure 3.
1. Remove the hand knob, cupped washer, flat
washer and carriage bolt from the upper chute.
2. Pivot the upper chute up so there is no gap bet
ween the upper and lower chute. See figure 3, in
set. Secure with hardware just removed.
ASSEMBLING THE HANDLE
1. Preassemble the upper and lower handles to the
------ handle panel as shown in figure 4.
A.
B.
Secure the top holes in the upper and lower
handles to the handle panel using two carriage
bolts 2V2" long, 5/16" cupped washers and
hand knobs. The head of the carriage bolts is
on the inside of the handle panel. Cupped side
of washers go against the upper handle. Do not
tighten the hand knobs at this time.
Secure the lower hole in the right hand side of
upper and lower handles to the handle panel
using carriage bolt 2" long, 5/16" cupped
washer and hex nut. The head of the carriage
bolt is on the outside of the handle. Cupped
side of washer goes against the handle panel.
Do not tighten at this time.
Leave lower hole on left side of upper and lower
handles and handle panel open.
NOTE
FIGURE 5
C.
All three bolts go through both the upper
and lower handles.
2. Attach the handle assembly to the unit as follows.
A. Loosen one self-tapping screw and cupped
washer on each side of the unit. See figure 5.
A 9/16" or adjustable wrench is required.
B. Slide the slotted end of the handles under the
cupped washers.
C. Secure the upper hole in the handles with 3/8"
cupped washers and 2" long hex bolts. Cup
ped side of washers go against the handles. Do
not tighten at this time.