Operating instructions, Care and maintenance, Controls (fig. i) – Sears KENMORE 233.5534559 User Manual
Page 3: Fig. i, Ht bulb replacement, Filter care, Cleaning, Blower installation and replacement (fig. 2), Pig. 2
Attention! The text in this document has been recognized automatically. To view the original document, you can use the "Original mode".
OPERATING INSTRUCTIONS
Always turn your hood on befort you begin cooking tu estate
air flow in [he kitchen. Let the hood run for a few min
X) clear the air after you mm the range off. This will help
keep the whole kitchen cleaner and brighter.
CONTROLS (FIG. I)
BLOWER — The blower has 7 speed ranges. Select the range
which offers adequate exhaust forthe amount and type of cook
being done.
UGHT — Three light levels are available. Use lOW for a night-
light. Use MED or HIGH when cooking.
AUTO TEMP — Your range hood has a unique feature which
moniEors the temperature inside the hood whenever a speed
range has been selected. As the temperatnn: increases, blower
i^ed will increase within the sclcrtcd speed range. The addi
tional air flow wi II exhaust heat and cooking by-pr^ucts more
effectively. As the temperature drops, blower speed will de<
crease.
To manually increase or decrease the blower speed, simply se*
lect a higher or lower range.
An indicator lamp lights when the hood is in the AUTO TEMP
mode.
HEAT SENTRY™- Your range hood is equipped with a HEAT
SENTRY™feature. This safety device senses excess heat above
tl№ cooking surface and opcrales as follows;
1. )lf blower is OFF - it turns blower ON to HIGH speed
2. )If blower is ON at a lower speed setting - it turns blower up
to HIGH speed.
An indicator lamp Ughis when the hood is in the HEAT SEN-
TRY™oiode,
u the tcraperature level drops to ttortnal, the blower will
,, >n to its original setting.
, HIGH HEAT ALARM-This special safety fc«ure sounds a warn
ing whenever an excessively high temperature is detected. It is
active whether the blower is ON or OFF. The alarm is a puls
ing, medium tone and resets autnmaticaUy when the tempera
ture drops.
TEST — Checks operation of Aurotnatlc Feanues:
Depress TEST ■ Auto Temp and Heat Sentry™ indkators will
light, the blower will come ON to HIGH speed, and (be Higli
Heat alarm will sound.
Release TEST - Hood will return to normal operating mode.
Note: If TEST is depressed when cooking temperamre is el
evated, some Automatic Features may «main ON afttr TESl’ is
released. Hood unll return to normal operating mode when
cooking temperature decreases.
FIG. I
CARE AND MAINTENANCE
>HT BULB REPLACEMENT
tiicmove light lens by squeezing sides of lens toward center to
release tabs. Install two 75 Watt max. bulbs, or one 75 Wait
bulb in left-hand soclcei, and one 25 Watt bulb in right-hand
socket, for night-light use. Do not use bulbs rated higher ilian
75 Watts.
FILTER CARE
Remove each filter by grasping the tab at U
k
bottom of filler,
lifting up and swinging filter out to the side.
AUUMINtJM FIUERS — Clean filters frequently In a detergent
solution. They are dishwasher safe.
DUCTFRSE MICROTEK* FIUERS - The aluminum niter is the
only washable part of the MiciDtdc* System IV Hlter. Snap it
out of its frame and clean it In a detergent solution or dish
washer.
The particle illter is not washable. It should last up to twelve
months with normal use.
CLEANING
Do not allow an excessive accumulation of grease. Use a mild
detergent suiuble for pointed surfaces. DO NOT USE ABRA
SIVE CLOTH, STEEL WOOL PADS, OR SCOURING POWDERS.
Vacuum blower to clean. Do not inmicnic blower in water.
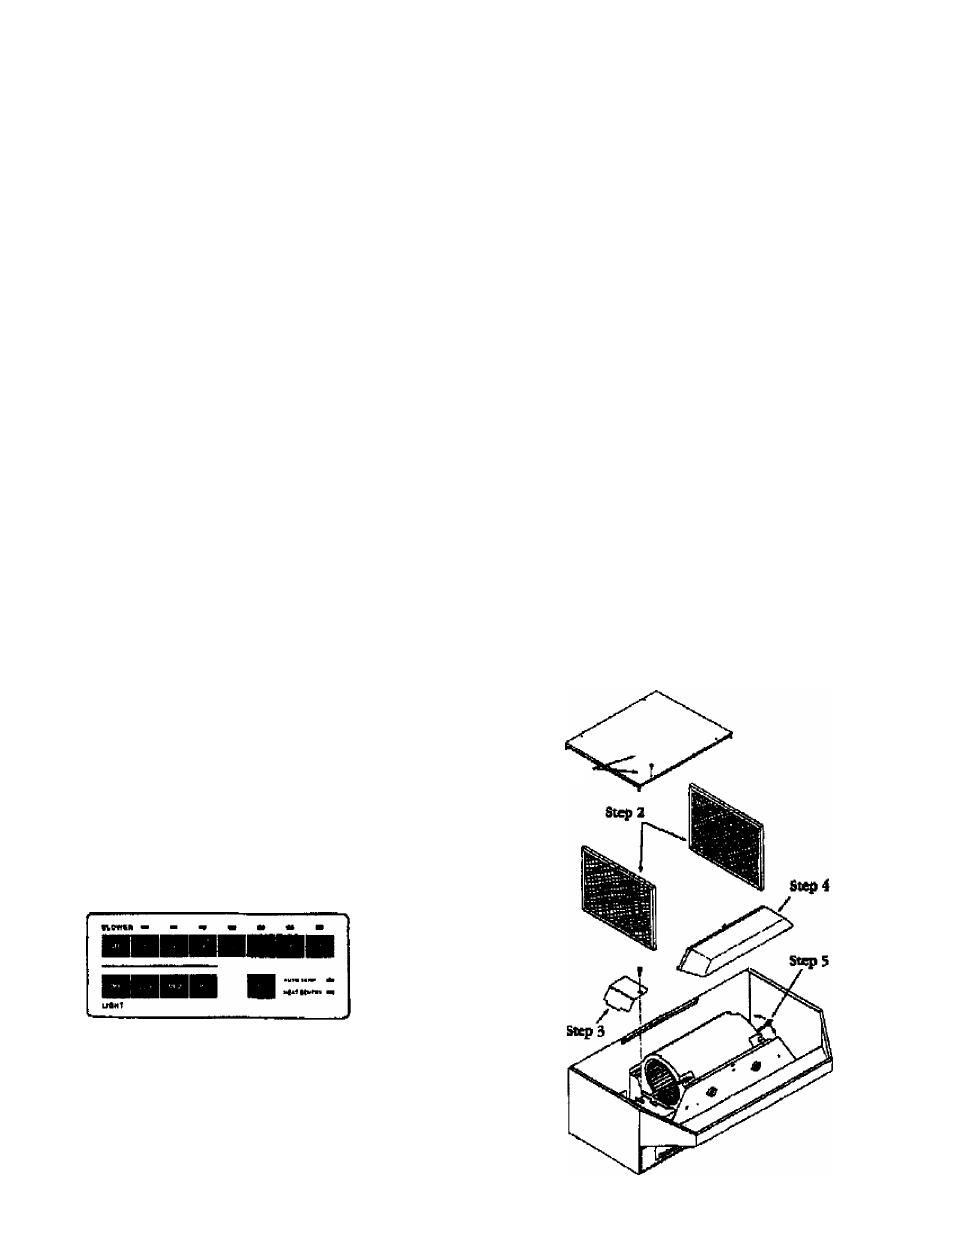
BLOWER INSTALLATION AND
REPLACEMENT (FIG. 2)
This hood is designed to be installed as either a vented or vent
less hood. Follow the appropriate directions below for your
installation.
1. Set hood upside down and remove bottom cover and screws.
2. Remove filters.
3. Remove wiring box cover suid screws.
4. Remeve light lens.
5. Tb make hood lighter and easier to handle, remove blower
aasembLy. Do not giup blower by the blowef whMls.
a. ) Unplug btawer
b. ) Loosen knurled outs on mounting rods and swing rods
out of the way. Do not remove nutscompletety from rods.
cO Lift out blower and set blower aside.
PIG. 2
Step 1