V-belts, Clean air screen (see fig. 12), Air filter (see fig. 13) – Sears 917.25147 User Manual
Page 18: Customer responsibilities, Engine
Attention! The text in this document has been recognized automatically. To view the original document, you can use the "Original mode".
CUSTOMER RESPONSIBILITIES
V-BELTS
Check V-belts for deterioration and wear after 100 hours of
operation and replace if necessary. The belts are not
adjustable. Replace belts if they begin to slip from wear.
TRANSAXLE COOLING
Keep transaxle free from build-up of dirt and chaff which
can restrict cooling.
ENGINE
LUBRICATION
Only use high quality detergent oil rated with API service
classification SPor SG. Select the oil’s SAE viscosity grade
according to your expected operating temperature.
SAE VISCOSITY GRADES .
ШШШ
!
“F
-20''
QP .
30" 32" 40’
60"
80” 100°
°C -30”
20-^
-ID" 0^ 10" 20^ 30" 40"
TEMP£RATURE RANGE ANTICIPATED BEFORE NEXT OIL CHANGE
FIG. 11
NOTE:
Although multi-viscosity oils (5W30, 10W30 etc.)
improve starting in cold weather, these multi-viscosity oils
will result in increased oil. consumption when used above
32°F. Check your engine oil level more frequently to avoid
possible engine damage from running low on oil.
Change the oil after the first two hours of operation and
every 25 hours thereafter or at least once a year if the
tractor is not used for 25 hours in one year.
Check the crankcase oil level before starting the engine
and after each eight (8) hours of operation. Tighten oil fill
cap/dipstick securely each time you check the oil level.
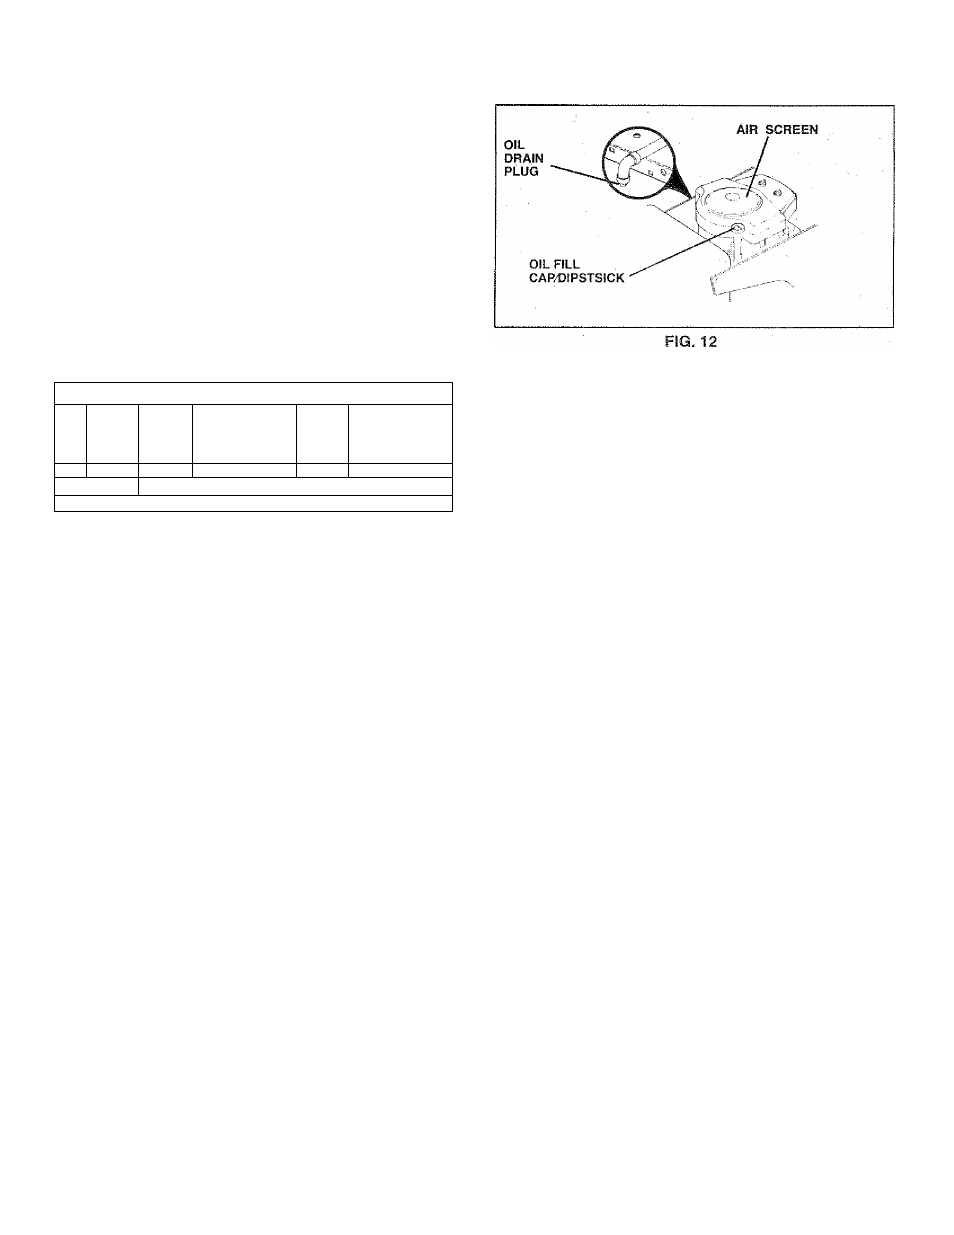
TO CHANGE ENGINE OIL (See Fig 11 and 12)
Determine temperature range expected before oii change.
All oil must meet API service classification SF or SG.
» Be sure tractor is on level surface. :
® Oil will drain more freely when warm.
® Catch oii in a suitable container.
"* Remove oil fill cap/dipstick. Be careful not to allow dirt
to enter the engine when changing oii.
® Remove drain plug.
*
After oil has drained completely, replace oil drain plug
and tighten securely.
*
Refill engine with oil through oil fill dipstick tube. Pour
slowly. Do not overfill. For approximate capacity see
“PRODUCT SPECIFICATIONS” on page 3 of this
manual.
» Use gauge on oil fill cap/dipstick for checking level. Be
sure dipstick cap is tightened securely for accurate
reading. Keep oil at “FULL” line on dipstick.
CLEAN AIR SCREEN (See Fig. 12)
Air screen must be kept free of dirt and chaff to prevent
engine damage from overheating. Clean with a wire brush
or compressed air to remove dirt and stubborn dried gum
fibers.
.
AIR FILTER (See Fig. 13)
;
Your engine will not run properly using a dirty air filter.
Clean the foam pre-cieaner after every 25 hours of opera
tion or every season. Service paper cartridge every 100
hours of operation or every season, whichever occurs first.
Service air cleaner more often under dusty conditions.
® Remove knob(s) and cover.
TO SERVICE PRE-CLEANER
*
Slide foam pre-cleaner off cartridge.
“ Wash it in liquid detergent and water.
*
Squeeze it dry in a clean cloth.
® Saturate it in engine oil. Wrap it in clean, absorbent
cloth and squeeze to remove excess oil.
“ If very dirty or damaged, replace pre-cleaner.
® Reinstall pre-cleaner over cartridge.
*
Reinstall cover and secure with knob(s).
TO SERVICE CARTRIDGE
® Remove wing nuts and cartridge plate.
“ Carefullv remove cartridge to prevent debris from
enteiing carburetor.
® Cleancartridgebytappinggentlyonflaisurface, livery
dirty or damaged, replace cartridge.
" Reinstall cartridge plate, wing nuts, precleaner, cover
and secure with knob(s). ,
■
18