Nomenclature and functions – Toa DT-930 UL User Manual
Page 4
4
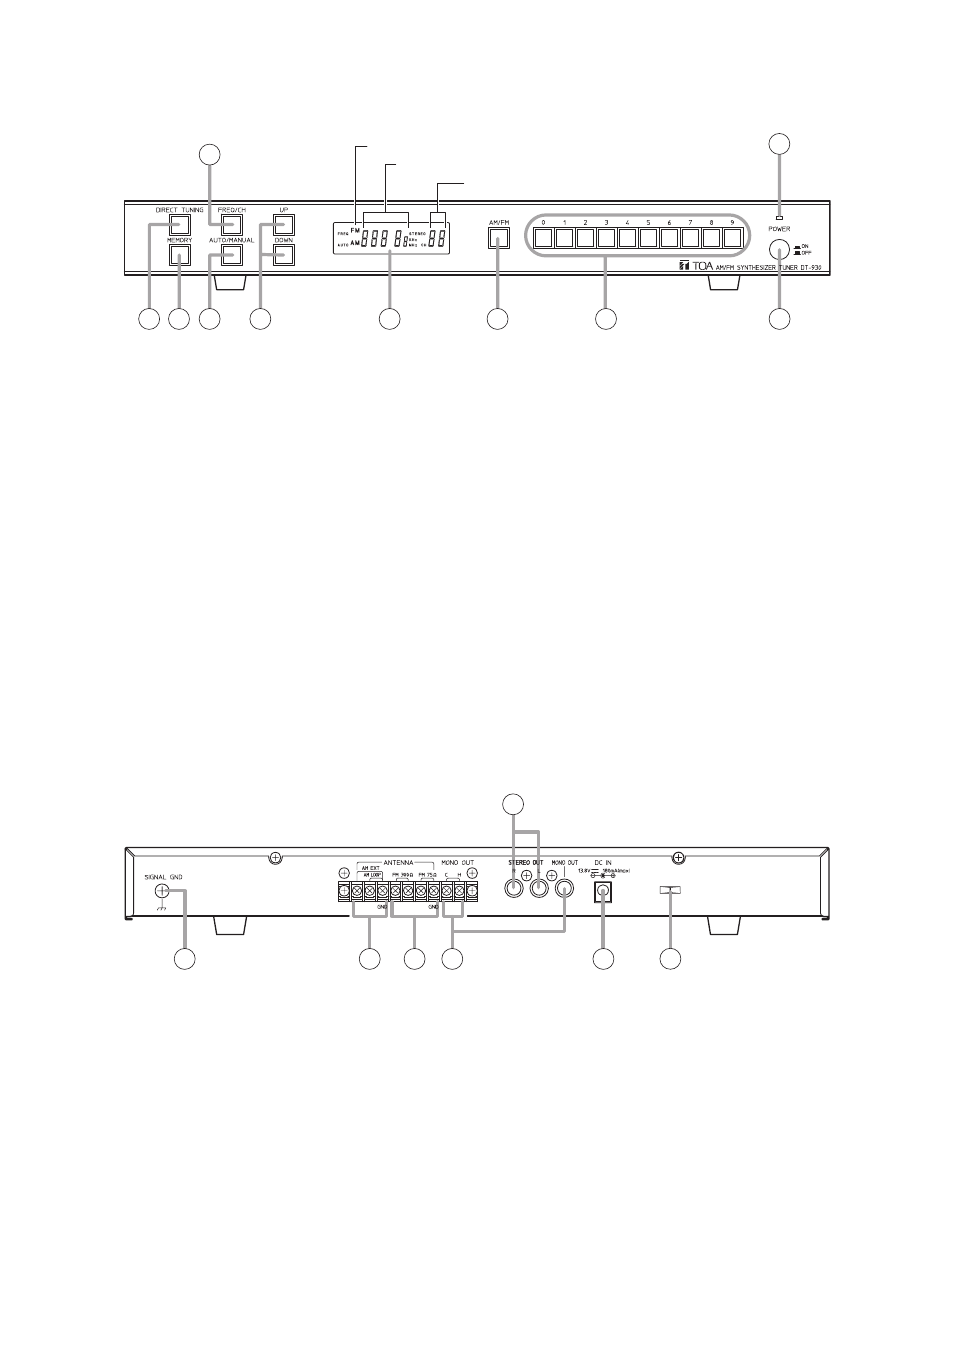
5. NOMENCLATURE AND FUNCTIONS
[Front]
1. Power switch
Pressing this switch switches on the power, and
pressing the switch again switches off the power.
Note
The receiving frequencies stored in memory are
retained even when the power is turned off.
2. Power indicator
Lights when the power is switched on. (Green)
3. Direct tuning key
Pressing this key selects direct tuning mode.
(Refer to p. 6.)
4. Memory key
Stores the receiving frequency in memory.
5. Frequency/Channel selector key
Selects either the receiving frequency or the
preset channel.
6. Auto/Manual mode selector key
Selects either auto or manual tuning mode.
(Refer to p. 5.)
7. Tuning keys (UP/DOWN)
Used to change the receiving frequency or
preset channel.
8. LCD indicator
Displays the AM or FM indication, receiving
frequency, and channel number.
9. AM/FM band selector key
Selects the desired band.
The indication alternates between AM and FM
with each depression of this key.
10. Preset memory enter keys
Used to enter numerals when storing or recalling
preset radio programs in memory, or when
setting a receiving frequency in direct tuning
mode.
1
2
3 4
5
6
7
8
9
10
Channel number
Frequency
AM/FM indication
11. Functional earth terminal
Hum noise may be generated when external
equipment is connected to the unit. Connecting
this terminal to the functional earth terminal of the
external equipment may reduce the hum noise.
Note: This terminal is not for protective earth.
12. AM antenna terminals
Connect to an AM antenna (loop antenna or
external antenna).
13. FM antenna terminals
Connect to an FM antenna. (300 Ω / 75Ω)
14. Monaural output terminals
Provide monaural audio output of received radio
programs.
(RCA jack, screw terminals / –15 dB, 10 kΩ load)
15. Stereo output terminals
Provide stereo audio output of received radio
programs.
(RCA jack / –15 dB, 10 kΩ load)
16. AC adapter input terminal
Connect the supplied AC adapter.
17. Cable holder
Insert the AC adapter cord near its plug into the
cable holder to prevent the plug from coming off.
11
12
13 14
15
16
17
[Rear]