Connection, Connection / back view – Studiologic Numa Organ User Manual
Page 8
NUMA Organ by Studiologic®
8
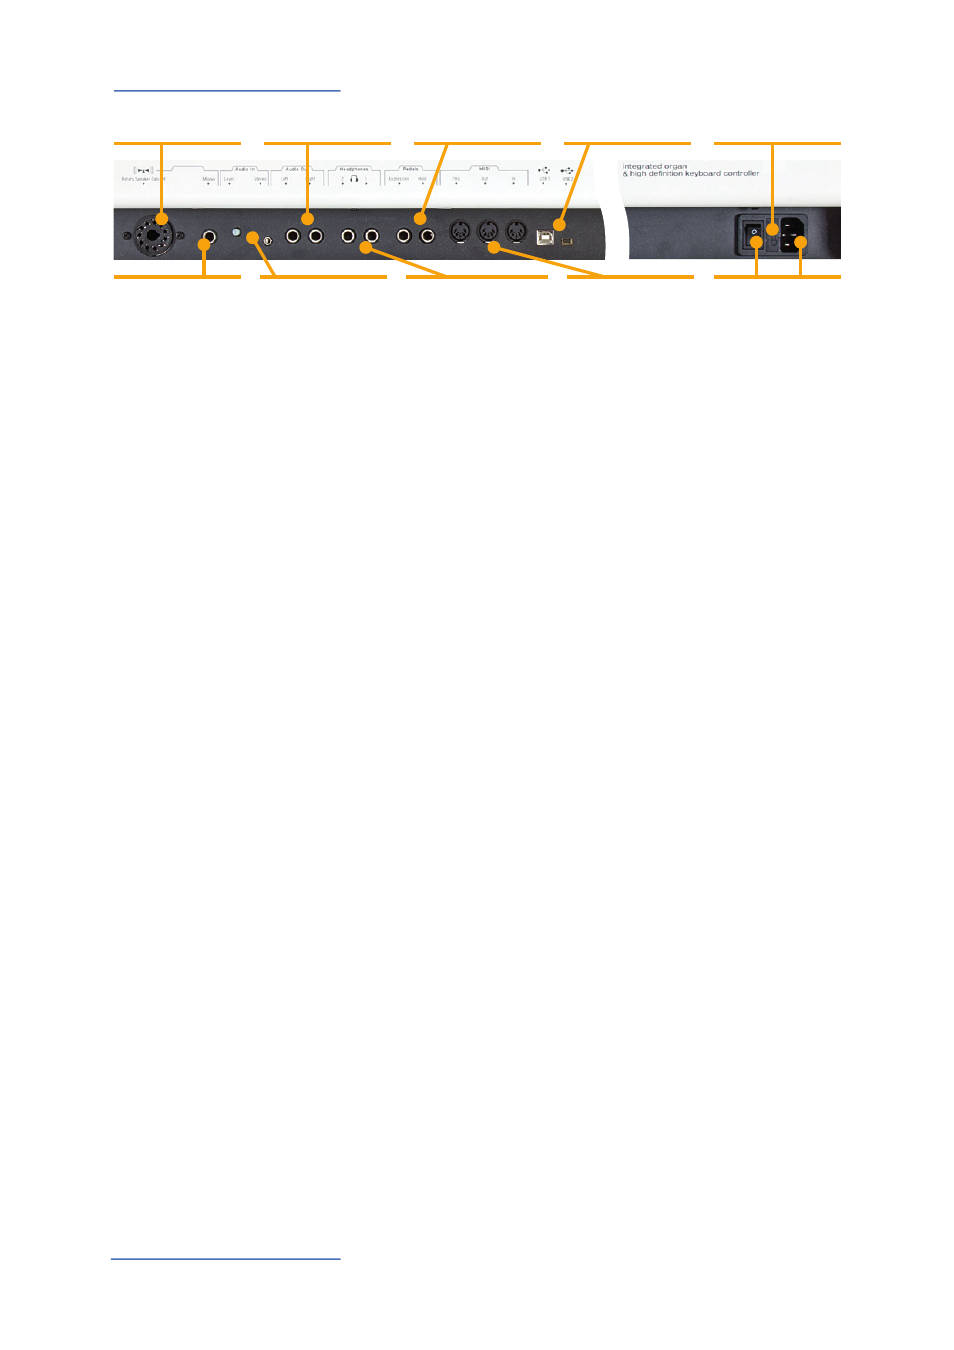
Connection / Back view
Use the power cord supplied with the device to connect the
NUMA Organ to the power socket. Switch the unit on by using
the power button near to the power socket of the NUMA
Organ.
Connect the optional volume / expression pedal FP- 50 or
VP-27 at the socket which is labelled Expression.
At the socket labelled Hold, you can plug in the Studiologic pedal
VFP 1 or PS 100, which is available as an optional extra.
Note: If you would like to attach other pedals, please refer to the required
specifi cations on page 65.
Connect the audio outputs Left and Right with the inputs of your
mixing desk or amplifi er, etc.
Use the separate mono direct out to play the NUMA Organ over
other amplifi ers.
Plug in your headphone(s) to one of the headphone outputs. You
can use up to two headphones at the same time.
You can plug in external audio devices, such as mp3-players for
playback or MIDI sound modules, at the audio input. The Level
knob near the jack on the back of the NUMA Organ is for adjusting
the input level.
For MIDI data transmission via USB, connect the NUMA Organ to
your computer with a USB cable. The fi rst time you switch the NUMA
Organ on, it will be recognised by your computer automatically as
a MIDI device and the appropriate driver will be installed by the OS
(class compliant).
The mini USB connector is destined for future fi rmware updates and
to load new physical models into the NUMA Organ.
Please refer to page 17.
Please refer to page 16.
Power connection
Sustain / Expression pedal
Audio out L/R
Direct out
Headphones
Stereo audio in / Level
USB 1
Mini USB 2
MIDI
Rotary Speaker Cabinet
Fuse
Page 4, 65
Mains • Power
Page 4, 8
USB 1 • Mini USB 2
Page 8, 16
MIDI In•Out•Thru
Page 17
Hold • Expression
Page 8, 11
Audio out L/R
Page 8
Headphone out 1/2
Page 8
Stereo audio in • Level
Page 8
Rotary Speaker
Cabinet, Page 16
Direkt-out
Page 8