Installation instructions – Reznor R6GI Option - Installation - Roof Curb - Light Commercial User Manual
Page 3
Note:
Duct Sup ports can be lo cated on ei ther end de pend ing
on in di vid ual ap pli ca tions.
Step 5:
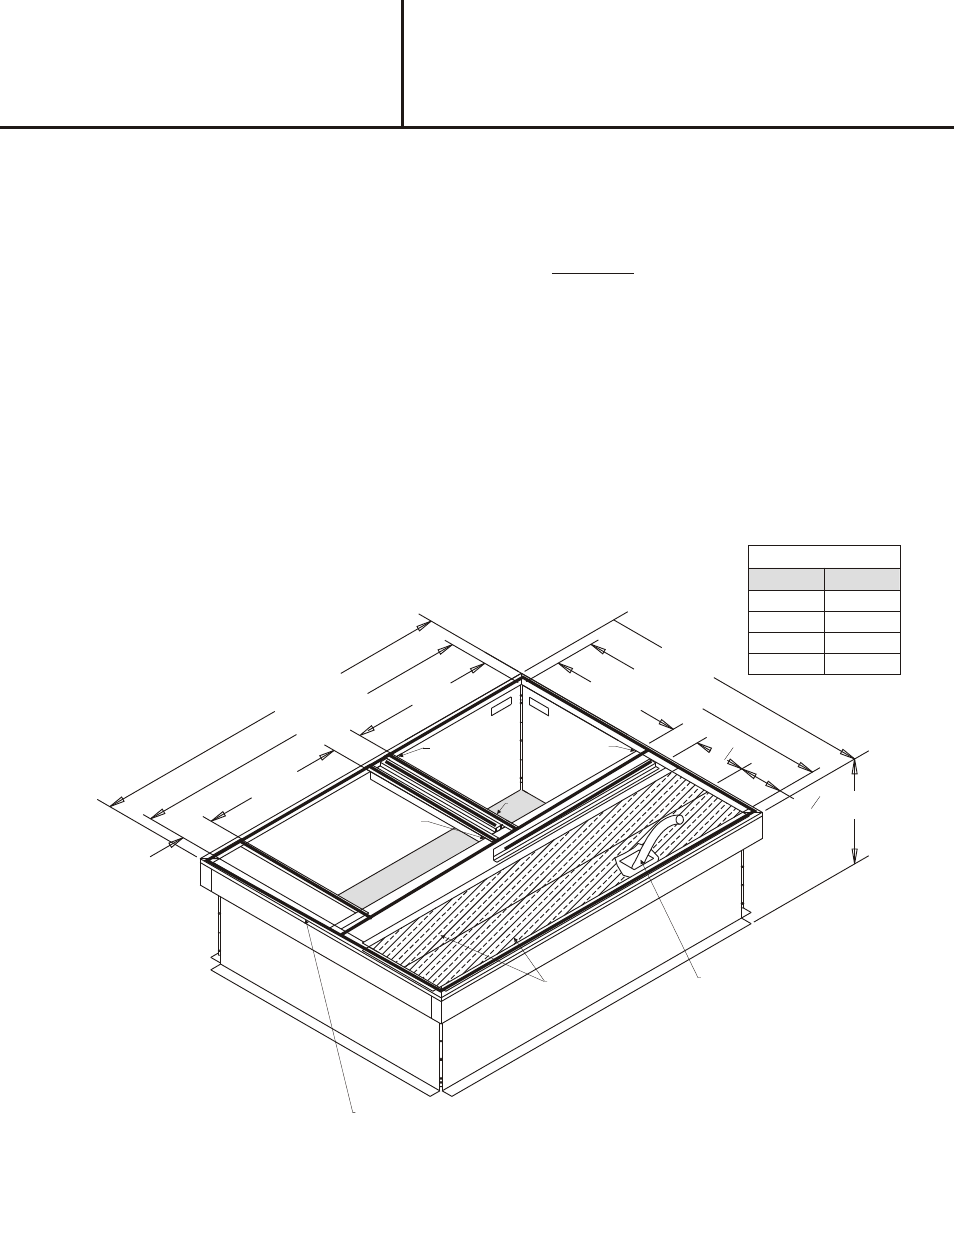
Install the duct horizontal support (C) as shown with
opening over the desired duct location as shown in Figure
7.
Step 6:
Install the vertical duct support (D) as shown in Figure 7.
Step 7:
Install the vertical duct support (E) and horizontal duct
support (F) on top of vertical duct support (D) and
horizontal duct support (C) respectively as shown in Figure
6.
Step 8:
Install the insulated pans (G) and (H) as shown in Figure 7.
Note:
If installing this curb for use with Nordyne R8HE Series
4 ½
46 ½
38 ½
41 ½
19
19
4
Fig ure 7
INSTALLATION INSTRUCTIONS FOR
547830A / 547831A / 547850A / 547851A
ROOF CURBS USED WITH R4GM-072, P6SD/P8SE,
Q6SD/Q8SE, R6G(D,F,I), R8G(D,E), R8HE 024-060 UNITS
(H)
(C)
DE TAIL #3
INSTALLATION
INSTRUCTIONS
GAS KET PLACE MENT
(BOLD BLACK LINES)
(D)
Gasket Layout
For optimum system performance
all cracks and seams should be
sealed with approved methods and
materials
condensing style package gas/electric unit, cut and
remove the insulation covering the 2” x 3” condensate
drain passage in outer panel (G) only. Before installing
inner panel (G) ensure there is enough slope and there are
no kinks or high spots that could trap water in the line prior
to entering the warmer interior of the building where a drain
trap is REQUIRED.
Step 9:
If the curb is being assembled and moved to another
location, attach the duct supports as shown in "Details".
Step 10:
Install 18 ½" x 18 ½" duct and secure to the curb with
screws or rivets.
Step 11:
Place the ¾" x 1 ¼" Gasket on all of the top edges of the
Roof Curb, including the duct supports. See Figure 7.
NOTE:
Figure 7 is shown without parts (E) and (F)
DETAIL #2
Duct Sizes Are:
Return 18 ½" x 18 ½"
Supply 18 ½" x 18 ½"
Roof Opening: (Shaded Area)
46 ½" Long x 19" Wide
SUP PLY
RETURN
4 ½
49 ½
19
*A
7
3
8
7
3
8
DETAIL #1
24" MINIMUM LENGTH OF
½" ID HOSE ABOVE TOP
OF CURB REQUIRED FOR
CONNECTION TO R8HE
SERIES UNITS
DI MEN SIONS
MODEL#
*A
547830A
8
547831A
14
547850A
18
547851A
24
(G)
- R6GF Option - Installation - Roof Curb - Light Commercial R6GD Option - Installation - Roof Curb - Light Commercial Q6SD Option - Installation - Roof Curb - Light Commercial P6SD Option - Installation - Roof Curb - Light Commercial DF6SF Option - Installation - Roof Curb - Light Commercial R8GD Option - Installation - Roof Curb - Light Commercial