Rear panel, Specifications, Tube replacement – MOOER Little Monster AC User Manual
Page 2: Fuse replacement, Panel instruction, Front panel
Objects
CC
17
Data
Objects
CC
17
Data
Full Raise -30 Cents
0
Full Raise 1 Semitones / 1 Cents
31
Full Raise -29 Cents
1
Full Raise 2 Semitones / 2 Cents
32
Full Raise -28 Cents
2
Full Raise 3 Semitones / 3 Cents
33
Full Raise -27 Cents
3
Full Raise 4 Semitones / 4 Cents
34
Full Raise -26 Cents
4
Full Raise 5 Semitones / 5 Cents
35
Full Raise -25 Cents
5
Full Raise 6 Semitones / 6 Cents
36
Full Raise
-24 Semitones /
-24 Cents
6
Full Raise 7 Semitones / 7 Cents
37
Full Raise
-23 Semitones /
-23 Cents
7
Full Raise 8 Semitones / 8 Cents
38
Full Raise
-22 Semitones /
-22 Cents
8
Full Raise 9 Semitones / 9 Cents
39
Full Raise
-21 Semitones /
-21 Cents
9
Full Raise 10 Sem
itones / 10 Cents
40
Full Raise
-20 Semitones /
-20 Cents
10
Full Raise 11 Semitones / 11 Cents
41
Full Raise
-19 Semitones /
-19 Cents
11
Full Raise 12 Semitones / 12 Cents
42
Full Raise
-18 Semitones /
-18 Cents
12
Full Raise 13 Semitones / 13 Cents
43
Full Raise
-17 Semitones /
-17 Cents
13
Full Raise 14 Semitones / 14 Cents
44
Full Raise
-16 Semitones /
-16 Cents
14
Full Raise 15 Semitones / 15 Cents
45
Full Raise
-15 Semitones /
-15 Cents
15
Full Raise 16 Semitones / 16 Cents
46
Full Raise
-14 Semitones /
-14 Cents
16
Full Raise 17 Semitones / 17 Cents
47
Full Raise
-13 Semitones /
-13 Cents
17
Full Raise 18 Semitones / 18 Cents
48
Full Raise
-12 Semitones /
-12 Cents
18
Full Raise 19 Semitones / 19 Cents
49
Full Raise
-11 Semitones /
-11 Cents
19
Full Raise 20 Semitones / 20 Cents
50
Full Raise
-10 Semitones /
-10 Cents
20
Full Raise 21 Semitones / 21 Cents
51
Full Raise
-9 Semitones /
-9 Cents
21
Full Raise 22 Semitones / 22 Cents
52
Full Raise
-8 Semitones /
-8 Cents
22
Full Raise 23 Semi
tones / 23 Cents
53
Full Raise
-7 Semitones /
-7 Cents
23
Full Raise 24 Semitones / 24 Cents
54
Full Raise
-6 Semitones /
-6 Cents
24
Full Raise 25 Cents
55
Full Raise
-5 Semitones /
-5 Cents
25
Full Raise 26 Cents
56
Full Raise
-4 Semitones /
-4 Cents
26
Full Raise 27 Cents
57
Full Raise
-3 Semitones /
-3 Cents
27
Full Raise 28 Cents
58
Full Raise
-2 Semitones /
-2 Cents
28
Full Raise 29 Cents
59
Full Raise
-1 Semitones /
-1 Cents
29
Full Raise 30 Cents
60
Full Raise 0 Semitones / 0 Cents
30
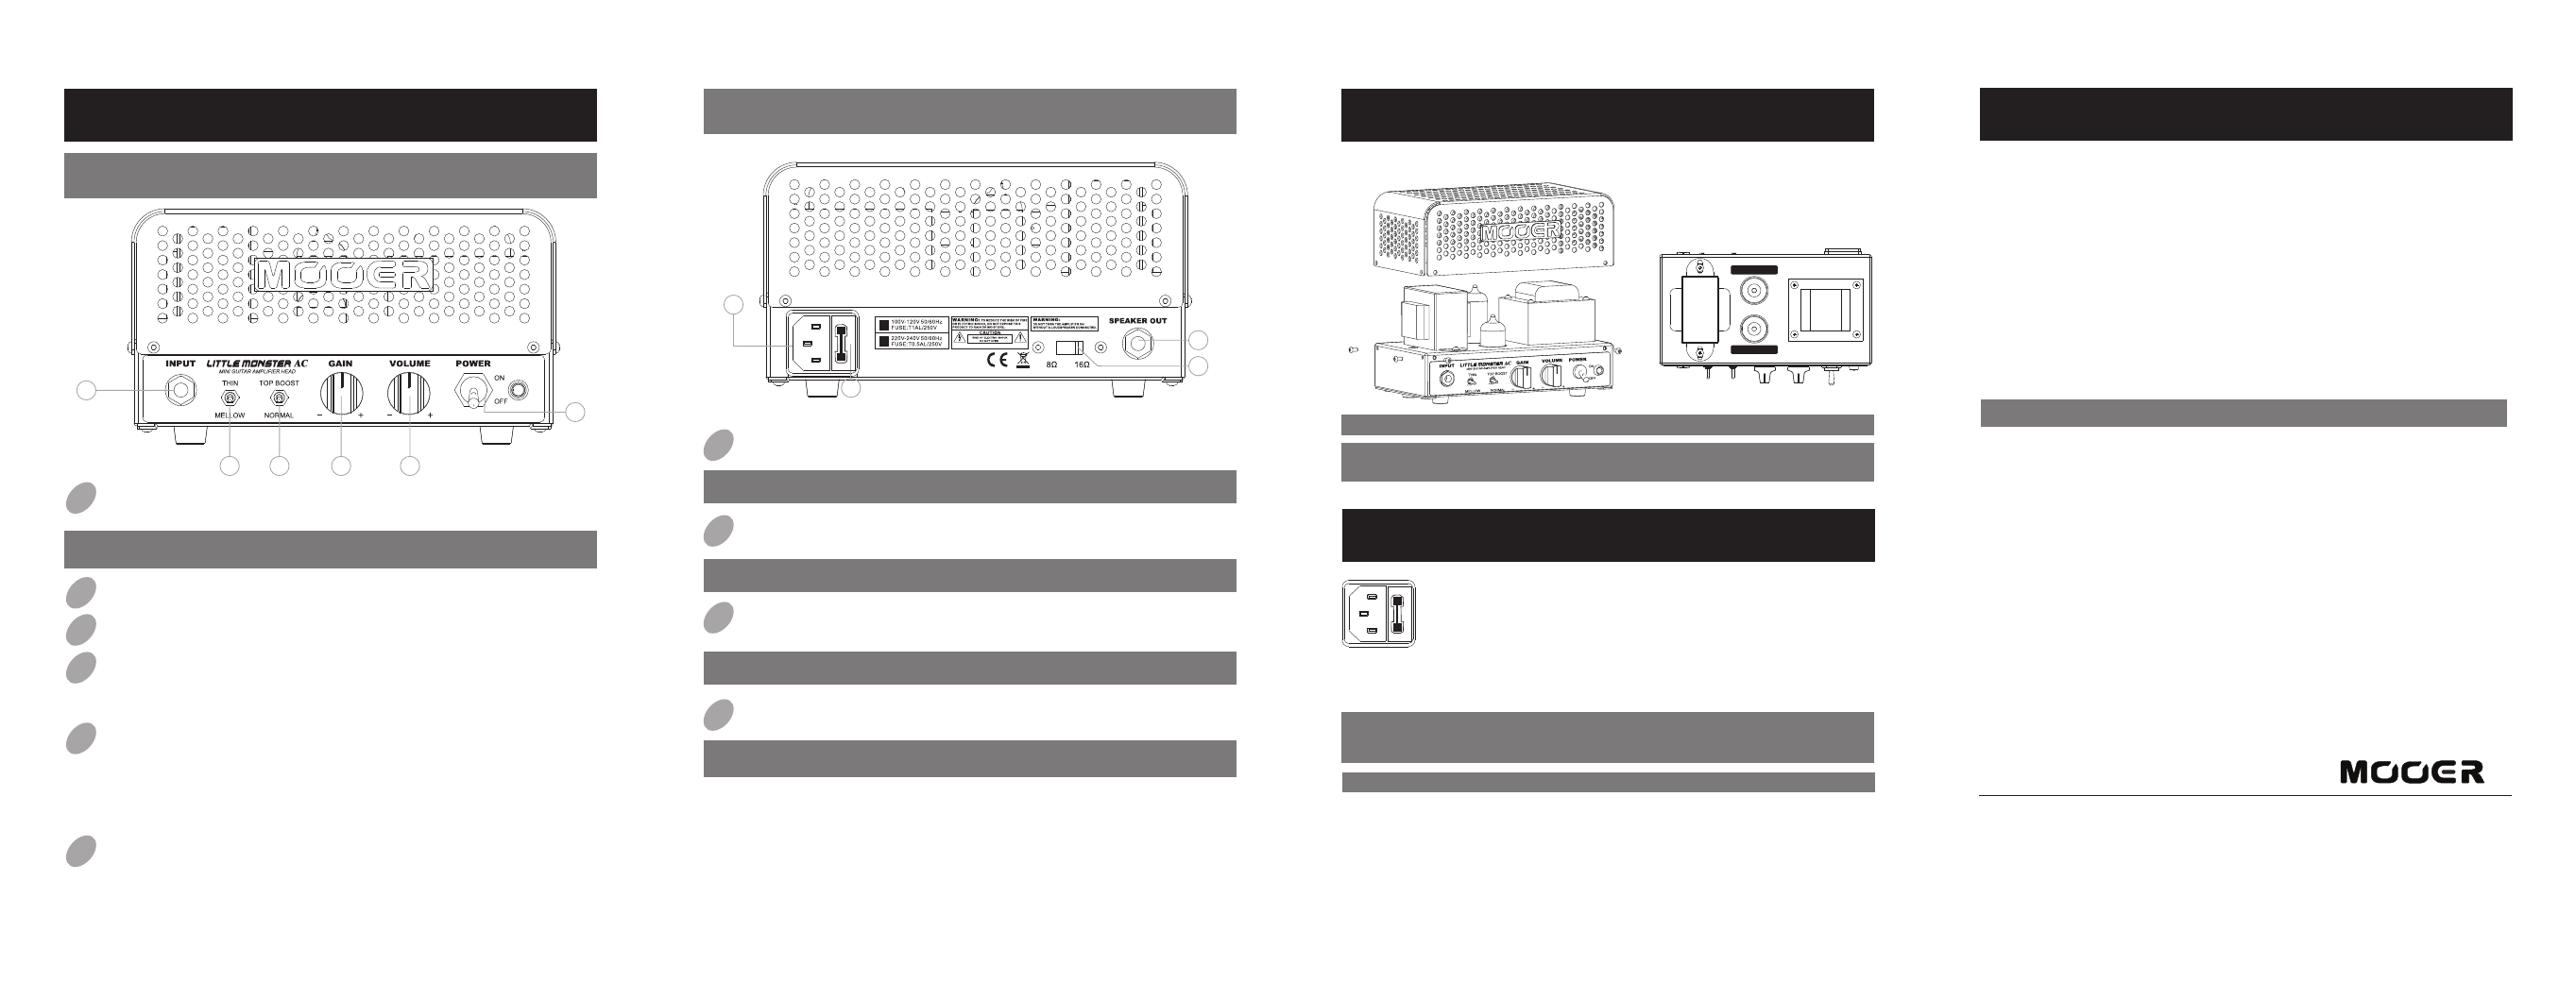
VOLUME Knob: Adjust the master volume of the amplifier.
GAIN Knob: Adjust the gain of the amplifier.
Tone Switch: Switch between THIN mode and MELLOW mode.
THIN - A bit more bright and shining sound.
MELLOW - A little plump and fat sound.
02
03
04
LED indicates the status.
01
POWER Switch and LED: Turn on or turn off the gear,
Warning: Always connect Speaker Out to the cabinet with a speaker
cable before turn on the power.
Channel Switch: Switch between NORMAL channel and TOP
NORMAL - Basic characteristic sound of Little Monster AC.
05
BOOST channel.
TOP BOOST - More gain will be obtained in this channel and the
high band frequency will be increased a little bit.
INPUT Jack: 1/4” mono audio jack, for connecting the guitar.
06
MOOER AUDIO CO.,LTD
www.mooeraudio.com
Rear Panel
3
2
1
F
U
S
E
4
Specifications
Power Output:
Preamp Tube:
Power Tube:
Power Requirements:
Dimensions:
Weight:
5 Watts
ECC83 (12A 7) x 1
X
EL84 (6BQ5) x 1
120mm (D) x 193mm (W) x 105mm (H)
2.55 Kg
Power Cable, Owner’s Manual, Transport Bag,
Accessories:
*
Disclaimer: Any specification’s update won't be amended in this manual.
100~120V 50/60Hz
FUSE: T1AL/250V
220~240V 50/60Hz
FUSE: T0.5AL/250V
Tube Replacement
Warning: Before replacing tubes, the power must be turned off.
EL84(6BQ5)
ECC83(12AX7)
Use the accessorial wrench to unlock all the bolts
Replace the tubes with correct type and
install them to the right socket.
and take down the metal cover.
Warning:
Vacuum tubes will get very hot during working, please make
sure they are cooling before replacing, in case of getting scalded.
Fuse Replacement
The Fuse provides amplifier circuit protection, please read carefully before
you replaced it.
Warning: Always replace a fuse with one of the specific rating and type
printed on the fuse holder. Never install a fuse of a higher rating than
as
value printed on the back of your amplifier and Specifications.
the
Warning: Always turn off the power before replacing fuse.
F
U
S
E
Wrench
8Ω/16Ω Selector: Choose the output impedance corresponding
Power Input: For connecting electricity here with the supplied
Fuse: Protects the amplifier from electrical fault.
01
02
03
04
SPEAKER OUT Jack: Connect to the cabinet (speaker).
Warning: Never switch the amplifier on without a loudspeaker
the speaker.
to
Warning: Always ensure the extension cabinet used is of the correct
impedance.
Warning: Always use the supplied power cord, if a replacement is
required, please contact your authorized dealer.
Warning: Never attempt to bypass the fuse or replace it of incorrect
power cable.
connected.
values.
Panel Instruction
1
2
3
4
5
6
Front Panel