Wiring panels, Concord/concord express/concord ultra panels, Advent panels – Interlogix SuperBus 2000 2X20 User Manual
Page 3: Ultragard panels
3. Splice the 4-conductor cable wires to the matching colored
wires located on the touchpad wiring harness.
Find your panel in the next section for specific wiring
instructions.
Wiring Panels
Concord/Concord Express/Concord Ultra Panels
1. Connect the touchpad wiring to the panel terminals as
shown in Figure 3 below. Wire multiple touchpads in
parallel.
2. If desired, connect an optional hardwire switch to the
yellow touchpad wires as shown in Figure 3 below.
Concord Express Systems- Wire a 2K ohm EOL resistor
(49-467) in series with normally closed switches and in
parallel with normally open switches (see Figure 3 below).
Concord Systems with software version 2.0 or newer-
Wire a 2K ohm EOL resistor (49-467) in series with
normally closed switches and in parallel with normally
open switches (see Figure 3 below).
Concord Systems with software versions 1.0–1.6 - This
switch must be unsupervised and a resistor must not be
used.
Note: The optional touchpad hardwire input must be
added to panel memory. See the Concord/Concord
Express panel Installation Instructions for setting the
configuration.
3. Insert the touchpad wiring harness connector onto the pins
located on the rear of the unit. Make sure the yellow wires
are to the left, as shown.
Figure 3: Wiring the touchpad to Concord and Concord Express
panels
3
4
5
6
GND
+12V
BUS
BUS
B
BUS
A
PANEL TERMINALS
NOT
USED
OPTIONAL
N/C SWITCH
WITH MAGNET
YELLOW
BLACK
RED
WHITE
GREEN
TOUCHPAD
WIRING HARNESS
49-430
TAB
SLOT (3)
OPTIONAL
N/O SWITCH
WITH MAGNET
2K OHM
EOL RESISTOR
(Concord 2.0 or later
and Concord
Express panels)
SHIELDED
CABLE
Connect Shield
to Earth Ground
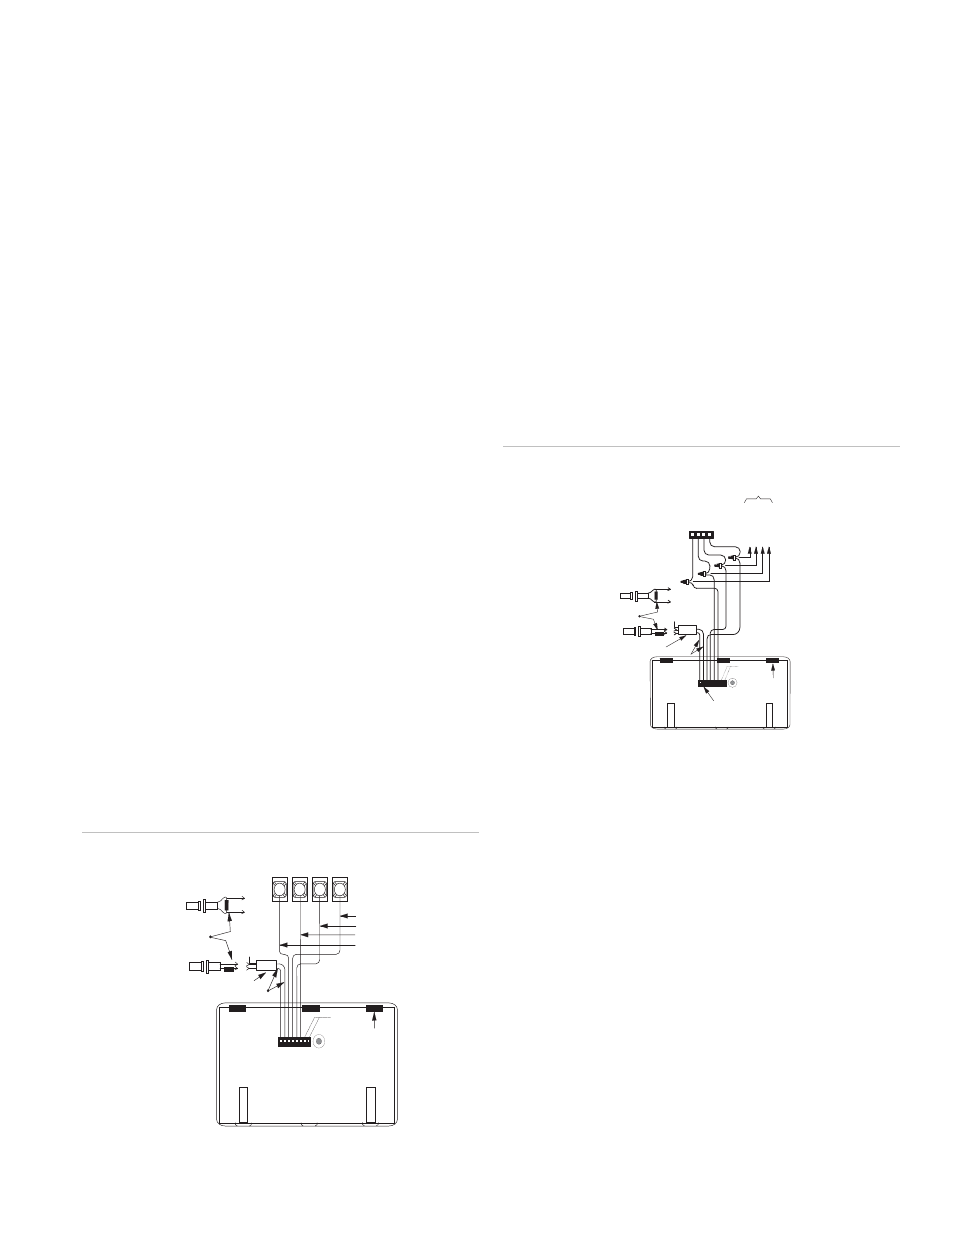
Advent Panels
1. Splice the touchpad wiring to the panel SuperBus wiring
harness as shown in Figure 4 below. Wire multiple
touchpads in parallel.
2. If desired, connect an optional hardwire switch to the
yellow wires on the touchpad wiring harness. Wire a 2K
ohm EOL resistor (49-467) in series with normally closed
switches and in parallel with normally open switches (see
Note: The optional touchpad hardwire input must be
added to panel memory. See the Advent panel Installation
Instructions for setting the configuration.
3. Insert the touchpad wiring harness connector onto the pins
located on the rear of the unit. Make sure the yellow wires
are to the left (see Figure 4 below).
Figure 4: Wiring the touchpad to Advent panels
NOT
USED
YELLOW
TOUCHPAD
WIRING HARNESS
49-430
SPLICE
PANEL SUPERBUS
WIRING
HARNESS 49-462
BL
ACK (
G
ND)
WHI
T
E
(
B
US
B)
GREE
N (
B
US
A)
RED (
+
1
2
VDC)
TO ADDITIONAL
SUPERBUS
TOUCHPADS
AND/OR
MODULES
TAB
SLOT (3)
OPTIONAL
N/C SWITCH
WITH MAGNET
2K OHM
EOL RESISTOR
OPTIONAL
N/O SWITCH
WITH MAGNET
Connect Shield
to Earth Ground
SHIELDED
CABLE
UltraGard Panels
1. Connect the touchpad wiring to the panel terminals as
shown in Figure 5 on page 4. Wire multiple touchpads in
parallel.
2. If desired, connect an optional hardwire switch to the
yellow touchpad wires as shown in Figure 5 on page 4
(unsupervised in UltraGard systems).
Note: The optional touchpad hardwire input must be
added to panel memory. See the UltraGard panel
Installation Instructions or Reference Manual for setting
the configuration.
3. Insert the touchpad wiring harness connector onto the pins
located on the rear of the unit. Make sure the yellow wires
are to the left
SuperBus 2000 2X20 LCD Alphanumeric Touchpad Installation Instructions
3