Advanced features – Great Planes Spirit Elite 2-Meter Sailplane Kit - GPMA0535 User Manual
Page 28
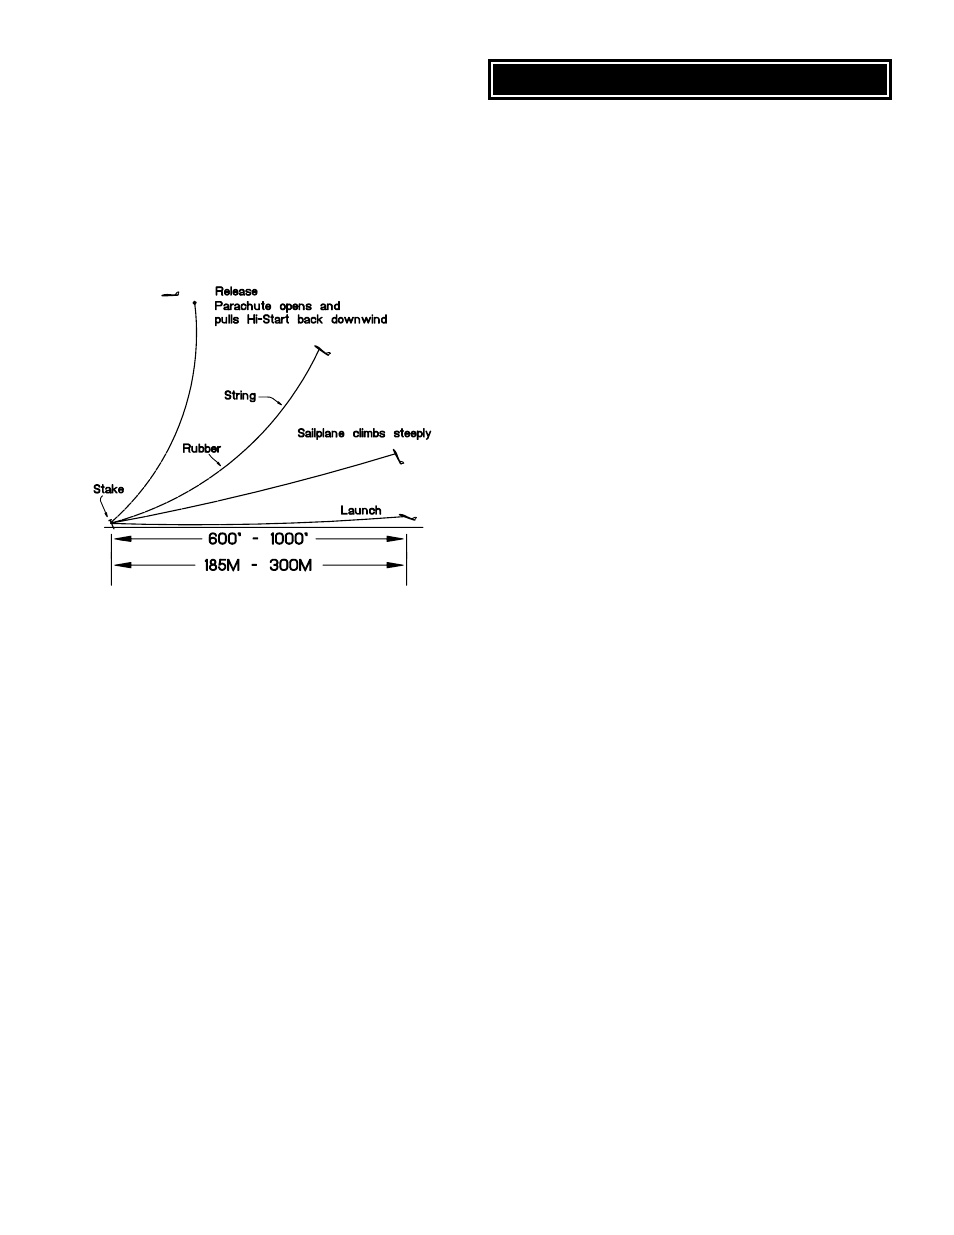
HI-START LAUNCH
A hi-start is the most common way to launch your SPIRIT
ELITE. Follow the directions that came with the hi-start and
lay it out directly into the wind. Place the stake at the far
upwind edge of the flying field so the parachute will blow
back onto the flying field.
Hook the parachute up to the tow hook. Pull the plane back
approximately twice as far as the rubber is long or whatever
the hi-start instructions recommend.
Hold the plane above your head with the wings level and the
nose pointed slightly up and directly into the wind. Give the
plane a push forward to get it flying and it will climb up like
a kite. You should not have to touch the elevator during the
launch. Use the rudder stick to keep it going straight up.
You will find the ailerons are not very responsive during the
first part of the launch. As the rubber relaxes the plane will
fly off the hi-start.
FIRST FLIGHTS
Use these flights to get the “feel” of the controls and the
SPIRIT ELITE’S flying characteristics. Adjust the trims on
your transmitter (a little at a time) until the plane will fly
straight and level with the transmitter sticks in their neutral
positions. If you built the polyhedral wing, rudder alone is
enough to perform smooth turns. If you built the straight
wing, you will need to coordinate ailerons with rudder for
smooth turns.
The SPIRIT ELITE is a very gentle plane that flys well in
light to moderate winds. Practice coordinating ailerons and
rudder until you can get a tight turn that is relatively flat.
Bank the sailplane with rudder and ailerons first, then add
elevator to pull it around. When setting up to land, point the
nose into the wind just downwind of where you want to land.
Line up with your landing spot and slowly feed in flaps (or
Crow). Add more or less flaps to control your descent angle
and speed so you end up hitting the spot.
There are several types of mixing the Spirit Elite can take
advantage of if you have a “computer radio”.
Launch Camber: Lowering the flaps and ailerons during the
launch will produce a steeper climb giving you better altitude.
A good place to start is about 15 degrees of flap and 5
degrees of aileron drop (The flaps will drop about three times
more than the ailerons). This automatically puts some
washout in the wing which adds stability for arrow straight
launches. If you don’t have a switch for launch camber, just
use the flaps for launch.
Crow: This is used to lose altitude quickly and to control your
glide for spot landings. This mixing is tied to the flap stick
(throttle)and allows the ailerons to come up as the flaps drop.
Be sure to use plenty of aileron differential when using
CROW mixing because the ailerons become less effective at
very high angles of deflection. Also use maximum rudder
coupling at full CROW. If you don’t have CROW capabilities
just use flaps and make sure you have full rudder throw when
the flaps start coming down. It is a good idea to get lined up
on the spot before dropping the flaps very much because the
rudder will become sluggish with the flaps down at slow
speeds. Note: You will need to mix in a little down elevator
with the flaps to keep the plane tracking straight.
Aileron/Rudder Coupling - This is used to allow the
sailplane to make efficient, non-slipping, non-skidding turns.
You will need to experiment to find the proper amount of
throw required to do this but 1” (25mm) of rudder throw at full
aileron is probably a good place to start.
Elevator/Camber Coupling - This is a neat type of mixing
allows the TE (ailerons and flaps) to respond to the elevator.
When properly set up, this can be very useful when floating
around in light air or when trying to thermal very tightly. This
mixing can change the flying characteristics of the plane so
start off small and get used it. A good place to start would be
1/8” (3mm) of TE drop at full up elevator.
Controlling the Wing Trailing Edge (Camber): The wing
camber is usually controlled by a 3-position switch. The traditional
way of setting this switch is to have: the middle position set to
neutral camber, one direction for reflex (the entire TE raises about
1/16”( 1.5mm)) and the other direction for positive camber (the
entire TE drops about 3/32”(2.5mm)). This way of programming
the switch is great for good thermal-days or days with a lot of wind
where you might need the reflex capability for zooming up wind.
The other way we set this switch is to have the “back” position for
neutral camber, the middle position for a slight amount of positive
camber (1/32”(1mm) - 1/16”(2mm)), and the forward position for
more positive camber (3/32”2.5mm - 1/8”(3mm)). The middle
position can be used once good air is located or when trying to
gain a few extra seconds of air time. Normally the L/D will not be
as great as neutral camber but the sailplane will float better. The
forward position is when the sailplane is low and encounters lift,
don’t panic, just hit the switch. The SPIRIT ELITE will really slow
up and will thermal “on a dime”. This set-up is great for duration
type flying without a lot of wind.
ADVANCED FEATURES
28