Great Planes Ultimate Biplane 40 Kit - GPMA0240 User Manual
Page 36
D 14. After the filler cures, sand it flush with the plastic.
Wet sand the entire wheel pant with 400-grit sandpaper in
preparation for primer.
Note: Don't forget to reinforce the joints with fiberglass
cloth and CA.
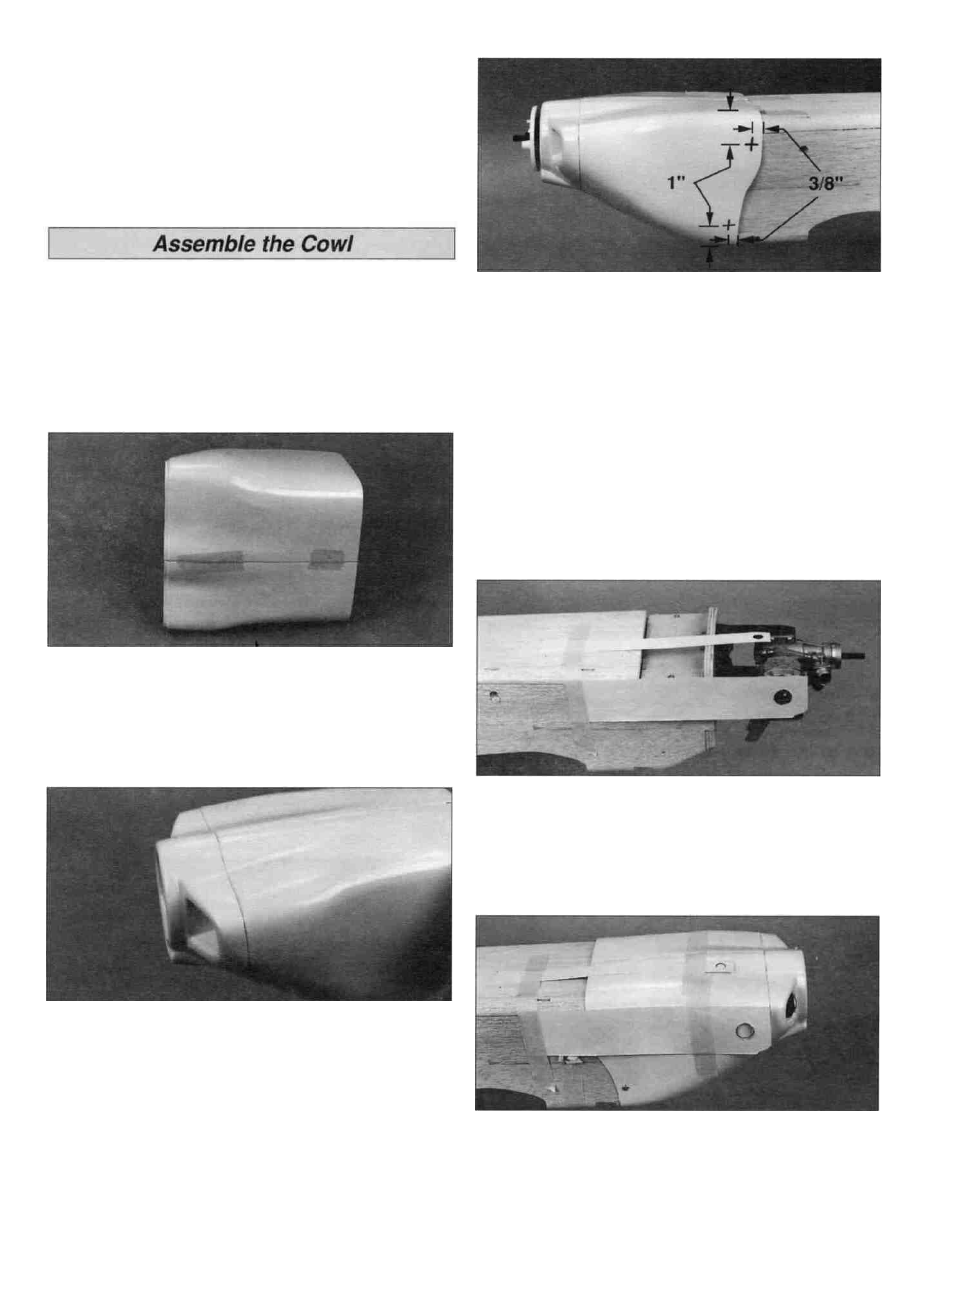
D 1. The cowl is assembled following the same procedure
as the wheel pants. Cut the cowl along the embossed cut
lines. Use your bar sander to true all the edges. For now
the opening in the cowl front only needs to be roughly cut
out. Use coarse sandpaper to roughen the inside of all the
overlapping areas so the glue will adhere better.
D 5. Slide the cowl over the engine and fuselage. Reinstall
the spinner backplate and center the cowl 1/6" to 3/32"
behind the spinner backplate. Tape the cowl in position and
place four marks (two on each side of the cowl) 3/8" in from
the back edge and approximately 1" from the top and
bottom of the cowl.
D 2. Tape the left and right side pieces together, then wick a
small amount of thin CA along the seams of the overlapping
joints. After the CA has cured, remove the tape and make
sure you have thoroughly glued the two pieces together by
inspecting the glue joints and adding thin CA if necessary.
D 6. Drill a 3/32" hole through the cowl and fuse at each
mark. Remove the cowl and enlarge the holes in the cowl
only to 1/8". Apply a couple of drops of thin CA to the cowl
mounting holes in the fuse to harden the wood. Attach the
cowl to the fuse with four #4 x 1/2" sheet metal screws.
D 3. Tape the cowl front to the sides. Use thin CA to tack
glue the bottom of the cowl front to the side. Next tack glue
the top of the cowl front to the sides. After the top and
bottom are glued, start gluing the seam along the sides.
D 7. Remove the cowl and use a piece of thin cardboard
or plastic to make templates for the cutouts in the cowl for
the glow plug, needle valve and exhaust. Tape the
templates to the fuselage side to accurately indicate the
position of the glow plug, needle valve and exhaust.
D 4. Use a sharp hobby knife or a Dremel MultiPro® with a
sanding drum to accurately cut the engine opening in the
front of the cowl.
D 8. Remove the engine and install the cowl. Transfer the
glow plug, needle valve and exhaust holes from the
templates onto the cowl.
36