Great Planes Giant Big Stik ARF - GPMA1224 User Manual
Page 17
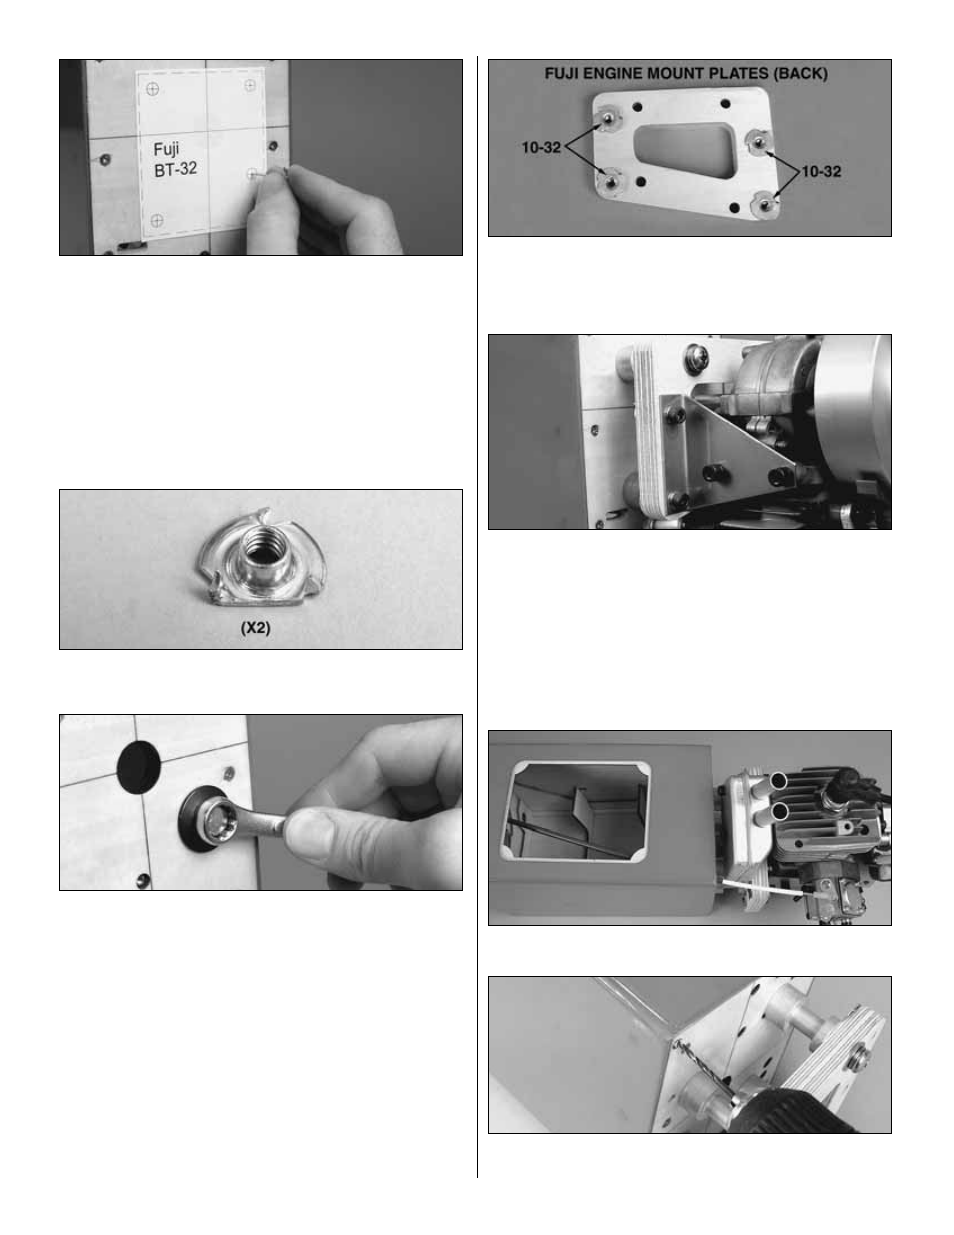
❏
1. Cut the Fuji BT-32 Engine Mount Template from the
back of the manual 1/16" [1.6mm] outside the dashed lines.
Use tape or repositionable spray adhesive to temporarily
hold the template to the firewall. The horizontal and vertical
lines on the template should align with the lines on the
firewall. Use a large T-pin or a sharpened wire to mark the
crossmarks for the bolt holes onto the firewall.
❏
2. Remove the template. Drill 1/8" [3.2mm] pilot holes at the
marks you made. Enlarge the holes with a 19/64" [7.5mm] (or
9/32" [7mm] drill).
❏
3. Cut or grind the side off two 1/4-20 blind nuts.
❏
4. Apply epoxy to the front of one of the blind nuts you
just cut off. Use a couple of large washers and a 1/4-20 bolt
to draw the nut into the back of the firewall in one of the
holes on the left side of the fuselage (to clear the aluminum
bracing inside).
❏
5. Draw the other blind nut into the other hole on the left
side, and two more blind nuts into the remaining two holes
the same way.
❏
6. Glue together the two 1/4" [6.4mm] plywood Fuji
engine mount plates. Install four 10-32 blind nuts (not
included) in the back of the plate where shown. These will
be for holding the engine to the plate.
❏
7. Mount the engine mount plate to the firewall with the
included aluminum standoffs, 1/4-20 x 2-1/2" [63mm]
Phillips or hex-head bolts and 1/4" [6.4mm] flat and lock
washers (not included). Do not use socket-head cap
screws–they stick out too far and will interfere with the
engine. Note: The actual standoffs included with your kit
might look different than the ones in the photo.
While we’re working on the front of the fuselage let’s go
ahead and hook up the throttle …
Refer to this photo to install the throttle pushrod.
❏
8. Drill a 3/16" [4.8mm] hole through the firewall in the
location shown (in the lower left corner for the Fuji BT-32) for
17