Gpmz0026d, Determine what you need to build your power system, Understanding motors – Great Planes Ammo 36mm Power System - GPMG5240-5325 User Manual
Page 4: Assemble your power system install the pinion gear
DETERMINE WHAT YOU NEED TO
BUILD YOUR POWER SYSTEM
Now that you have a component for your power system,
there are several different ways to select the rest of the
components of your power system. In time, experience will
help you to determine what works best for you, but an easy
way to determine what you need now is the following.
PROCEDURE #1: If you know the size of the propeller you
want to turn and the rpm, then look at the chart included in
the packaging and:
❏
1. Find the combination in the motor/prop chart that
delivers the closest performance to what you want.
❏
2. Note the gear ratio you need.
❏
3. Note the recommended battery voltage.
❏
4. Determine if you want to use LiPo or NiMH batteries
based on the desired ready-to-fly airplane weight.
Select the number of cells based on the recommended
voltage shown on the chart.
❏
5. Determine the battery capacity needed based on the
current draw of your system and your desired flight time.
❏
6. Determine the ESC you need based on the system
current draw shown on the motor/prop chart. See the
ESC section.
PROCEDURE #2: If you know the approximate weight of
your airplane, including the motor and battery, and the
performance you want from it, answer the questions below to
determine the correct power system for your plane. You may
need to make more than one calculation using different
motors and battery combinations. See the battery section for
some of the battery weights for the suggested batteries.
❏
1. Perform the following calculation to determine the
wattage required:
• If you expect trainer-like performance then multiply 75
x Airplane Weight (lbs)
• If you expect aerobatic or high speed-like performance
then multiply 100 x Airplane Weight (lbs)
• If you expect 3D or extreme performance multiply 150
x Airplane Weight (lbs)
❏
2. The number you get is the minimum wattage you will
need for your plane to perform as you wish. Look at the
chart and determine what combination gives you the
performance you want based on wattage and maximum
propeller size that will fit on the plane.
❏
3. Note the gear ratio you need.
❏
4. Note the recommended battery voltage.
❏
5. Determine if you want to use LiPo or NiMH batteries
based on the desired ready to fly airplane weight.
Select the number of cells based on the recommended
voltage shown in the chart.
❏
6. Determine the battery capacity needed based on the
current draw of your system and your desired flight time.
❏
7. Determine the ESC you need based on the system
current draw.
In addition to these two procedures, you can also visit
the Great Planes ElectriFly web site for descriptions of
the power systems recommended for our line of electric
and glow airplanes as well as more detailed explanation
on the subject.
UNDERSTANDING MOTORS
kV (rpm/volt): This is a number that gets thrown around
quite a bit when talking electrics and it is important to know
what it is. kV is the number of rpm a motor will spin per each
volt applied (rpm/volt) under no load.
This means that basically a motor that has a kV of 1000
when connected to a 12V battery will try to spin at 12,000rpm
(1000x12) under no load. Likewise a 3500kV motor will try to
spin at 42,000rpm (3500x12) under no load.
When a propeller is attached to the motor, the motor will try
to spin the prop at the rated kV. Depending on the diameter
and pitch of the propeller (the larger the diameter or higher
the pitch, the harder it is to spin), the motor’s current draw
can be increased or decreased. There are meters available
from your hobby dealer that measure current and voltage.
Because every motor has a maximum current it can take
based on its design and cooling ability, the maximum size of
propeller that can be used with each motor can be determined.
Too large of a propeller and the motor will spin at a much
lower rpm than its rated kV, causing it to draw a lot of current
and overheat. If the propeller/fan is too small, it will require
little effort (current) to turn the prop at the rated kV.
Ideally the motor should be matched with a propeller that
causes the motor to draw 80-100% of its rated maximum
constant current. Once a power system is set up, it can be
fine-tuned by adjusting the propeller size and measuring
the amount of current the motor is drawing.
Please note that the kV of a motor does not change with
voltage, but if a higher voltage is applied to the motor, it will
try to spin the same propeller at a higher rpm. This will
cause the motor to draw more current and possibly exceed
the maximum rated current of the motor. So, if a battery with
lower voltage is replaced with one with a higher voltage, it is
recommended that a smaller propeller be used to keep the
current in check. If a higher voltage battery is replaced by a
lower voltage battery, the size of the propeller can be
increased to keep the motor at its rated current.
Another possibility to fine tune the power system’s
performance is to use another motor with higher kV to
increase the current or a lower kV to lower the current.
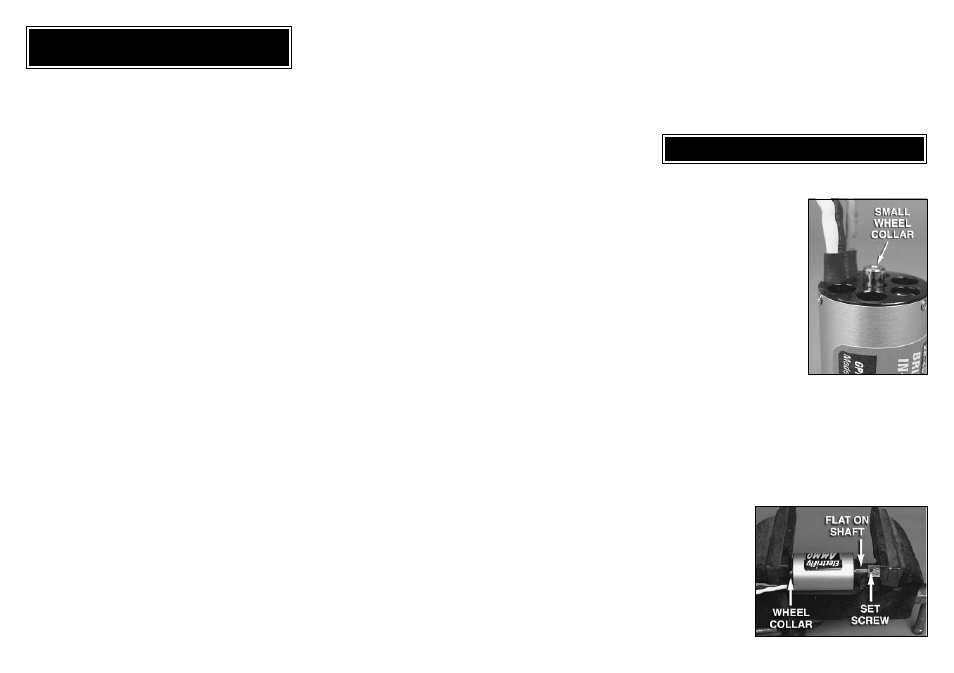
ASSEMBLE YOUR POWER SYSTEM
INSTALL THE PINION GEAR
Once you have determined the
gear ratio you need, the pinion
gear will need to be installed on
the motor shaft. The pinion gear
is a press fit on the motor shaft
and it will need to be heated and
pressed on. Never force the
pinion gear on the shaft without
supporting the other end of the
motor shaft. A small wheel collar
works well for supporting the
motor shaft. If you have a drill
press, the motor can be placed
in a vise with the motor shaft
supported on a small wheel
collar. Use a small micro torch to heat the pinion gear and use
the drill chuck of the drill press to press the pinion onto the
shaft. Note: The pinion gear uses a small set screw to secure
the pinion gear to the motor shaft. When installing the pinion
gear make sure that the flat on the motor shaft is aligned with
the set screw.
If you do not have a drill press a small vise can also be
used. Place the motor between the jaws of the vise with the
end of the motor shaft supported and the pinion gear
centered on the
motor shaft. Heat
the pinion gear and
slowly close the
jaws of the vise.
You may need to
use a second
wheel collar so that
the pinion gear can
be pressed on past
the end of the
motor shaft.