Always fly over soft grassy fields, Start, Center – Estes 4552 - Star Strike User Manual
Page 2: Choose a good flying site
2
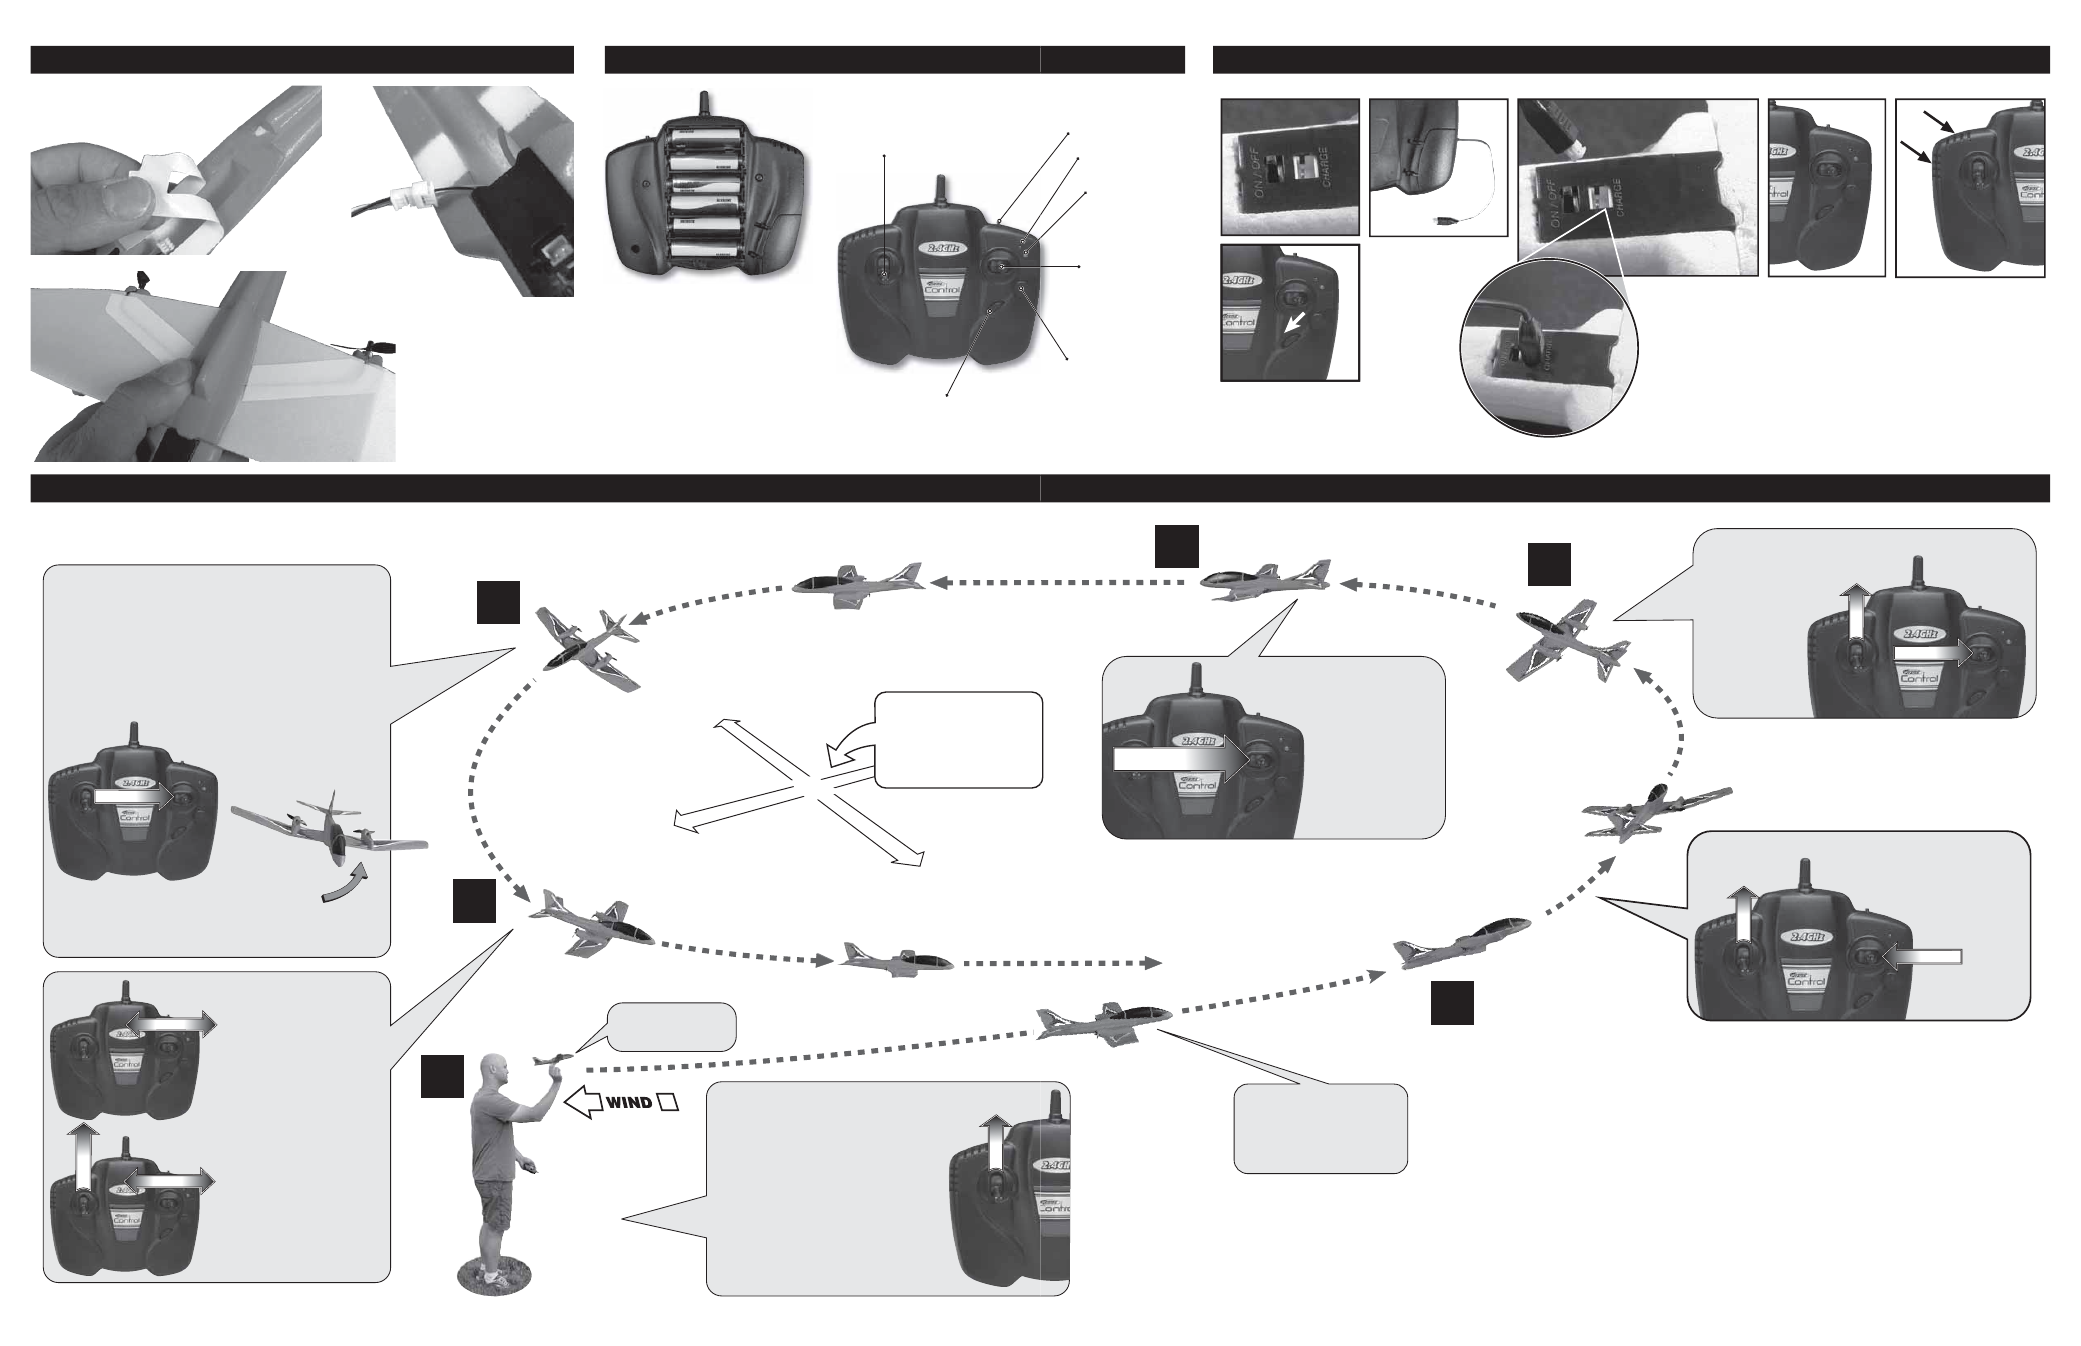
Controller with Built-in Charger
Wing Installation Instructions
Remove screw and back cover.
Insert 6 new “AA” alkaline
batteries in the correct polarity.
Replace cover and screw. New
batteries should be installed after
every fourth complete charge of
the Star Strike.
Flying You
Throttle Stick:
Push and hold up for full motor
power. Push halfway up for
cruising speed. Release to stop.
Switch “ON” for fl ying
Switch “CHG” for charging
TAP
START
100
YARDS (91 m)
100 YARDS (91 m)
Find a large open area.
You don’t want to fly
near people, streets,
houses, trees or power
lines.
1.
5.
6.
CHOOSE A GOOD FLYING SITE:
END LEFT TURN
Tap direction control stick right.
LEFT TURN PATH
Tap direction control stick left.
STEERING AN AIRCRAFT COMING TOWARD YOU
1. Imagine you’re in the cockpit. Turn and point the
controller antenna in the direction the aicraft is flying.
OR
2. While the aircraft’s wing is banked, tap the
direction control stick in the direction of the low wing
until it levels.
Hold aircraft under
the wing.
Release the throttle
control stick to begin
descent. Tap the
direction control stick
left or right to steer into
the wind and keep the
wings level.
Tap the throttle control
stick to keep the aircraft
on a gentle path to
touchdown.
TAP
TAP
TA
P
LANDING THE AIRCRAFT
1. Check wind speed and
direction.
2. Turn controller switch ‘ON’. The
red LED will illuminate.
3. Turn aircraft switch ‘ON’.
4. Check motor and turn controls.
5. Apply full power (throttle
control stick pushed up).
6. Toss aircraft straight and level
into the wind.
PUSH
5 mph [8km/h] or less
To stop turning, tap the direction control
stick in the low wing’s direction.
1. Peel tape backing.
3. Attach wing.
2. Connect plug.
3
2. Open controller
charging door.
Extend charge
cord.
3. Plug charge
cord into aircraft
(DO NOT FORCE
OR PLUG
BACKWARDS). The
green controller
LED glows.
4. Charge until
green LED turns
off. Unplug cord
and store in
controller charge
compartment.
NOTE: While charging,
heat is released through
the controller vents. Never
cover the vents.
Vents
Charge the Aircraft
ur Aircraft
Power LED (red)
Charger LED
(green)
Flight Direction Trim:
Adjusts the right and
left direction.
Direction Stick:
Tap (push and
release) left or
right to steer.
Turn by tapping the stick
shown left — fast repeated
taps for tight turns, or slow
repeated taps for wide
turns.
End turns by tapping the stick
shown to the right, leveling the
wings to fly straight.
TAP
PUSH
TAP
PUSH
ALWAYS FLY OVER
SOFT GRASSY FIELDS!
DO NOT FLY IN PARKING LOTS OR STREETS.
2.
3.
4.
END LEFT TURN
Tap direction control
stick right.
BEGIN LEFT TURN
Tap direction control
stick left.
Fly straight by
centering the
direction control
stick. Tap left or
right to keep the
wings level.
Let the aircraft fly on its
own for 3- 5 seconds to
gain speed and altitude
before making first turn.
Flying Time: Up to 10 minutes.
CENTER
1. Turn aircraft off and
controller to CHG.
Binding Button