Rocket configurations: a. 2-piece rocket, B. 3-piece rocket, C. 4-piece rocket – Estes 2029 - Converter User Manual
Page 2: Apply decals
3
3
2
1
A. Carefully cut out shock cord
mount at left.
E. Glue mount 1” (25 mm) inside
upper body tube. Hold until glue
sets. Let dry.
D. Squeeze tightly and
hold until glue sets.
SHOCK CORD
MOUNT
SECTION
3
SECTIO
N
2
SECTIO
N
1
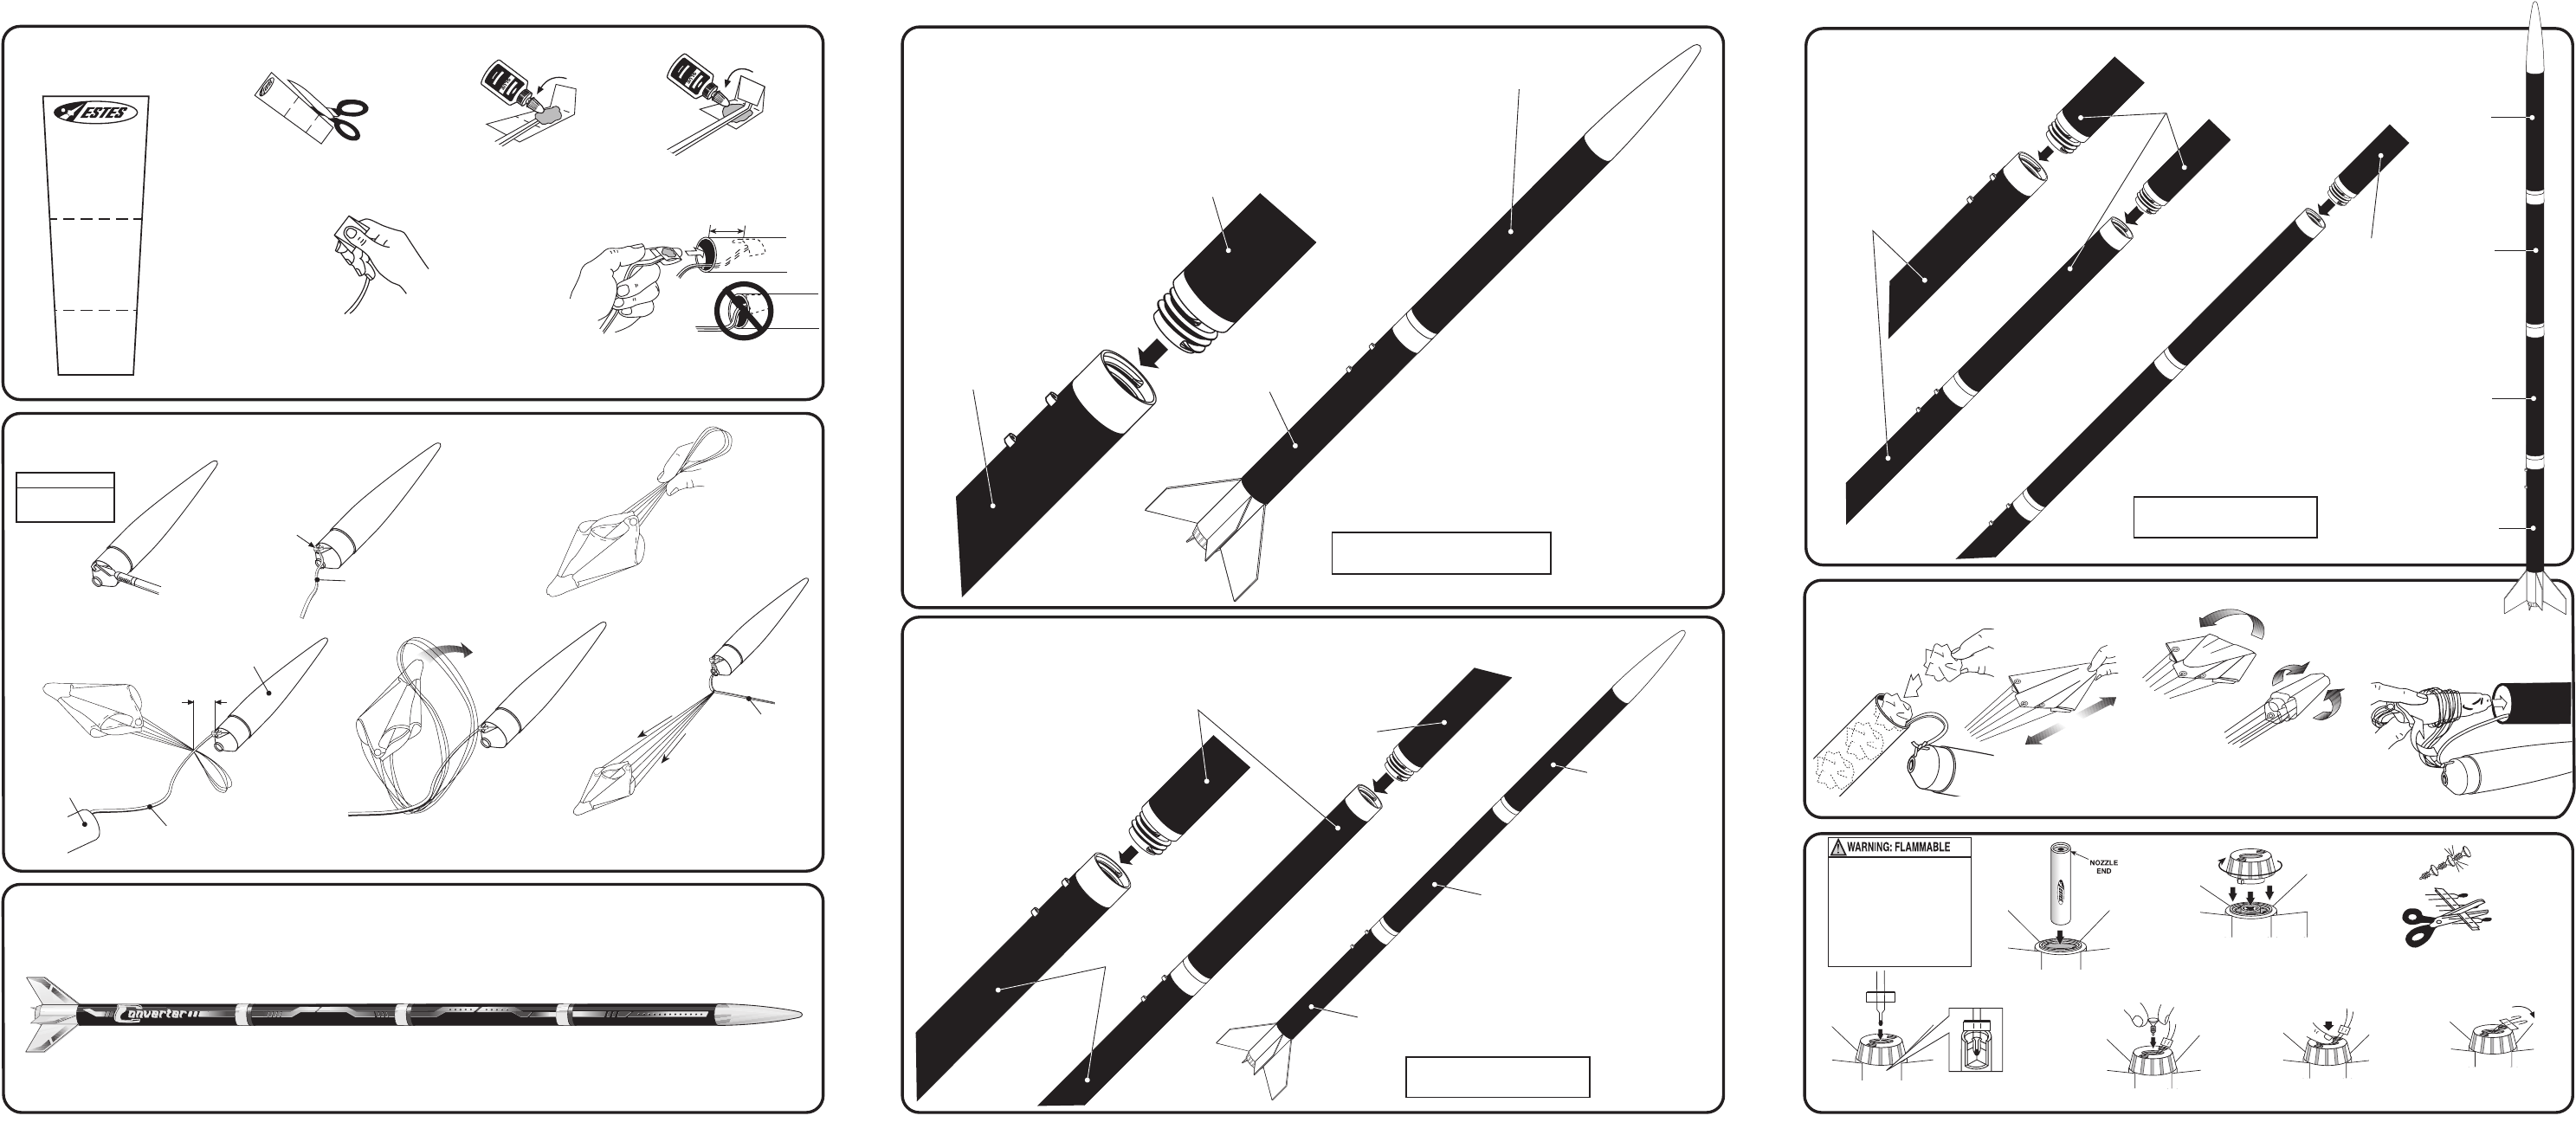
7. ROCKET CONFIGURATIONS:
A. 2-Piece Rocket
TAIL SECTION
NOSE CONE SECTION
You can easily change the length of your rocket by screwing different body
tube sections together. You can fly a 2-section, 3-section or 4-section rocket.
A. Screw the nose cone section onto
the tail assembly.
B. 3-Piece Rocket
TAIL SECTION
BODY TUBE
A. Screw either body section
onto the tail assembly.
RECOMMENDED ENGINES:
B6-2, B6-4, C6-3, C6-5
NOSE CONE
SECTION
B. Screw the nose cone section
onto the body section.
BODY TUBE
A. Insert 6-8 loosely
crumpled squares
of recovery
wadding.
E. Wrap lines loosely. Insert ‘chute,
shock cord and nose cone into
body tube.
B. Lay end of shock cord
on sections 2 and 3 of
mount. Apply glue to
section 2. Fold section
1 over section 2.
1”
(25 mm)
YES
TAIL SECTION
NOSE CONE SECTION
RECOMMENDED ENGINES:
B4-2, B4-4, B6-2, B6-4, C6-3, C6-5
NOSE CONE
SECTION
TAIL SECTION
C. 4-Piece Rocket
TAIL SECTION
BODY TUBE
A. Screw either body section
onto the tail assembly.
C. Screw the nose cone section
to the top of the body.
B. Screw the remaining
body section onto the
body.
NOSE CONE
SECTION
BODY TUBE
BODY TUBE
RECOMMENDED ENGINES:
B6-2, B6-4, C6-3, C6-5
NOSE CONE
SECTION
TAIL SECTION
C. Apply glue to section 3.
Fold forward.
4. ATTACH SHOCK CORD AND MOUNT
5. ATTACH NOSE CONE AND PARACHUTE
8. PREPARE PARACHUTE FOR FLIGHT
CAUTION:
DO NOT CUT OFF
EYELET OF NOSE
CONE.
page 4
page 3
page 5
C. Fold.
D. Roll.
IMPORTANT:
Both recovery wadding and
parachute must slide easily into body.
(If fit is too tight, undo and repack).
B. Spike
parachute.
NOTE: Only Estes Wadding (302274) recommended.
A.
Clean the eye of the
nose cone.
DOUBLE
KNOT
SHOCK
CORD
B.
Tie shock cord to
nose cone with a
double knot.
C.
Form loop with
parachute
shroud lines.
D.
Lay shock cord
over loop about
3/4” (19 mm) from
nose cone.
E.
Pass
parachute
through loop.
F. Pull tight.
SHOCK
CORD
3/4”
(19 mm)
SHOCK
CORD
BODY TUBE
NOSE CONE
D. Hold rocket upright,
drop in igniter.
E. Insert igniter plug.
F. Firmly push all the
way in.
G. Bend igniter wires as
shown.
A. Slide engine into rear
of rocket as shown.
C. Separate igniter and
igniter plug.
To avoid serious injury,
read instructions & NAR
Safety Code included with
engines before proceeding.
PREPARE YOUR ENGINE
ONLY WHEN YOU ARE
OUTSIDE AT THE LAUNCH
SITE PREPARING TO LAUNCH!
If you do not use your prepared
engine, remove the igniter before
storing your engine.
IGNITER MUST
TOUCH
PROPELLANT.
B. Twist engine lock ring
into locked position to
hold engine in place.
SHOCK CORD
MOUNT
SECTION
3
SECTION
2
SECTION
1
A.
Assemble as a 4-piece rocket and apply decals as shown.
This assures that the labels line up when flying as a 2-piece or 3-piece rocket.
6. APPLY DECALS
NO