Launching your rocket, Warning, Important – Estes 1876 – Hydrogen Rocket User Manual
Page 2: Preparing the fuel generation solution, Caution, Launcher assembly
READ AND FOLLOW THE INSTRUCTIONS AND HYDROGEN ROCKET SAFETY CODE BEFORE USING.
LAUNCHING YOUR ROCKET
PREPARING THE FUEL GENERATION SOLUTION
If you come in contact with the solution,
rinse immediately with water.
CAUTION
1. Pour 8 oz. (240 ml) of tap
water into a measuring cup.
2. Pour one (1) packet of citric acid
crystals into the measuring cup.
3. Stir solution with spoon until
crystals dissolve.
4. Carefully, pour solution into the
plastic bottle, then cap bottle.
NOTE:
After a while, the solution will change
to a light brown color. This is normal and
the solution can be used over again to
generate 100’s of launches! When not in
use, pour solution back in bottle and save.
1
Unscrew the two Battery Compartment
Caps. Pull out the battery trays. Insert
three `D´ alkaline batteries into each tray
following the polarity markings (+ & -
signs) in the trays. Then slide each tray
back into the Launch Base and screw
on the caps.
• Read and follow the Hydrogen Rocket Safety Code.
• Launch only in large open fields away from power lines, trees and buildings.
• Launch only in little or no wind and good visibility.
• Place the Launch System on LEVEL surfaces only.
• Keep all spectators 15 FEET
(5 m)
away from Launch System at all times.
• Launch only in temperatures between 50° F
(10° C)
to 100° F
(38° C)
.
To prevent damage to the Fuel
Generator, only operate the
unit between temperatures of
50° F
(10° C)
and 100° F
(38°C)
.
CAUTION
K
E
E
P
E
VE
RYO
NE 15
FE
E
T
(5
m
)
F
R
O M
L AU NC H
ER
Launch Button
Launch Base
IMPORTANT NOTE:
The Fuel
Generation Solution needs time to fully
penetrate the generator for maximum
hydrogen fuel generation. Allow the
unit to sit for 15 minutes before using!
Not doing so will greatly affect the
amount of hydrogen produced resulting
in poor rocket performance.
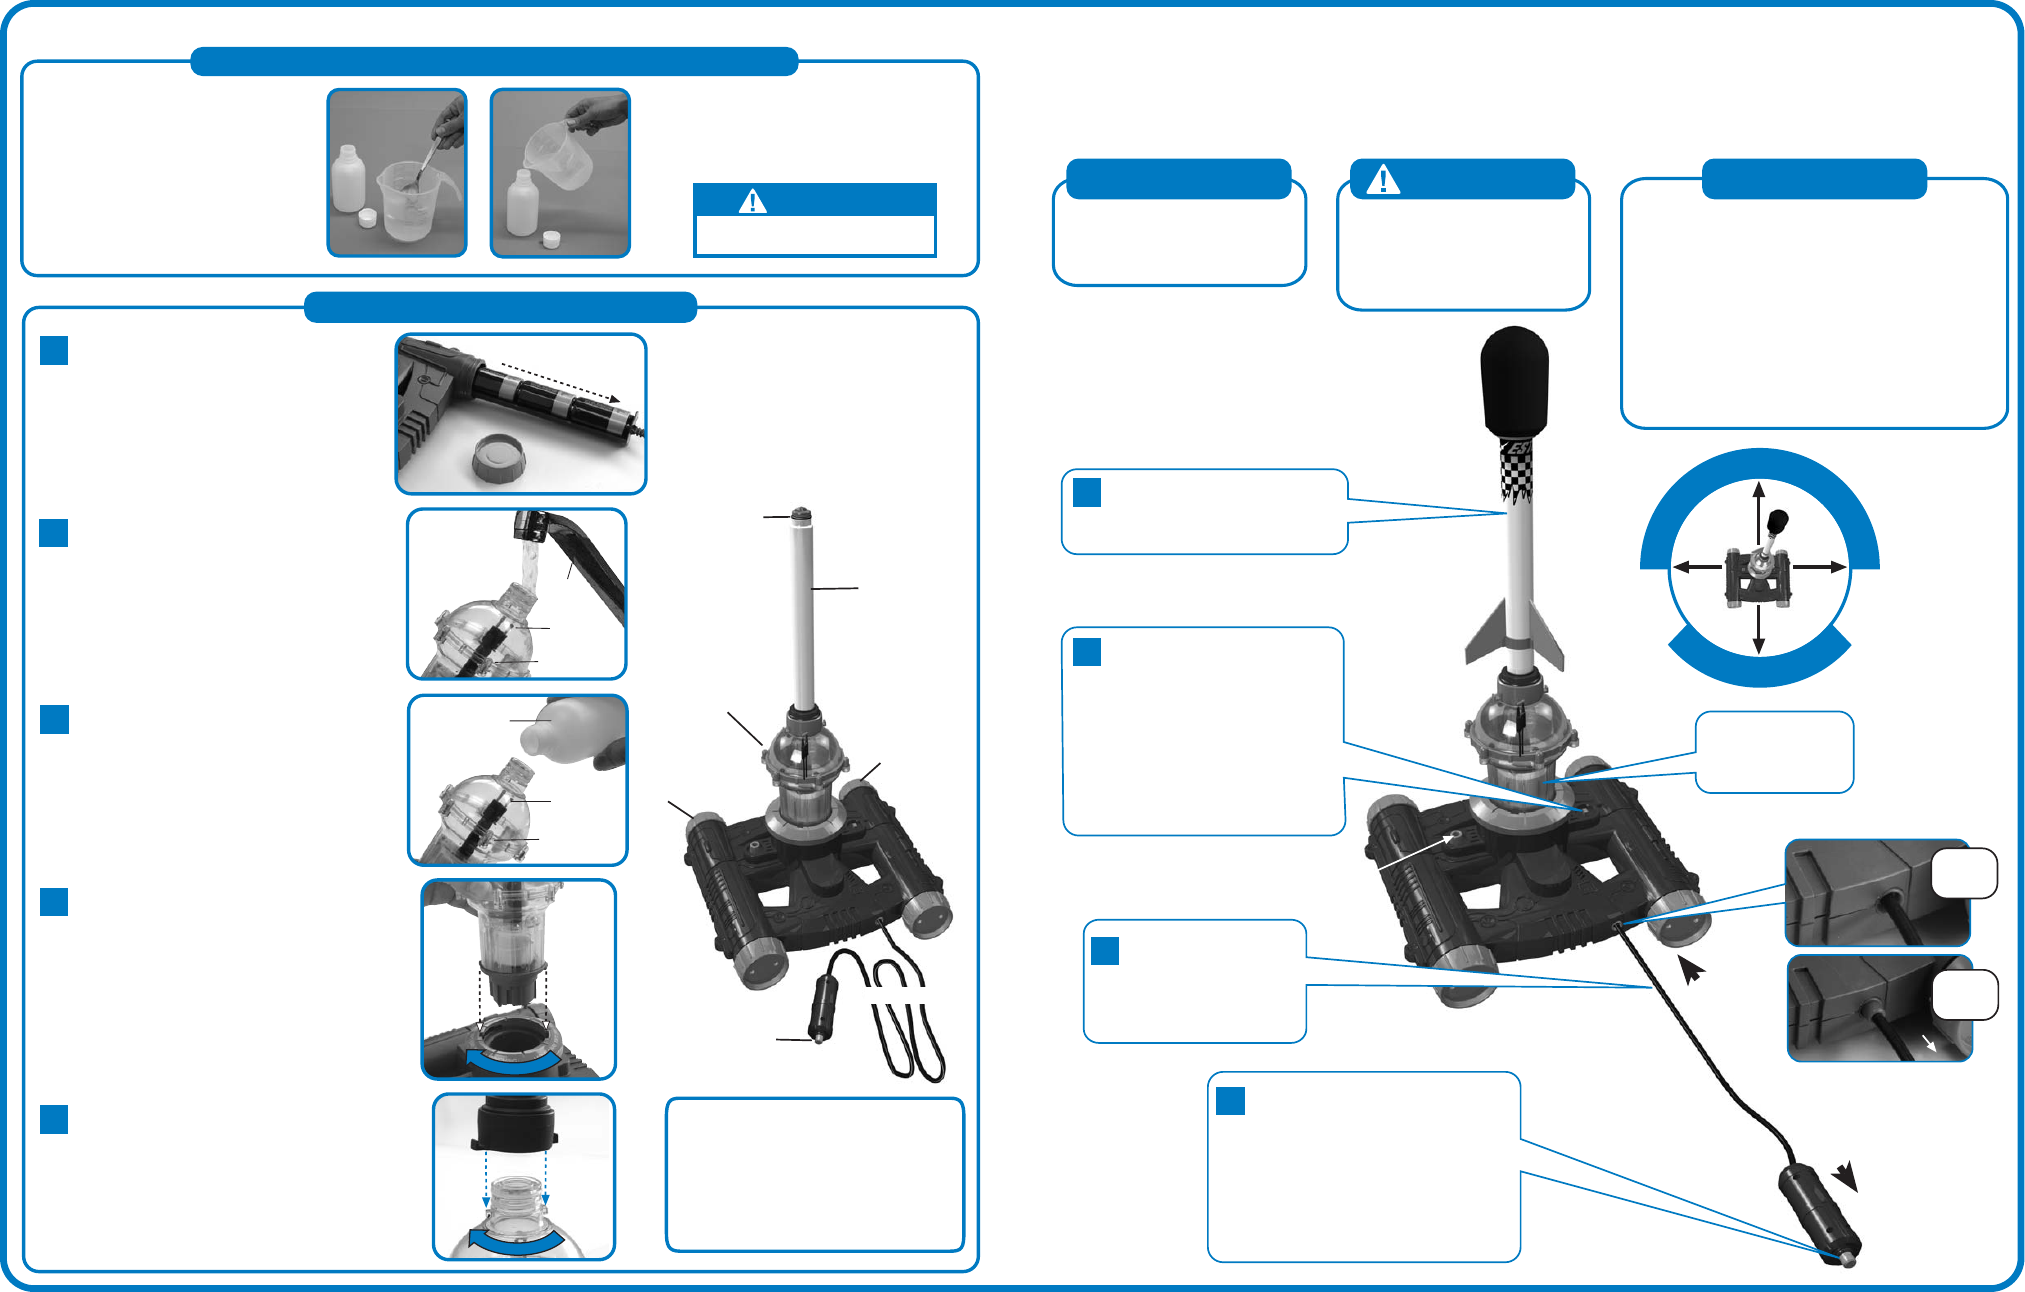
LAUNCHER ASSEMBLY
To prevent the possibility of
severe injury, never place or
allow anyone else to place
any part of his/her body over
the launch tube.
WARNING
2
Turn switch ‘ON’ to begin fuel
generation (red LED will light).
A "Launch Tone" will sound
when fuel generation is
complete
(approx. 3-4 minutes)
.
1
Make sure Launch Tube O-Ring
is in place.
Slide Hydrogen Rocket all the
way down on Launch Tube.
Bubbling in the
Fuel Generator
indicates system is
working.
Fuel Generator
Launch Tube
Battery
Compartment
Cap
Battery
Compartment
Cap
Launch Cable
Pull T
ray Out
3
Tilting the generator to the side, slowly
pour solution from the bottle into the Fuel
Generator. Avoid pouring it on the Igniter
(thin wire coil) inside the generator. Fill
to the Center Ring of generator. DO NOT
overfill and cover the Igniter. Wipe off any
spilled solution with a paper towel or rag.
Igniter
Center Ring
NOTE:
If Igniter gets wet, allow unit to sit for
15 minutes to allow Igniter to dry.
3
When "Launch Tone" is
heard, pull Launch
Cable taut to activate
Launch Base Safety
Switch. Keep cord taut
until rocket launches.
Launch Base Safety Switch
Safety
Switch
`OFF´
EXTEND LA
UNCH CABLE ITS FULL LENGTH
Notes:
1. You can launch before "Launch
Tone" sounds, however
performance will be reduced.
2. Reset switch to "OFF" then
"ON" after each launch.
4
Notes:
1. Reset switch to "OFF" then "ON"
after each launch.
2. If Igniter is wet or batteries are
old you may need to hold the
Ignition Button down longer until
rocket blasts off.
Safety
Switch
`ON´
PULL
Power `ON´ LED
IMPORTANT
1. Be sure the small O-Ring is in place at the top
of the Launch Tube before using.
2. The system will completely shut off when the
"Launch Tone" stops. If you have not launched
the rocket before "Launch Tone" stops, follow
these steps:
1. Turn switch off.
2. Remove rocket and launch tube to allow
hydrogen gas to escape from fuel generator.
3. Replace launch tube and rocket.
4. Turn switch "ON" to restart fuel generation.
5. Follow remaining launch steps.
Press and hold Ignition Button down
until rocket blasts off.
5
Attach the Launch Tube to the top of the
generator again, aligning the tabs in the
Launch Tube with the Slots in the
generator and twist
clockwise 90° to lock
in place.
TW
IST TO LOCK
Launch Tube
O-Ring
4
Insert the Fuel Generator into the Launch
Base aligning the tabs of the generator
with the slots in the base and twist
clockwise 90° to lock in place.
TW
IST TO LOCK
2
Tilting the Fuel Generator to the side,
slowly add plain tap water to fill the
generator half full. Swirl the water inside
the generator for 2-3 minutes to wet the
generator material in the Fuel Generator.
Pour out the water and replace it with
the Fuel Generating Solution as outlined
in Step 3.
Igniter
Fill 1/2 Full
Kitchen
Faucet
Fuel
Generation
Solution