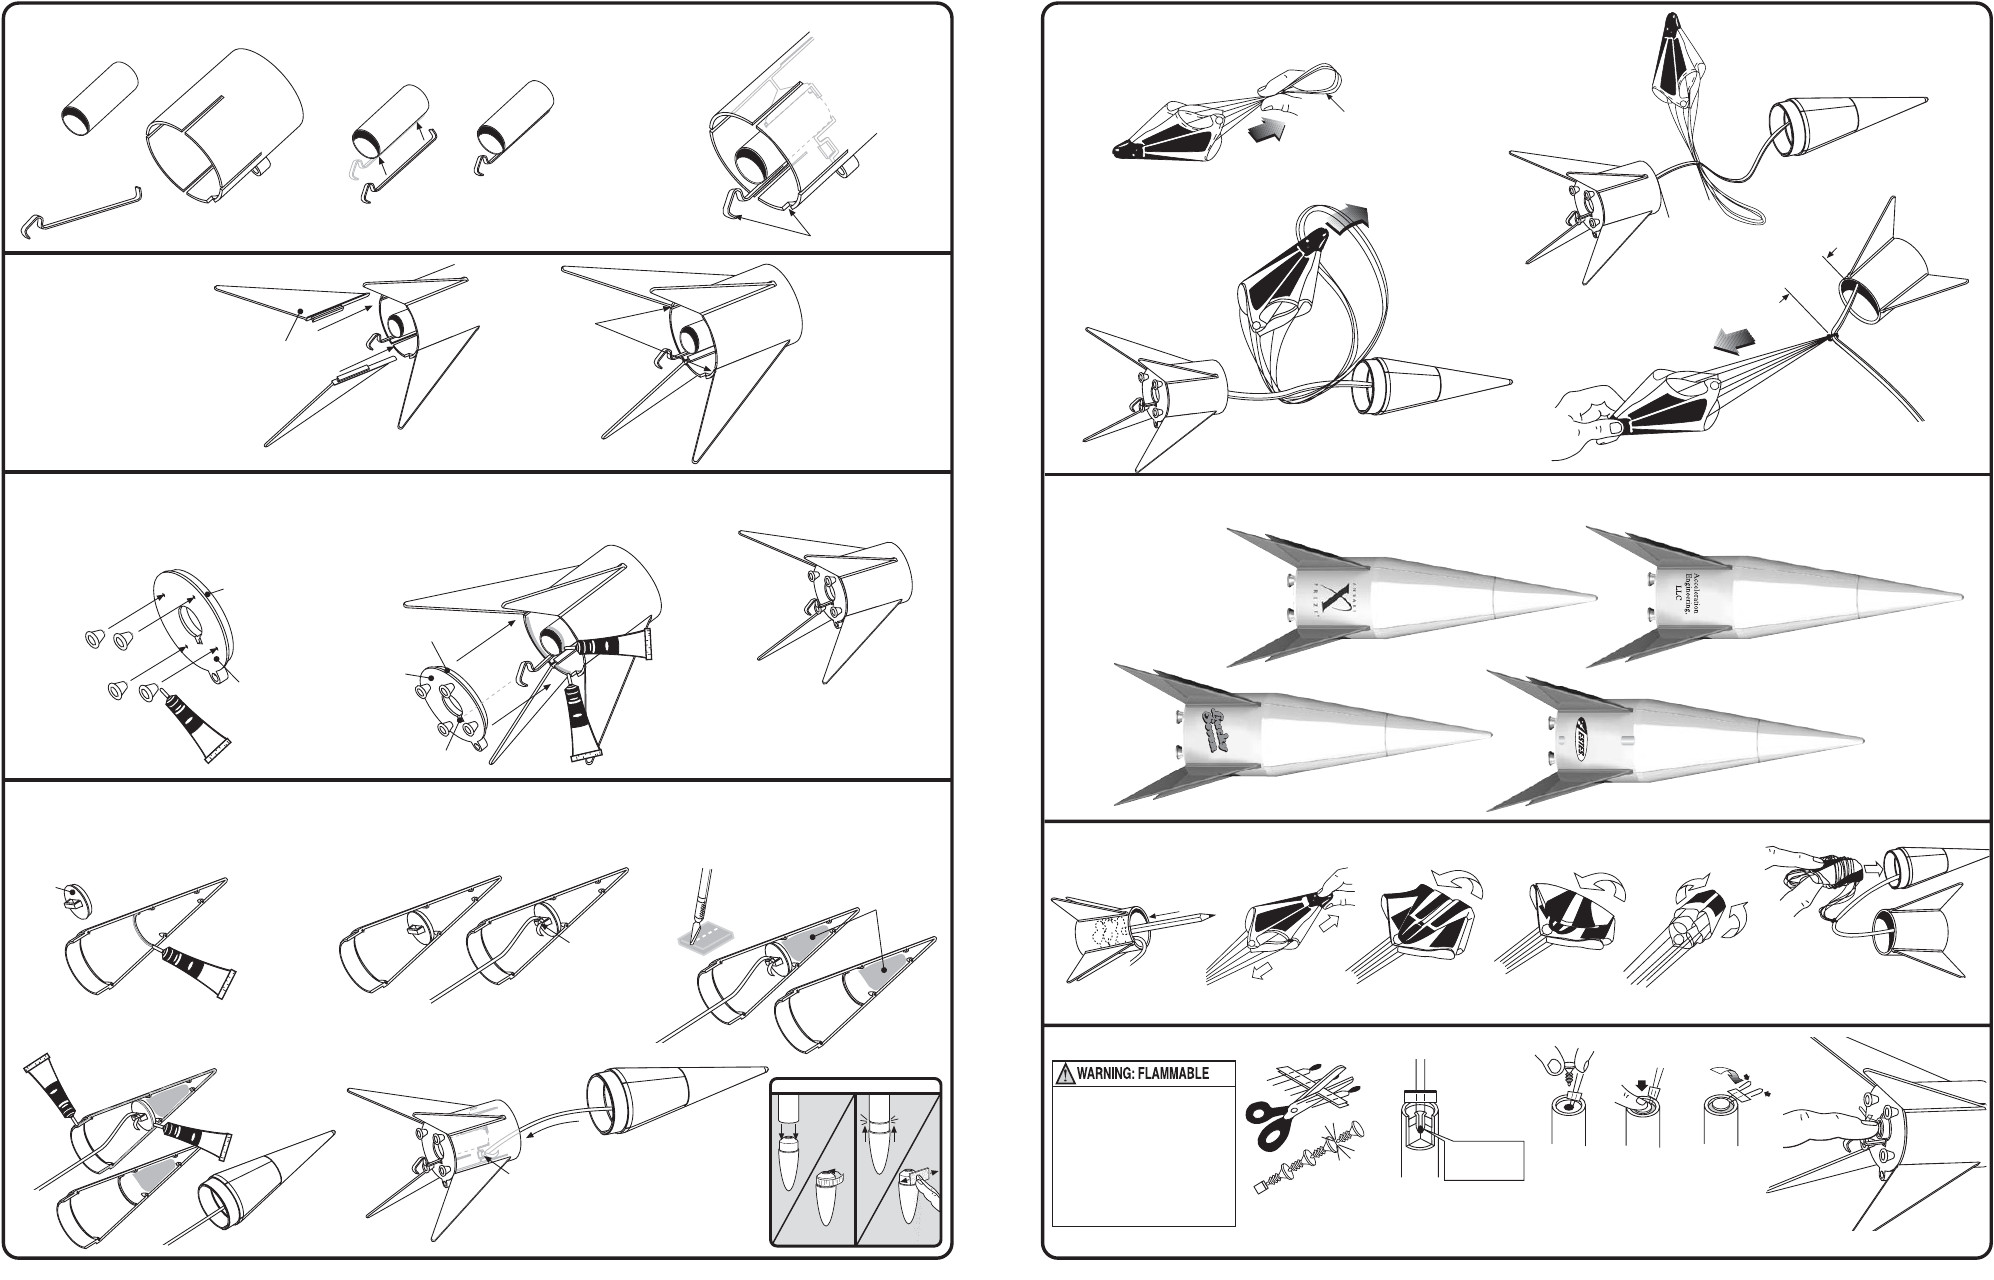
Install engine mount, Assemble base, Install fins – Estes 0807 - Lucky Seven User Manual
Page 2: Assemble nose cone & attach shock cord, Apply decals, Rocket preflight, Attach parachute, E. f, D. c. a. c
HELPFUL HINT: IF NOSE CONE/COUPLER FIT IS. . .
TOO
TIGHT
TOO
LOOSE
ADD
MASKING TAPE.
SAND FOR FIT.
1.
INSTALL ENGINE MOUNT
page 2
A.
Hold Engine Hook against
Engine Mount Tube.
B.
Insert Engine Mount and
Engine Hook into Body.
3.
ASSEMBLE BASE
2.
INSTALL FINS
4.
ASSEMBLE NOSE CONE & ATTACH SHOCK CORD
6.
APPLY DECALS
page 3
ENGINE
MOUNT
TUBE
MINI
ENGINE
HOOK
BODY
A.
Insert one Fin into each slot on
Body. Slide in until end of Fin is
Flush with rear of Body.
FIN
BODY
BASE
RIDGE
FLAT
SIDE
A.
Apply tube type plastic cement to tab
on Nozzle. Insert into hole in flat side
of Base. Let Dry. Repeat for remaining
Nozzles.
B.
Apply tube type plastic cement to inside
ridge of Body. Apply cement around
outside edge of motor tube. Align
Engine Hook with slot and insert Base
into Body. Let Dry.
PLASTIC
CEMENT
COMPLETED
ASSEMBLY
A.
Apply tube type plastic cement to bulkhead of
one half of Nose Cone. Install Cap. Let Dry.
CAP
B.
Insert Shock Cord through eyelet on
Cap. Tie with double knot.
Peel decals one at a time from
backing sheet and apply
where shown. Rub down to
remove bubbles.
DOUBLE
KNOT
ENGINE HOOK
ALIGNS WITH NOTCH
P
L
A
S
T
IC
C
E
M
E
N
T
B.
TIP MUST TOUCH
PROPELLANT.
ROCKET PREFLIGHT
E.
F.
Insert Engine into rocket.
D.
C.
A.
C.
Fold.
E.
Roll.
F.
Wrap lines loosely, insert
Parachute and Shock Cord
into Nose Cone.
A.
Insert 2 - 3 loosely crumpled squares
of Recovery Wadding.
B.
Spike.
NOTE: Only Estes wadding
(#302274) recommended.
To avoid serious injury,
read instructions & NAR
Safety Code included with
engines.
PREPARE YOUR ENGINE
ONLY WHEN YOU ARE
OUTSIDE AT THE LAUNCH
SITE PREPARING TO LAUNCH!
If you do not use your prepared
engine, remove the igniter before
storing your engine.
FLAT
SIDE
BASE
RIDGE
SLOT
NOTE: Do not get glue inside
Engine Mount Tube.
IGNITER MUST
TOUCH
PROPELLANT
D.
Fold Again.
FLUSH
PLASTIC
CEMENT
PLAS
TIC
CEM
ENT
C.
Cut clay weight in half. Press each
half into cavity of Nose Cone halves.
CLAY
WEIGHT
D.
Apply tube type plastic cement to
edges of Nose Cone and press
together. Let Dry.
COMPLETED
NOSE CONE
E.
Attach Shock Cord to Base.
Pass through eyelet and tie
with double knot.
PLASTICC
EMENT
DOUBLE
KNOT
PLASTIC
CEM
ENT
5.
ATTACH PARACHUTE
LOOP
A.
Form loop with shroud lines.
B.
Lay shock cord over loop
about 1 1/2” (3.8 cm)
from Base.
C.
Pass ‘chute through
loop.
D.
Pull tight.
1 1/2"
(3.8 cm)
1 1/2"
(3.8 cm)