Owner’s manual, W arning, Model stinger r34 soft air rifle 6 mm plastic bb – Crosman SASR34 User Manual
Page 2
Model Stinger R34
Soft
Air Rifle
6 mm Plastic BB
OWNER’S MANUAL
READ ALL INSTRUCTIONS A N D WARNINGS IN THIS
M A N U A L BEFORE USING THIS SOFT AIR GUN
Instructions in Spanish included on reverse side.
Distributed by
Crosman Corporation
Routes 5 & 20,
East Bloomfield, NY 14443
w w w.crosman.com
1-800-7AIRGUN
SASR34-515
YOU AND OTHERS WITH YOU SHOULD A LW AYS WEAR SHOOTING GLASSES TO PROTECT YOUR EYES.
READ ALL INSTRUCTIONS BEFORE USING.
BUYER AND USER HAVE THE DUTY TO OBEY ALL LAWS ABOUT THE USE AND OWNERSHIP OF THIS SOFT AIR GUN.
Please read this owner’s manual completely. Remember to treat this soft air gun with the same
respect you would a firearm. Always carefully follow the safety instructions found in this owner’s
manual and keep this manual in a safe place for future use.
If you have any questions regarding your new soft air gun, please contact Crosman Customer
Service at: 1-800-724-7486, 585-657-6161 or www.crosman.com.
THIS SOFT AIR GUN IS INTENDED FOR USE BY THOSE 16 YEARS OF AGE OR OLDER.
W ARNING:
This is not a toy.
Adult supervision required. Misuse or careless use
may cause serious injury, particularly to the eye. May be dangerous up to 100 yards
(91.44 meters).
7. Aiming and Firing Safely
You and others with you should always wear shooting glasses to
protect your eyes.
Always point your soft air gun in a SAFE DIRECTION.
Do not shoot at hard surfaces or at the surface of water.
The
plastic BBs may bounce off or ricochet and hit someone or
something you had not intended to hit. If the plastic BBs should
happen to hit a hard surface, DO NOT re-use those plastic BBs
because they could possibly cause damage to your soft air gun.
Your soft air gun is designed for target shooting and is suited for
both indoor and outdoor use. Always remember to place your
target carefully.
THINK about what you will hit if you miss the
target.
The soft air gun is correctly aimed when the front sight blade is positioned exactly in the center of
the rear peep sight. The bulls-eye should appear to rest on the top of the front sight. (Fig. 8)
When you are sure of your target and backstop, and the area around the target is clear,
take the
soft air gun "OFF SAFE" (See Section 2.2) and pull the trigger to fire.
To use the Electronic Red Cross Sight
To use the accessory electronic sight, turn the sight on using the large dial on top of the sight and
turning clockwise. Aim the red cross at the center of your target.
To turn the electronic sight off, turn the dial counterclockwise.
8. Maintaining Your Soft
Air Gun
DO NOT MODIFY OR ALTER YOUR SOFT AIR GUN. Tampering
with the soft air gun or attempts to change the soft air gun in any
way may make it unsafe to use and will void the warranty.
If you drop your soft air gun, visually check to see that it works
properly before you use it again. If anything seems changed, like a
shorter or weaker trigger pull, this may mean parts are worn out or
broken. Call Customer Service at Crosman for assistance before
using your soft air gun again.
9. Reviewing Safety
Do not ever point the soft air gun at any person. Do not ever point the soft air gun at anything you
do not intend to shoot.
Always treat the soft air gun as though it is loaded and with the same respect you would a firearm.
Always aim in a SAFE DIRECTION. Always keep the muzzle of the soft air gun pointed in a SAFE
DIRECTION.
Always keep the soft air gun "ON SAFE" until you are ready to shoot in a SAFE DIRECTION.
Always check to see if the soft air gun is "ON SAFE" and unloaded when getting it from another
person or from storage.
Always keep your finger off the trigger and out of the trigger guard until ready to shoot.
You and others with you should always wear shooting glasses to protect your eyes.
If your reading or prescription glasses are not safety glasses, make sure you wear shooting
glasses over your regular glasses.
Use 6 mm plastic BBs only.
Do not shoot at hard surfaces or at the surface of water.
The plastic BBs may bounce off or
ricochet and hit someone or something you had not intended to hit. If the plastic BBs should
happen to hit a hard surface, do not reuse those plastic BBs because they could cause possible
damage to your soft air gun.
Replace the backstop if it becomes worn. Place the backstop in a location that will be safe should
the backstop fail.
Do not attempt to disassemble or tamper with your soft air gun. Call Customer Service at Crosman
Corporation for repair. Using unauthorized repair centers or modifying the function for your soft air
gun in any way may be unsafe and will void your warranty.
Do not put the soft air gun away loaded. Make sure ALL of the plastic BBs are unloaded from the
soft air gun.
Always store this soft air gun in a secure location.
SPECIFICATIONS
•
LED Flashlight takes three 1.5V (A613) button cell lithium batteries.
P E R F O R M A N C E : Many factors can affect velocity, including brand of projectile, type of projectile and
barrel condition.
Mechanism/Action
Spring Air Repeater
Caliber/Ammunition
6mm plastic BBs
Magazine
Up to 18 BBs
W eight
4.5 lbs (2.04 kg)
Overall Length
23.75 inches to 33.5
inches (60.33 cm to
85.09 cm)
Sights
Front: Blade
Rear: Peep
Accessory Sight:
Electronic Red Cross
Sight
Barrel Length
4.37 inches (11.1 cm)
Barrel Material
Precision aluminum
Safety
Lever
Velocity
Up to 300 fps (91.44 m/s)
R E PAIR SERVICE
If your soft air gun needs repair, we recommend that you call Crosman Corporation Customer service at 1-800-
724-7486 or 585-657-6161. (International customers should contact their distributor.) DO NOT AT T E M P T TO
DISASSEMBLE IT! Your soft air gun requires special tools and fixtures to repair it. If you take it apart you
probably will not be able to reassemble it correctly. Crosman assumes no warranty responsibility under such
circumstances.
LIMITED 30 DAY W A R R A N T Y
This product is warranted to the retail consumer for 30 days from date of retail purchase against defects in
material and workmanship and is transferable.
W H AT IS COVERED
Replacement parts and labor.
Transportation charges to consumer for repaired product.
W H AT IS NOT COVERED
Transportation charges to Crosman for defective product. Damages caused by abuse, modification or failure to
perform normal maintenance - see step 7.
Any other expense. CONSEQUENTIAL DAMAGES, INCIDENTAL
DAMAGES, OR INCIDENTAL EXPENSES, INCLUDING DAMAGE TO PROPERTY. SOME STATES DO NOT
ALLOW THE EXCLUSION OR LIMITATION OF INCIDENTAL OR CONSEQUENTIAL DAMAGES, SO T H E
ABOVE LIMITATION OR EXCLUSION MAY N O T APPLY TO YOU.
W A R R A N T Y CLAIMS
U S A Customers: Attach your name, address, description of problem, phone number and copy of sales receipt to
product. Package and return to Crosman Corporation, Rts. 5 & 20, E. Bloomfield, NY 14443.
Canadian Customers: Follow packaging procedures above and send to Crosman Parts & Service Depot, 611
Neal Drive, Peterborough, Ontario, K9J 6X7 Canada.
International Customers: Please return product to your nearest distributor. If you do not know your distributor,
please call 585-657-6161 and ask for our International Department for assistance.
IMPLIED WARRANTIES
A N Y IMPLIED WARRANTIES, INCLUDING THE IMPLIED WARRANTIES OF MERCHANTABILITY A N D
FITNESS FOR A PA RTICULAR PURPOSE, ARE LIMITED IN DURATION TO 30 DAYS FROM DATE OF
R E TAIL PURCHASE. SOME STATES DO NOT ALLOW LIMITATIONS ON HOW LONG AN IMPLIED
W A R R A N T Y LASTS, SO THE ABOVE LIMITATIONS MAY N O T APPLY TO YOU.
To the extent any provision of this warranty is prohibited by federal, state, or municipal law which cannot be
preempted, it shall not be applicable. This warranty gives you specific legal rights, and you may also have other
rights which vary from state to state.
CROSMAN is a registered trademark of Crosman Corporation in the United States.
1. Learning the Parts of
Your New Soft
Air Gun.
Learning the names of the
parts of your new soft air
gun will help you to
understand your owner’s
manual. Use this manual to
increase your enjoyment of
this soft air gun.
2. Operating the Safety
2.1. To Put the Soft
Air
Gun "ON SAFE":
Locate the safety on the left side of the receiver.
(Fig.
2)
Push lever all the way up to the right side so that the lever is
pointing to the word "SAFE".
Like all mechanical devices, a soft air gun safety can fail. Even when
the safety is "ON SAFE", you should continue to handle the soft air
gun safely. NEVER point the soft air gun at any person. NEVER
point the soft air gun at anything you do not intend to shoot.
2.2 To Take the Soft
Air Gun "OFF SAFE":
Locate the safety on the left side of the receiver.
(Fig.
2)
Push the lever all the way up to the left so that the lever is pointing to the word "AUTO" or put it on
the vertical position pointing to the word "SEMI".
The soft air gun is "OFF SAFE" and ready to fire when pointing to either of these words.
NOTE- This soft air gun does not shoot automatically.
The words "Auto" and "Semi" do not
indicate the different modes of firing.
3. Installing, adjusting and removing the stock
Before installing, adjusting or removing accessories; make
sure your gun is "ON SAFE", (see section 2.1) and pointed in
a SAFE DIRECTION.
3.1 Installing the stock
Line stock up with grooves at the back of the rifle. (Fig. 3)
W ith the stock in this position push the stock down until it
locks into place.
3.2 Adjusting the stock
After installing the stock, you may open or extend the
stock to one of two different lengths.
Push up on the stock adjustment lever and pull the stock back one or two clicks to the desired
length.
3. 3 Removing the stock
Make sure the soft air gun is "ON SAFE." (See Section 2.1)
Point the soft air gun in a SAFE DIRECTION.
Make sure the stock is in one of the open positions. (see section 3.2)
Pull back the stock release button.
Push the stock upward until it has cleared the soft air gun.
4. Installing, adjusting and removing other accessories
4.1 Installing and adjusting the foregrip
While holding the button on the side of the foregrip down, line the foregrip up with the bottom rail
so that the Foregrip Release Button is facing the rear of the gun.
Continue holding the button down, while sliding the foregrip back to the desired position.
4.2 Removing the foregrip
Hold the button on the side of the foregrip down.
Continue holding the Foregrip Release Button down, while sliding the foregrip forward until it clears
the rail.
4.3 Installing and using the accessory flashlight
Loosen the mounting screw on the flashlight.
Place flashlight on a rail in desired position.
Tighten mounting screw.
To turn flashlight on or off, push the button on the back of the flashlight.
Fig 1
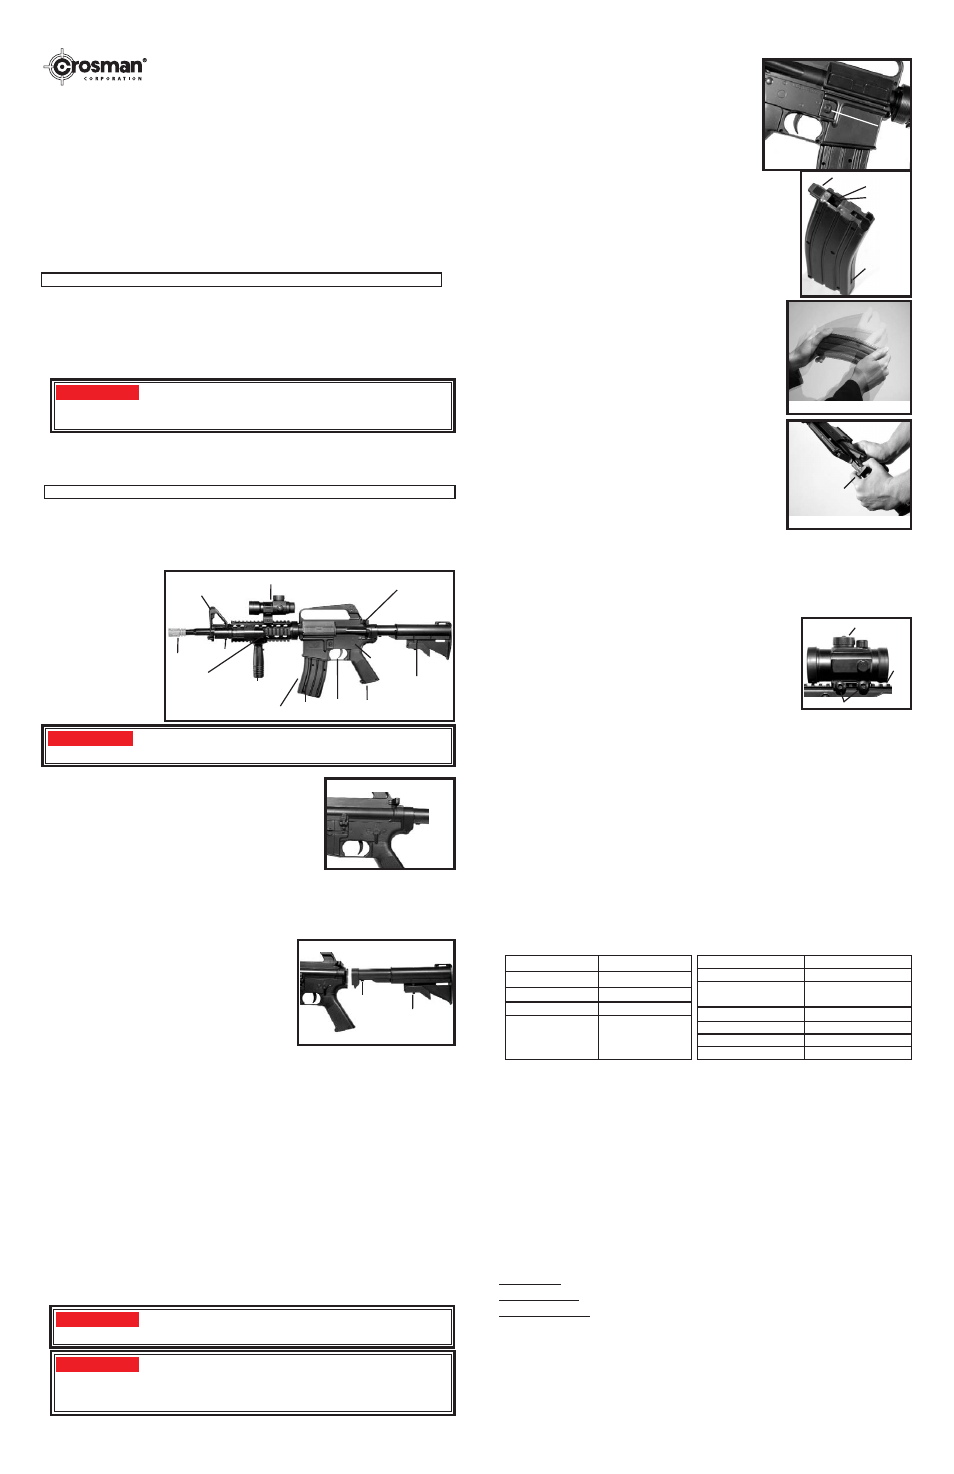
5. Loading and Unloading Plastic BBs
5.1 Loading Plastic BBs
Make sure the soft air gun is "ON SAFE." (See Step 2.1)
Point the soft air gun in a SAFE DIRECTION.
Locate and push the clip release button on the right side of
your soft air gun which is located above the trigger.
(Fig.
4)
Locate the BB guide on the front of the clip. Pull down and
to the right until it locks into place. (Fig. 5)
Holding the clip upright, open the reservoir door on the top of
the clip by sliding the door out.
Fill the clip reservoir with up to 400 BBs and slide the door closed.
Holding the clip horizontally as shown (Fig.6) shake the clip
until 18 BBs feed into the magazine.
Release the BB guide by pushing the spring to the left and
slowly releasing.
Insert the loaded clip back into the soft air gun until you hear it click,
indicating that the clip is securely locked into place.
5.2 Unloading Plastic BBs
Make sure the soft air gun is "ON SAFE." (See Step 2.1)
Point the soft air gun in a SAFE DIRECTION.
Locate and push the clip release button on the right side of your soft
air gun located above the trigger.
(Fig.
4)
Locate the BB guide on the front of the clip. Pull down and to the
right until it locks into place. (Fig. 5)
Holding the clip upright, open the reservoir door on the top of the clip
by sliding the door out.
Pour the soft air BBs out of the reservoir into a container or your
hand.
Pull back on the tab in the slot on top of the magazine.
Note: Plastic BBs will unload rapidly.
Before replacing the magazine, shake the soft air gun to release
any plastic BBs which may have fallen out of the magazine into
the soft air gun.
6. Cocking the gun
Make sure the soft air gun is "ON SAFE." (See Step 2.1)
Point the soft air gun in a SAFE DIRECTION.
Make sure the magazine is loaded and installed in the gun.
Locate the cocking handle at the back of the soft air gun.
Pull the handle back until it clicks. (Fig. 6)
Release the handle.
The soft air gun is now cocked and ready to fire.
NOTE: You must cock the soft air gun before each and every
shot.
W ARNING:
Use 6 m m BBs only in this soft air gun. Use of any other ammunition
can cause injury to you or damage to the soft air gun.
W ARNING:
Keep the soft air gun in the "ON SAFE" position until you are actually
ready to shoot. Then turn the safety to the "OFF SAFE" position.
W ARNING:
Never assume that because the soft air gun no longer fires a BB
and/or the magazine is removed from the grip frame, that a BB is not lodged in the
barrel. Always treat the soft air gun as though it is loaded and with the same respect
you would a firearm.
Fig 2
Fig 4
Fig 5
Fig 8
Safe for ON SAFE
Muzzle
Safety
Trigger
Magazine
Clip
Electronic red cross sight
Four-sided rails
Front
sight
Cocking
handle
Stock
Auto or Semi
for OFF
Clip
release
button
Door
On/Off
Mounting Screws
Grip
Fig 3
Stock
release
button
Push here to
extend stock
Fig 6
Tip & shake to load
Fig 7
Pull back to cock
Bolt
Rail
Foregrip