Crosman 40005 User Manual
Owner’s manual, 1911 semi- automatic bb repeater co, Air pistol
1911
Semi- Automatic BB Repeater CO
2
Air Pistol
OWNER’S MANUAL
READ ALL INSTRUCTIONS AND WARNINGS IN THIS MANUAL BEFORE USING THIS AIRGUN
Crosman Corporation
7629 Routes 5 & 20
Bloomfield, NY 14469
www.crosman.com
1-800-724-7486 1911BB-515
READ AND UNDERSTAND THIS ENTIRE MANUAL BEFORE USING THIS AIRGUN! AND REMEMBER, THIS AIRGUN IS NOT A TOY. TREAT IT WITH THE SAME RESPECT YOU WOULD
A FIREARM.
NOT A TOY. ADULT SUPERVISION REQUIRED. MISUSE OR CARELESS USE MAY RESULT IN SERIOUS INJURY OR DEATH. DANGEROUS
WITHIN 450 YARDS (411 METERS).
YOU AND OTHERS WITH YOU SHOULD ALWAYS WEAR SHOOTING GLASSES TO PROTECT YOUR EYES.
BUYER AND USER HAVE THE DUTY TO OBEY ALL LAWS REGARDING THE USE AND OWNERSHIP OF THIS AIRGUN.
DO NOT BRANDISH OR DISPLAY THIS AIRGUN IN PUBLIC – IT MAY CONfUSE PEOPLE AND MAY BE A CRIME. POLICE AND OTHERS
MAY THINk IT IS A fIREARM. DO NOT CHANGE THE COLORATION AND MARkINGS TO MAkE IT LOOk MORE LIkE A fIREARM. THAT IS DANGEROUS AND MAY
BE A CRIME.
THIS PRODUCT CONTAINS LEAD, A CHEMICAL kNOWN TO THE STATE Of CALIfORNIA TO CAUSE CANCER AND BIRTH DEfECTS (OR
OTHER REPRODUCTIVE HARM.)
If you have any questions regarding your airgun, please contact Crosman at 1-800-724-7486, 585-657-6161 or www.crosman.com.
1. Safety First
•
ALWAYS treat the airgun as though it is loaded and ready to fire and with the same respect you would a firearm.
•
ALWAYS store the airgun unloaded.
•
ALWAYS store the airgun away from children.
•
ALWAYS aim in a SAFE DIRECTION – DO NOT point the airgun at any person or at anything you do not intend to shoot.
•
ALWAYS keep the muzzle of the airgun pointed in a SAFE DIRECTION.
•
ALWAYS keep your finger off the trigger and out of the trigger guard until ready to shoot.
•
ALWAYS keep the airgun “ON SAFE” until you are ready to shoot (see section 3A).
•
ALWAYS check to see if the airgun is “ON SAFE” (see section 3A) and unloaded when getting it from another person.
•
ALWAYS have you and others wear shooting glasses to protect your eyes.
•
ALWAYS wear shooting glasses over eye glasses if your reading or prescription glasses are not safety glasses.
•
ALWAYS place the backstop in a location that will be safe should the backstop fail.
•
ALWAYS check your backstop for wear before and after each use. All backstops are subject to wear and will eventually fail. Replace your backstop if
the surface is worn or damaged, or if a ricochet occurs.
•
ALWAYS use the proper size BB in your airgun. Check the markings on your airgun to verify the BB size.
•
NEVER reuse ammunition.
•
NEVER shoot at hard surfaces or at the surface of water. The BB may bounce off or ricochet and hit someone or something you had not intended
to hit.
•
NEVER attempt to disassemble or tamper with your airgun.
•
Use an Authorized Service Station, using unauthorized service or repair centers, or modifying the function of your airgun in any way, may be
unsafe and will void your warranty.
•
NEVER point the airgun at any person or at anything you do not intend to shoot.
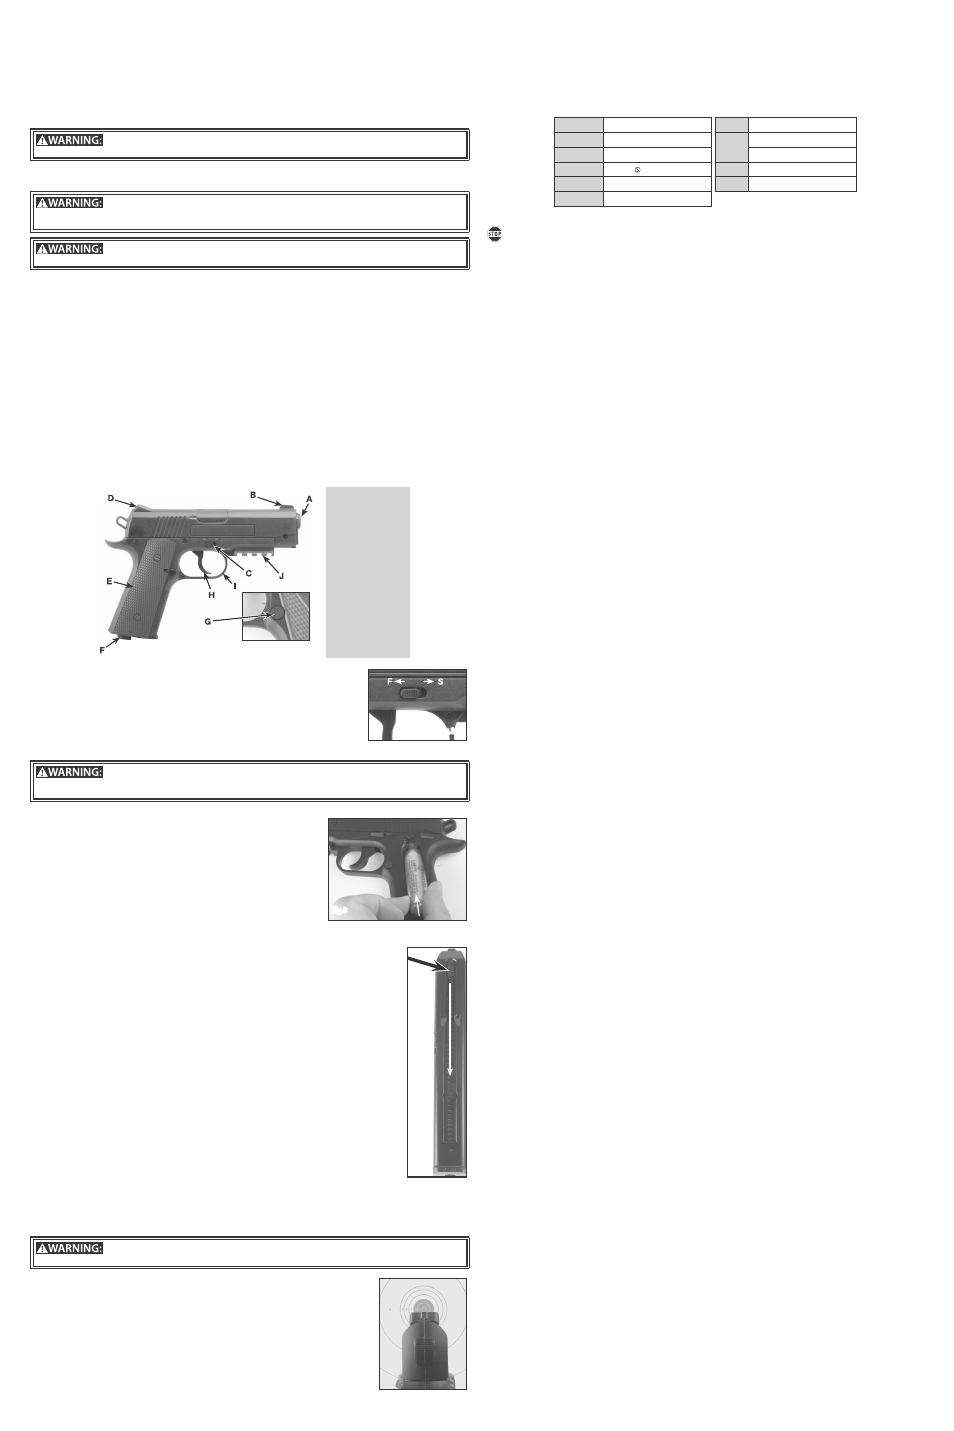
2. Learning the Parts of Your New Airgun
Learning the names of the parts of your airgun will help you understand your owner’s manual.
A. Muzzle
B. front Sight
C. Safety
D. Rear Sight
E. Grip Cover
F. Piercing wing
G. Magazine Release Button
H. Trigger
I. Trigger Guard
J. Accessory Rail
3. Operating the Safety
A. To Put the Airgun “ON SAFE:”
1.
Push the safety in and slide all the way toward the “S” for “ON SAfE” (fig. 2). The safety is not “ON SAfE” unless it is pushed
all the way forward.
Like all mechanical devices, an airgun safety can fail. Even when the safety is “ON SAfE”, you should continue to handle the airgun as if it is
“Off SAfE” or fIRE.
NEVER
point the airgun at any person.
NEVER
point the airgun at anything you do not intend to shoot.
B. Take the Airgun “OFF SAFE”
1.
Push the safety in and slide all the way back toward the “f” for fIRE or “Off SAfE.” When the Safety button on the right side
of the airgun is all the way back, it is “Off SAfE” and can be fired.
4. Installing and Removing the CO
2
Cartridge
A. Installing a New CO
2
Cartridge
kEEP HANDS AWAY fROM ESCAPING CO
2
GAS. ESCAPING CO
2
GAS CAN CAUSE fROSTBITE If ALLOWED TO COME IN CONTACT
WITH SkIN. ALWAYS MAkE SURE THE CO
2
CARTRIDGE IS EMPTY BEfORE ATTEMPTING TO REMOVE IT fROM THE AIRGUN BY SLOWLY TURNING THE WING
COUNTER-CLOCkWISE ALL THE WAY UNTIL YOU NO LONGER HEAR THE ESCAPE Of CO
2
GAS.
CAUTION:
We recommend the use of CROSMAN
®
POWERLET
®
CO
2
cartridges. They are made to fit your airgun. Other brands of CO
2
cartridges may not fit properly may result in injury to
you or damage to your airgun. Do not store your airgun with a CO
2
cartridge in it.
1.
Put the airgun “ON SAfE” (see Section 3A).
2.
Make sure the airgun is UNLOADED and POINTED IN A SAfE DIRECTION.
3.
With your hand under the magazine, push the magazine release button (I) to remove the magazine
4.
Remove the grip cover (E) from the left side of the airgun by lifting it at the indentation on the bottom
of the grip.
5.
Turn the piercing wing (f) counter-clockwise, to allow clearance for the CO
2
cartridge.
6.
Put 1 drop of Crosman 0241 Pellgunoil
®
on the tip of every CO
2
cylinder in order to properly maintain
your airgun.
7.
Insert a new CO
2
cartridge into the airgun, small neck first, pointing toward the piercing assembly
(fig. 3).
8.
Snap the grip covers back into place.
9.
With your thumb and finger, turn the piercing wing (f) clockwise until tight to pierce the CO
2
cartridge. If
you hear a hissing sound when piercing the cartridge, try tightening the screw slightly more. Never use
any tool on the piercing wing. Over-tightening the CO
2
can cause injury to you or damage to your airgun.
10.
Release the piercing wing (f) up and snap the grip covers back into place.
11.
Point the airgun in a SAfE DIRECTION, take “Off SAfE” (See Step 3B) and pull the trigger. If the airgun does not make a popping noise after
pulling the trigger, the CO
2
is not being discharged. In that even tighten the piercing wing a little more, point the airgun in a SAfE DIREC-
TION and pull the trigger until there is a popping noise, which will mean the airgun is releasing CO
2
with each pull of the trigger.
NOTE:
We recommend the use of CROSMAN
®
POWERLET
®
CO
2
cartridges. They are made to fit your airgun. Other brands of CO
2
cartridges may not fit properly.
NEVER try to force any CO
2
cartridge into or out of place.
Do not store your airgun with a CO
2
cartridge in it. (This is very important to remember, as it will prolong the longevity of your airgun seals.) (See Steps 4A
& 4B).
B. Removing the CO
2
Cartridge
1.
Put the airgun “ON SAfE” (See Step 3A).
2.
With your hand under the magazine, push the magazine release button (H) to remove the magazine.
3.
Point the airgun in a SAfE DIRECTION.
4.
Slowly turn the piercing wing (f) counter clockwise, to release any remaining CO
2
being careful not to come in contact with the escap-
ing gas.
5.
Remove the left grip cover (E).
6.
Tip out the empty cartridge. It may be cold to the touch.
5. Loading and Unloading Steel BBs
A. Loading Steel BBs
1.
Make sure the airgun is “ON SAfE” (See Step 3A) and pointed in a SAfE DIRECTION.
2.
With your hand under the magazine, push the magazine release button (H) to remove the magazine.
3.
Pull down the BB follower tab (fig. 4) to the bottom. Tab will lock in place.
4.
Insert up to 20 steel BBs into the BB loading hole on the front of the magazine.
5.
Place a finger over the end of the magazine to prevent the BBs from exiting.
6.
With your finger over the end and the magazine pointed in a safe direction, release the BB follower tab by pushing tab at bottom
of magazine.
NOTE:
Releasing the BB follower tab quickly, or without the end covered, could allow BBs to exit the magazine.
7.
Insert the loaded magazine into the airgun
8.
After reading the entire manual, including the section on reviewing safety procedures, your airgun is now loaded and ready to aim and fire.
B. Unloading Steel BBs
1.
Make sure the airgun is “ON SAfE” (See Step 3A) and pointed in a SAfE DIRECTION.
2.
With your hand under the magazine, push the Magazine Release Button (H) to remove the magazine.
3.
Pull and hold down the BB follower tab.
4.
Tip the magazine until all the BBs fall out of the hole.
5.
If a BB is still visible in the top of the magazine, push the BB out of the magazine using the follower tab.
6.
Aim the airgun in a SAfE DIRECTION; insert the magazine into gun, take it “Off SAfE” (See Step 2B) and fire.
7.
Repeat this procedure several times until you are sure you are no longer firing BBs and the gun is empty of BBs.
NOTE:
The airgun must be charged with CO
2
when following these steps but remember, do not store your airgun with a CO
2
cartridge in it.
EVEN THOUGH YOU GO THROUGH THE UNLOADING PROCEDURE, CONTINUE TO TREAT THE AIRGUN AS THOUGH IT WERE LOADED.
DO NOT POINT AT ANYTHING YOU DO NOT INTEND TO SHOOT.
6. Sighting the Gun
• The airgun is correctly aimed when the front sight blade is positioned in the notch of the rear sight. (fig. 5)
• The top of the front sight blade should be even with the top of the notch in the rear sight. The bulls-eye should appear to rest on the top
of the front sight.
• When you are sure of your target and backstop, and the area around the target is clear, take the airgun “Off SAfE” (see section 3B) and
pull the trigger to fire.
7. Maintaining Your Airgun
A. General
• Put 1 drop of Crosman 0241 Pellgunoil
®
on the tip of every CO
2
cylinder in order to properly maintain your airgun.
• DO NOT use petroleum distillate based oil or solvent and DO NOT over oil as this can cause damage to your airgun.
• DO NOT MODIfY OR ALTER YOUR AIRGUN. Attempts to modify the airgun in any way inconsistent with this manual may make your airgun
unsafe to use, cause serious injury or death, and will void the warranty.
• If you drop your airgun, visually inspect for damage before you use it again.
• If anything seems changed, like a shorter or weaker trigger pull, this may mean worn out or broken parts. Call Crosman customer service
for assistance before using your airgun again.
Fig. 2
Fig. 3
Fig. 4
Fig. 5
B. Clearing a Jam
• Never look down the barrel to see if a jam has been cleared.
• Make sure the airgun is ‘ON SAfE” and pointed in a SAfE DIRECTION.
• Remove the CO
2
cartridge (following section 4B)
• Remove magazine.
• Insert the tapered end of the cleaning rod (rod not included) into the barrel.
• CAREfULLY and slowly apply more pressure until you push the BB out of the breech.
• Reinstall the magazine and test gun.
• If you are not able to unjam your airgun by following the procedure above, take no further action. An authorized service station will unjam your airgun at no cost during the
warranty period.
SPECIFICATIONS
Mechanism
BB Repeater
Safety
Slide
Power Source
12 gram POWERLET CO
2
cartridge
Sights
Front:
fixed Blade
Caliber
BB cal. 4.5mm
Rear:
fixed Notch
Ammunition
Steel BB
Length
7.83 inches
Capacity
Up to 20 BB
Weight
.88 lb.
Velocity
Up to 480 fps
PERFORMANCE
Your airgun gun was designed to function best with CROSMAN
®
and BENJAMIN
®
branded ammunition. Use of other ammunition may cause your airgun to malfunction.
STOP! DO NOT RETURN THIS PRODUCT TO THE STORE.
Save on gas and avoid the trip back to the store. Our customer service representatives are here to help you. Contact us directly at 1-800-7AIRGUN (1-800-724-7486). You can also
get answers to frequently asked questions at www.crosman.com.
REPAIR SERVICE
If your airgun needs repair, take or send it to your nearest Crosman Authorized Service Station. DO NOT ATTEMPT TO DISASSEMBLE IT! Your airgun requires special tools and fixtures
to repair it. Any disassembly or modification not performed by an Authorized Service Station will void the warranty. (See www.crosman.com or call Crosman customer service at
800-724-7486 for list of stations).
SPECIAL CUSTOMER SERVICE
Crosman Authorized Service Stations will unjam your airgun at no cost during the warranty period.
LIMITED ONE YEAR WARRANTY
This product is warranted to the retail consumer for one year from date of retail purchase against defects in material and workmanship and is transferable. To register the serial number of
your airgun, please return the airgun registration form or register on line at www.crosman.com. The warranty is not conditioned on the return of the card. You should retain the original
sales receipt as record of date of purchase.
WHAT IS COVERED
Replacement parts and labor. Transportation charges to consumer for repaired product.
WHAT IS NOT COVERED
Transportation charges to Authorized Service Station for product. Damages caused by abuse, modification or failure to perform normal maintenance – see Owner’s Manual. Any other
expense. CONSEQUENTIAL DAMAGES, INCIDENTAL DAMAGES, OR INCIDENTAL EXPENSES INCLUDING DAMAGE TO PROPERTY. SOME STATES DO NOT ALLOW THE EXCLUSION OR LIMITATION Of
INCIDENTAL OR CONSEQUENTIAL DAMAGES SO THE ABOVE LIMITATION OR EXCLUSION MAY NOT APPLY TO YOU.
HOW TO OBTAIN WARRANTY PERFORMANCE
U.S. Customers-
Locate nearest service station (visit www.Crosman.com or call Crosman customer service at 800-724-7486 for list of stations). The service station will give you details
of how to proceed with sending the item in for repair. You must contact the station prior to shipping your product.
Canadian Customers-
Contact Gravel Agency, Quebec (866) 662-4869.
International Customers- Please return product to your nearest distributor. If you do not know your distributor, please call 585-657- 6161 and ask for our International Department
for assistance.
IMPLIED WARRANTIES
Any implied warranties including the implied warranties of merchantability and fitness for a particular purpose are limited in the duration to one year from the date of retail purchase.
Some states do not allow limitations on how long an implied warranty lasts so the above limitations may not apply to you. To the extent any provision of this warranty is prohibited by
federal, state or municipal law, which cannot be preempted, it shall not be applicable. This warranty gives you specific legal rights and you may also have other rights, which vary, from
state to state.
CROSMAN and BENJAMIN are trademarks of Crosman Corporation.