Using the safety, Cocking your crossbow, Learning the parts of your new crossbow – Crosman ABX340 User Manual
Page 2: Assembling your crossbow, Loading your crossbow, Warning
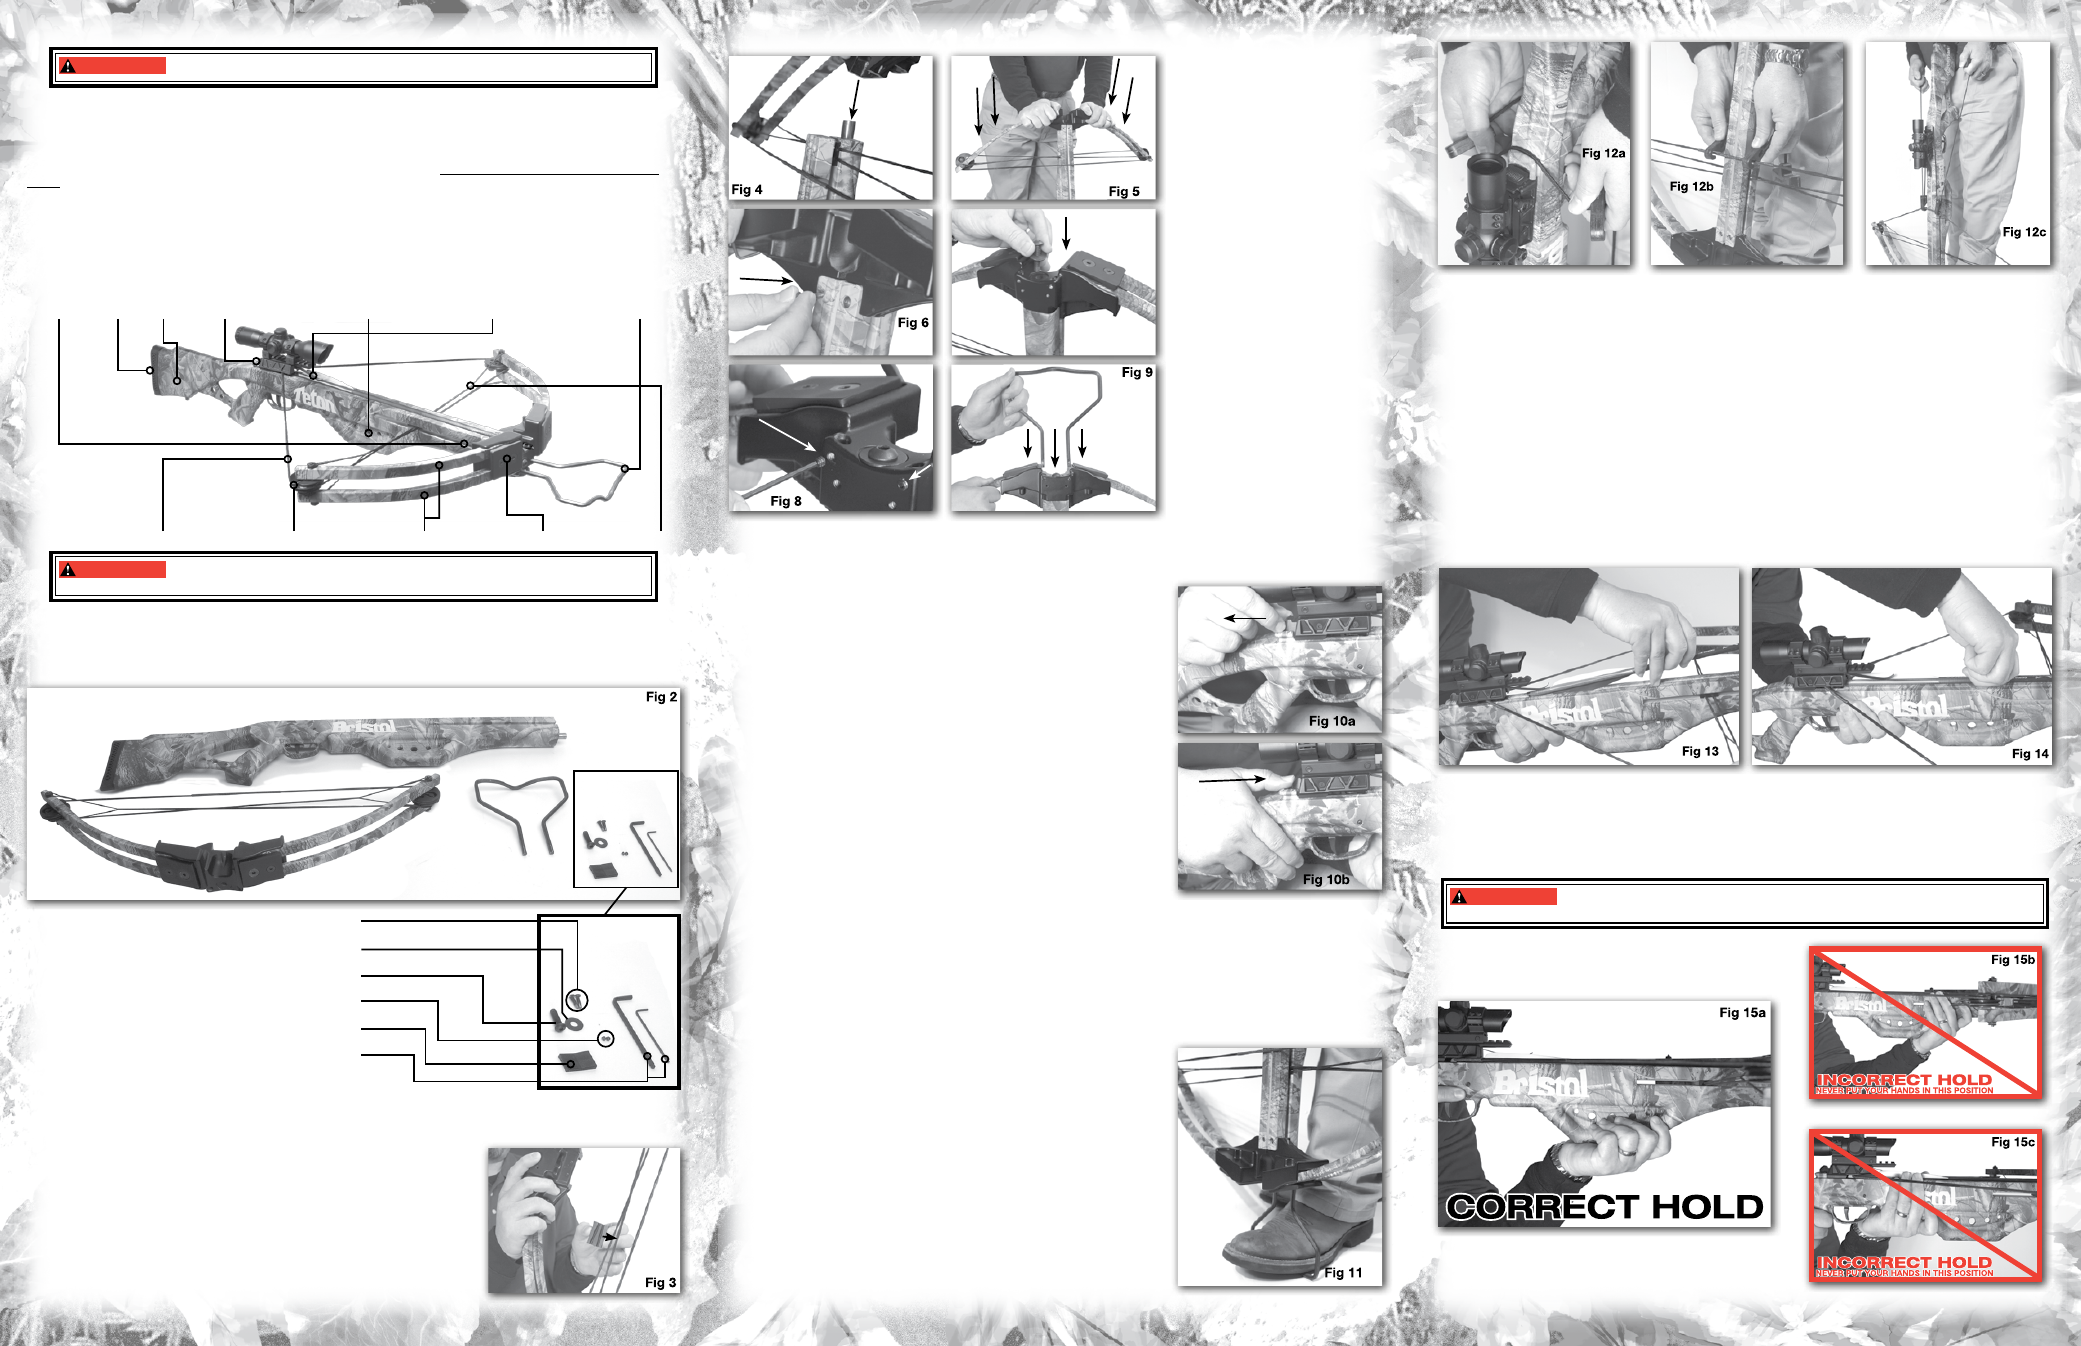
Insert the 2 smaller screws in to the
stock of the crossbow and tighten
with the 3/32 hex wrench. (fig. 6)
Place the large washer and large
button head screw into the hole in
the front end prod (fig. 7) and tighten
with the 3/16 hex wrench. NOTE:
Make sure that the screw is very
tight.
Place the 2 set screws into the
upper holes and turn 2-3 times just
until they are held in place. DO NOT
TIGHTEN. (fig. 8)
Insert the cocking stirrup as shown,
with the flats facing the set screws
and press the stirrup down into
position. (fig. 9)
Tighten the set screws.
Do not attempt to test the assembly
by dry firing. Dry firing can cause
serious injury to you and/or damage
to your bow.
Mount the CenterPoint optic in-
cluded with your bow following the
instructions provided with the optic.
3. USING THE SAFETY
A. To Put The Crossbow “On Safe”
• Always keep your crossbow pointed in a SAFE DIRECTION.
• Locate the safety on the back of the stock.
• Pull the safety back toward the butt of the stock (fig.10a ) covering
the red line.
• The safety is not engaged (“ON SAFE”) unless it is all the way back.
Like all mechanical devices, a crossbow safety can fail. Even when the safety
is “ON SAFE”, you should continue to handle the crossbow safely. NEVER point
the crossbow at any person. NEVER point the crossbow at anything you do not
intend to shoot.
B. To Take the Crossbow “OFF SAFE”
• Locate the safety on the back of the stock.
• Make sure your crossbow is pointed in a SAFE DIRECTION.
• Push the safety all the way forward exposing the red line (fig 10b).
• The safety is now disengaged (“OFF SAFE”).
• When you can see the red line near the safety, the crossbow is
“OFF SAFE” and can be fired.
4. COCKING YOUR CROSSBOW
DO NOT cock or load your crossbow unless you are in a safe area and in a posi-
tion to load and shoot safely
. Be sure you have the correct size arrows with
you. We recommend using only 20” crossbow arrows that are no lighter
than 400 total grains. ALWAYS identify your target and beyond prior to
shooting.
NOTE: TO COCK YOUR CROSSBOW, THE SAFETY MUST BE IN THE
“OFF SAFE” POSITION. AS YOU COCK THE CROSSBOW THE SAFETY
WILL ENGAGE TO THE “ON SAFE POSITION”.
Continue to handle the
crossbow safely. NEVER point the crossbow at any PERSON. NEVER point the
crossbow at anything you do not intend to shoot.
A. Using a Rope Cocking Device (included with The ABX320 and ABX340)
• Place the safety in the “OFF SAFE” position. The crossbow will not cock if the safety is in the “ON
SAFE” position.
• Pull the trigger to verify that it is ready to accept the string. If the trigger will not move, the safety is
“ON SAFE” and the crossbow cannot be cocked.
Never assume the safety is on. Always treat your
crossbow as if it is loaded.
• Place the cocking stirrup on the ground and place your foot
securely inside. (Fig 11)
• Place the rope cocking device (NOT INCLUDED IN MODEL HEX)
in the channel behind the trigger. (Fig 12a)
• Place the rope cocking device’s hooks around each side of the
stock. (Fig 12b)
• Reach over the stock and firmly grasp the rope cocking device’s
handles on each side. (Fig 12c)
• Pull the string back until it clicks into place.
• After drawing, relax your hand tension slightly to ensure the string
has been captured by the trigger latch. DO NOT LET GO OF THE
STRING COMPLETELY.
• If the string is not held securely, gently let the string down and repeat
the above steps. NOTE: The main string should click into place
and the safety should automatically engage. Never assume
the safety is on. Always treat your crossbow as if it is loaded.
• If the string does not move, the bow is cocked and ready to load –
you can completely let go of the string.
• Remove the cocking device.
WARNING:
Adult use only. Misuse or careless use may cause serious injury or death.
READ ALL INSTRUCTIONS AND WARNINGS IN THIS MANUAL BEFORE USING THIS CROSSBOW.
BUYER AND USER HAVE THE DUTY TO OBEY ALL LAWS ABOUT THE USE AND OWNERSHIP OF THIS
CROSSBOW.
YOU AND OTHERS WITH YOU SHOULD ALWAYS WEAR SHOOTING GLASSES TO PROTECT YOUR EYES.
If you have any questions about your new product or need some help,
Do not return your product to the
store before talking with us. There are two ways to get the answers to your questions. You can get lots of
product information on the Internet at www.centerpointhunting.com, OR If you’d like to talk with us directly, call
Centerpoint
®
Customer Service at 1-866-726-1122 and one of our friendly customer service representatives will
be glad to help you.
1. LEARNING THE PARTS OF YOUR NEW CROSSBOW
Learning the names of the parts of your crossbow will help you to understand your owner’s manual. Use this
manual to increase your enjoyment of this crossbow
Stock assembly
Travel Path Butt Stock
Safety (See Fig 10a) Foregrip
Arrow Retention Spring
Cocking Stirrup
Front End Prod
Main String
Wheel
Limbs
Riser
Cable
WARNING:
Keep your fingers and thumb below the travel path of the bow string and cables.
Failure to do so could result in serious injury.
2. ASSEMBLING YOUR CROSSBOW
Before heading out to shoot, you must first complete the assembly of your crossbow. First verify all the parts
are included. Remove the stock assembly, front end prod, and cocking stirrup from the carton. Open the
hardware packet consisting of
2 Small Screws
1 Large Washer
1 Large Button Head Screw
2 Set Screws
1 Cable Slide
2 Hex Wrenches (3/16 And 3/32)
We recommend that you are seated when you begin the assembly of the
bow.
Hold the stock between your knees with the trigger side away from your
body, and with the broad head scoop in the riser facing you .
Locate the cable slide in the hardware packet. Place the narrow end onto the
cables with the flat side facing the screw holes (fig 3). Slide the cable slide in
to the center of the bow.
Once the cable slide is centered, slide it into the cable channel (fig 4).
Stand up and firmly press the front end prod onto the stock (fig. 5).
B. Cocking by Hand
If you do not have a rope cocking device you can manually cock your crossbow.
• Place the safety in the “OFF SAFE” position. The crossbow will not cock if the safety is in the
“ON SAFE” position.
• Pull the trigger to verify that it is ready to accept the string. If the trigger will not move, the safety
is “ON SAFE” and the crossbow cannot be cocked. Never assume the safety is on. Always treat
your crossbow as if it is loaded.
• Place the cocking stirrup on the ground and place your foot securely inside.
• Bending at the waist reach over the stock and firmly grasp the rope on each side. Pull the string
back until it clicks into place.
• After drawing, relax your hand tension slightly to ensure the string has been captured by the trigger
latch. DO NOT LET GO OF THE STRING COMPLETELY.
• If the string is not held securely, gently let the string down and repeat the above steps. NOTE:
The main string should click into place and the safety should automatically engage. Never
assume the safety is on. Always treat your crossbow as if it is loaded.
• If the string does not move, the bow is cocked and ready to load –you can completely let go
of the string.
5. LOADING YOUR CROSSBOW
Never shoot any projectile in your crossbow except for arrows recommended by CenterPoint for your specific
crossbow.
Shooting other than recommended arrows could result in injury to you or damage to your crossbow.
• With your crossbow pointed in a SAFE DIRECTION, place the arrow so that the cocking vane
(the different colored vane), is down in the groove (fig 13).
• Slide the arrow back to the trigger assembly, under the arrow retention spring, until the arrow rests
fully on the string. (fig. 14)
• With the crossbow pointed down range, shoulder the crossbow, and place your hand on the stock
with your fingers and thumb positioned on the foregrip, below the travel path of the cables
and string. (fig 15a)
WARNING:
Keep your fingers and thumb below the travel path of the bow string and cables.
Failure to do so could result in serious injury.