Crosman B1500EPNP User Manual
Owner’s manual, Elite powermaster
ELITE POWERMASTER
Model B1500EP-NP
.177 cal Air Rifle
OWNER’S MANUAL
READ ALL INSTRUCTIONS AND WARNINGS IN THIS
MANUAL BEFORE USING THIS AIR GUN
Crosman Corporation
7629 Rts. 5 & 20
East Bloomfield, NY 14443 USA
800-7-AIRGUN
www.crosman.com
Made In P.R.C.
B1500EPNP-515
WARNING:
Not a toy. This airgun is recommended for adult use only. Misuse or care-
less use may cause serious injury or death. May be dangerous up to 650 yards (594 m).
WARNING:
Do not brandish or display this airgun in public—it may confuse people and
may be a crime. Police and others may think it is a firearm. Do not change the coloration and
markings to make it look more like a firearm. That is dangerous and may be a crime.
YOU AND OTHERS WITH YOU SHOULD ALWAYS WEAR SHOOTING GLASSES TO PROTECT YOUR EYES.
READ ALL INSTRUCTIONS BEFORE USING.
BUYER AND USER HAVE THE DUTY TO OBEY ALL LAWS ABOUT THE USE AND OWNERSHIP OF THIS AIRGUN.
THIS AIRGUN IS INTENDED FOR USE BY ADULTS ONLY
WARNING:
This product contains one or more chemicals known to the state of Califor-
nia to cause cancer and birth defects or other reproductive harm. Wash hands after handling
This airgun has been classified as an adult gun, and is recommended for adult use only.
Because it is considered to be a special-purpose airgun, it is exempt from specific types of
trigger pull, safety mechanisms and drop tests.
Read this owner’s manual completely. And remember that an airgun is not a toy. Always carefully follow the safety
instructions in this owner’s manual and keep the manual in a safe place for future use. If you have any questions
regarding the operation of your new airgun contact Crosman at 1-800-724-7486.
1. Learning the Parts of Your New Airgun.
Learning the parts of your new airgun helps you understand your owner’s manual. Use this manual to increase your
enjoyment of this airgun.
FRONT SIGHT
REAR SIGHT
SAFETY
TRIGGER
GRIP
BARREL
BUTT
STOCK
FOREARM
Break in Period
There may be up to a 100
shot break-in period. During
this period accuracy may be
inconsistent and your gun may
seem loud. This will improve as
the nitro piston breaks in.
2. Operating the Safety
A. To Put the Airgun “ON SAFE:”
Locate the safety in front of the trigger.
•
The letters “F” (fire) and “S” (safe) on the bottom of the trigger guard indicate the appropriate position of the safety (Fig
•
2).
Push the safety towards the trigger to put the safety on. The safety is on, and the airgun is “ON SAFE” when the lever is
•
in the rear position (near the trigger). (Fig. 2)
Even when the safety is on, you should continue to handle the airgun safely. Don’t point the gun at anything you
don’t intend to shoot.
Like all mechanical devices, an airgun safety can fail. Even when the safety is “ON SAFE”, you should continue to
handle the airgun safely. NEVER point the airgun at any person. NEVER point the airgun at anything you do not
intend to shoot.
B. To Take the Airgun “OFF SAFE”
WARNING:
Keep the airgun “ON SAFE” until you are actually ready to shoot. Then
push the safety to the “OFF SAFE” position.
Push the safety to the forward position (away from the trigger). When the airgun is “OFF SAFE” (Fig. 2) it is ready to be
•
fired after following the instructions in this manual on how to load.
3. Adjusting the Trigger
This airgun has a trigger with a screw for adjustment of the second
stage length (Fig. 3)
Note: This feature is added for advanced shooters. Most shooters can
use the settings provided during manufacturing of the gun and should
not need to make any modifications.
Make sure airgun is “ON SAFE”, unloaded and not cocked.
•
To reduce the second stage length, rotate the adjusting screw coun-
•
terclockwise.
To increase the second stage length, rotate the adjusting screw
•
clockwise.
4. Cocking and Loading Your Airgun
A. Cocking Your Airgun
WARNING:
Make sure you do not touch the trigger or push the safety to the “OFF
SAFE” position.
Do not cock your airgun until you are ready to load and fire, since the only way to un-cock your airgun is to fire it.
Firing your gun without a pellet in the chamber (dry firing) may cause damage to your airgun.
Put the airgun “ON SAFE” (SECTION 2).
•
Point the airgun in a SAFE DIRECTION.
•
Holding the gun close to your body, firmly tap the muzzle. (Fig. 4A)
•
Anchor gun against thigh and pull barrel down as far as it will go to engage the nitro piston. (Fig.4B)
•
Be careful not to pinch your hand or fingers in the hinge area of the airgun.
•
B. Loading Your Airgun
WARNING:
Make sure you do not pull the trigger while cocking the air rifle or with the
barrel in the down position. This may cause serious damage to the air rifle.
CAUTION: Use .177 caliber pellets only in your airgun. Never reuse ammunition. Your air gun was designed to work
with Crosman branded ammunition, these include Crosman
®
and Benjamin. Use of any other ammunition can cause
injury to you or damage to the airgun.
There may be up to a 100 shot break-in period. During this period accuracy may be inconsistent and your gun may
seem loud. This will improve as the nitro piston breaks in.
With the barrel in the open position, after it has been cocked, place one pellet, nose forward, into the breech (Fig. 5).
•
Make sure that the skirt of the pellet is flush with face of breech.
Move the barrel back to its original position by pushing the barrel up until it locks (Fig. 6).
•
Be sure that the barrel is locked in the closed position after loading/cocking to help ensure better accuracy.
•
Once again, be careful not to pinch your hands or fingers. Be sure the airgun is “ON SAFE” and pointed in a
safe direction.
WARNING:
Your air rifle is now loaded and ready to fire. Keep the air rifle “ON SAFE”
until you are ready to shoot. Do not point at anything you don’t intend to shoot.
C. Unloading Your Airgun
Do not cock and load your airgun until you are ready to shoot since the only way to un-cock your airgun is to fire it
in a safe direction. REMEMBER, choose your targets carefully and be sure that the area around the target is clear.
THINK what you will hit if you miss the target! Do not store your gun cocked or loaded.
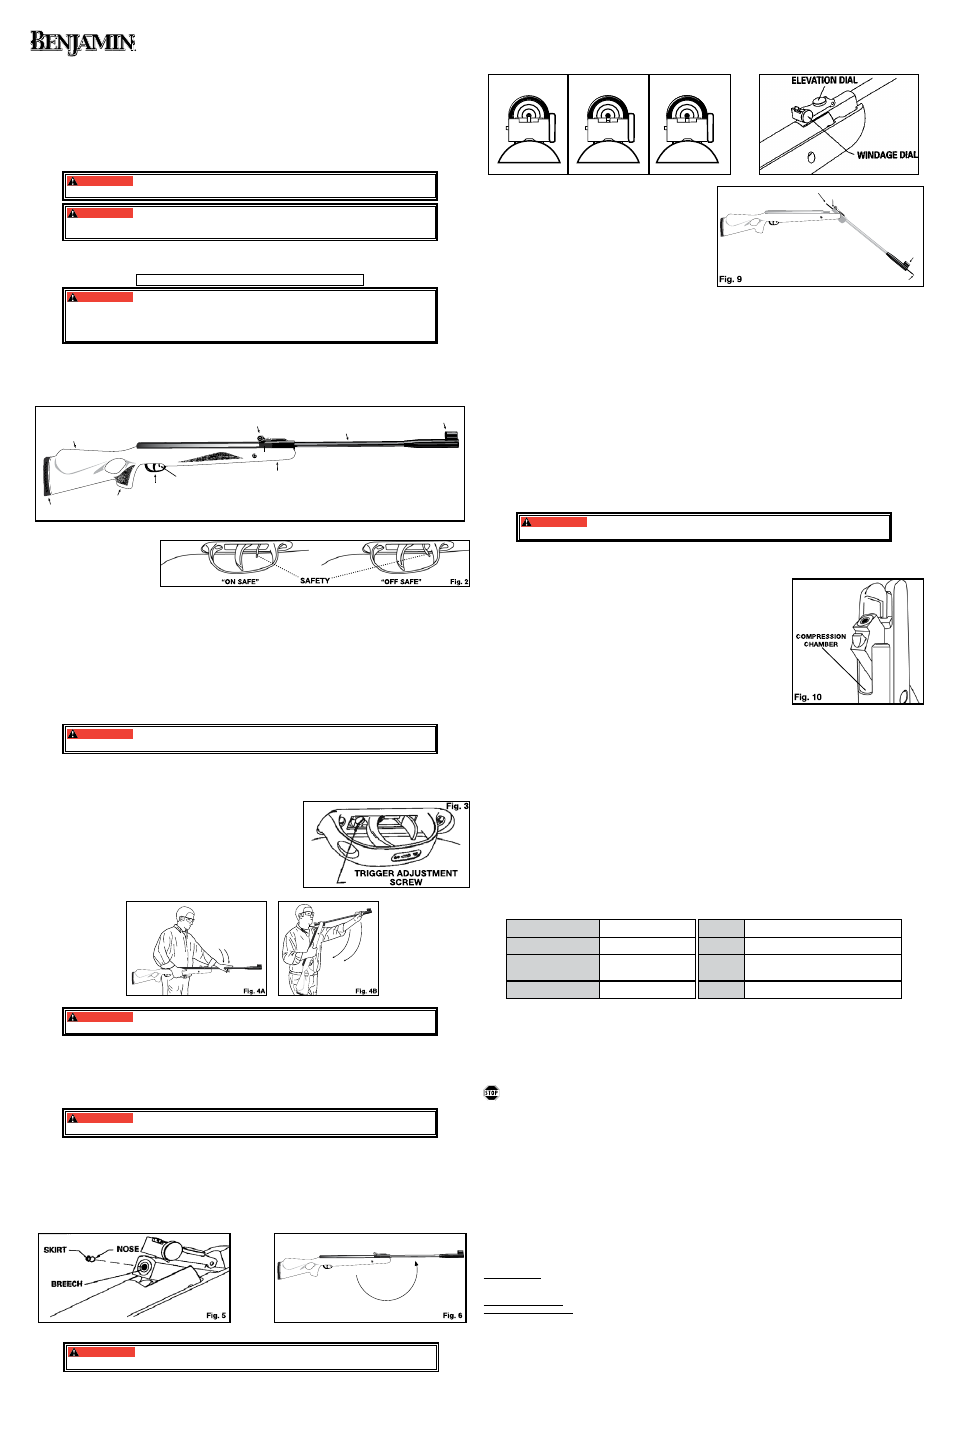
5. Aiming and Firing Safely
A. Aiming and Firing the Air Rifle
Fig 8
TOO HIGH
TOO LOW
CORRECT
Fig 7
You and others with you should always wear shooting
•
glasses to protect your eyes.
Always aim your air rifle in a SAFE DIRECTION. When you
•
are sure of your target and backstop, and the area around
the target is clear, take the air rifle “OFF SAFE” (See SEC-
TION 2.2) and squeeze the trigger to fire.
Do not shoot at hard surfaces or at the surface of water.
•
The pellet may bounce off or ricochet and hit someone or
something you had not intended to hit.
Always choose your target carefully. It is best to shoot at paper
•
bull’s-eye targets which are attached to a safe backstop. A
heavy blanket should be hung behind the backstop to prevent
ricochet should you miss the backstop.
Your backstop should be checked for wear before and after
•
each use. Replace your backstop if the surface is worn or
damaged or if a ricochet occurs.
Your air rifle is designed for target shooting. Always remember to place your target carefully. THINK about what you will
•
hit if you miss the target.
The air rifle is correctly aimed when the front sight is positioned exactly in the notch of the rear sight. The top of the front
•
sight post should be even with the top of the notch in the rear sight. The bull’s-eye should appear to rest on the top of
the front sight (Fig. 7).
When you are sure of your target and backstop, and the area around the target is clear, take the airgun “OFF SAFE”
•
(See section 2.2) and pull the trigger to fire.
B. Sight Adjustment
NOTE: Pellet weight may affect accuracy
Elevation is set by means of the rear sight-elevating dial situated on the rear sight base. Turn the dial counterclockwise
•
to make the pellet hit higher on the target and turn the dial clockwise to make the pellet hit lower on the target. (Fig. 8)
Windage is set by turning the windage dial located on the right side of the sight. Turn the dial counterclock-wise to make
•
the pellet hit to the left on the target and turn the dial clockwise to make the pellet hit to the right on the target. (Fig. 8)
C. Scope
Your airgun is packaged with a CenterPoint 3-9x 40 mm Adjustable Objective scope. Refer to the owner’s manual
for your scope for instructions on mounting and use.
6. Removing a Jammed Pellet
Put your airgun “ON SAFE” (Section 2A).
•
Do not reload the airgun if a pellet is jammed.
•
Break the barrel open slightly (without pulling the barrel all the way down to the point that it cocks the action) and look
•
down the breech to see if the gun is jammed.
If it is jammed, insert a cleaning rod into the breech and push the jammed pellet out of the muzzle. Don’t try to reuse
•
that pellet (Fig. 9)
WARNING:
Do not cock the airgun during the removal of a jammed pellet unless you
plan on continuing to shoot.
Remember: do not fire your airgun without a pellet in the chamber (dry fire). This may permanently damage your airgun.
If you are not able to unjam your airgun by following the unloading procedure, take no further action. An Authorized
•
Service Station will unjam your airgun (no cost during the warranty period).
7. Maintaining Your Airgun
Periodically tighten all stock fasteners
•
Check and tighten scope mounts if applicable
•
To ensure that your air rifle maintains uniform power, it is important that you
•
apply a drop of Crosman RMCOIL every few hundred shots into the compres-
sion chamber. (Fig. 10) The external metal parts should be cleaned with a cloth
that has RMCOIL on it.
CAUTION: Use Crosman RMCOIL only and do not over-oil. To do so can
cause possible damage to the gun and injury to the shooter and bystanders.
CAUTION: Do not attempt to disassemble your airgun. DO NOT MODIFY OR
ALTER YOUR AIRGUN. Attempts to modify the airgun in any way inconsistent
with this manual may make your airgun unsafe to use, cause serious injury or
death, and will void the warranty.
If you drop your airgun, visually check to see that it works properly before you
use it again. If anything seems changed, like a shorter or weaker trigger pull,
this may mean worn out or broken parts. Call Crosman customer service for
assistance before using your airgun again.
8. Reviewing Safety
Never point the airgun at any person or at anything you do not intend to shoot.
•
Always treat the airgun as though it is loaded and with the same respect you would a firearm.
•
Always aim in a SAFE DIRECTION. Always keep the muzzle of the airgun pointed in a SAFE DIRECTION.
•
Always keep the airgun on safe until you are ready to shoot.
•
Always check to see if the airgun is “ON SAFE” (see section 2A) and unloaded when getting it from another person or
•
from storage.
Always keep your finger off the trigger and out of the trigger guard until ready to shoot.
•
You and others with you should always wear shooting glasses to protect your eyes.
•
If your reading or prescription glasses are not safety glasses, make sure you wear shooting glasses over your regular glasses.
•
Use .177 caliber (4.5mm) pellets only in your airgun. NEVER reuse ammunition.
•
Do not shoot at hard surfaces or at the surface of water. The pellet may bounce off or ricochet and hit someone or
•
something you had not intended to hit.
Place the backstop in a location that will be safe should the backstop fail.
•
Your backstop should be checked for wear before and after each use. All backstops are subject to wear and will even-
•
tually fail. Replace your backstop if the surface is worn or damaged or if a ricochet occurs.
Do not attempt to disassemble or tamper with your airgun. Use an Authorized Service Station. Using unauthorized repair
•
centers or modifying the function of your airgun in any way may be unsafe and will void your warranty.
Before you store your airgun make sure it is not loaded or cocked.
•
Whenever you store the airgun, make sure it is “ON SAFE” (see section 2A.)
•
SPECIFICATIONS
Mechanism
Break Barrel
Length
48.25”
Power source
Nitrogen filled Piston
Barrel
Rifled
Caliber/ammunition .177 caliber pellet
Velocity
Up to 1500fps with high velocity pellet
Up to 1200fps with standard pellet.
Weight
8.8 lbs
Safety
Ambidextrous Lever
*Using alloy pellets
PERFORMANCE
Many factors affect velocity, including brand of projectile and weight of projectile.
Your air gun was designed to work with Crosman branded ammunition, these include Crosman
®
and Benjamin
®
. Use of other am-
munition may cause your gun to malfunction.
Break in Period
There may be up to a 100 shot break-in period. During this period accuracy may be inconsistent and your gun may seem loud. This
will improve as the nitro piston breaks in.
DO NOT RETURN THIS PRODUCT TO THE STORE.
Our friendly customer service representatives will be glad to help. You can get answers to frequently asked
questions at www.crosman.com or you can contact us directly at 1-800-7AIRGUN (1-800-724-7486)
REPAIR SERVICE
If your airgun needs repair, we recommend you take or send it to your nearest Crosman Authorized Service Station. DO NOT
ATTEMPT TO DISASSEMBLE IT! Your airgun requires special tools and fixtures to repair it. Any disassembly or modification not
performed by an Authorized Service Station will void the warranty.
A SPECIAL CUSTOMER SERVICE
Crosman Authorized Service Stations will unjam your airgun at no cost during the warranty period.
LIMITED ONE YEAR WARRANTY
This product is warranted to the retail consumer for one year from date of retail purchase against defects in material and workman-
ship and is transferable. To register the serial number of your airgun return the airgun registration form. The warranty is not condi-
tioned on the return of the card. You should retain the original sales receipt as record of date of purchase.
WHAT IS COVERED
Replacement parts and labor. Transportation charges to consumer for repaired product.
WHAT IS NOT COVERED
Transportation charges to Authorized Service Station for defective product. Damages caused by abuse, modification or failure to per-
form normal maintenance – see Owner’s Manual. Any other expense. CONSEQUENTIAL DAMAGES, INCIDENTAL DAMAGES, OR
INCIDENTAL EXPENSES INCLUDING DAMAGE TO PROPERTY. SOME STATES DO NOT ALLOW THE EXCLUSION OR LIMITATION
OF INCIDENTAL OR CONSEQUENTIAL DAMAGES SO THE ABOVE LIMITATION OR EXCLUSION MAY NOT APPLY TO YOU.
HOW TO OBTAIN WARRANTY PERFORMANCE
U.S. Customers- Locate nearest service station (see www.crosman.com or call Crosman customer service at 800-724-7486 for
list of stations). The service station will give you details of how to proceed with sending the item in for repair. You must contact the
station before shipping your product.
Canadian Customers: Contact The Gravel Agency 418-682-3000 ext. 46.
International Customers- Return product to your nearest distributor. If you do not know your distributor call 585-657-6161 and
ask for our International Department for assistance.
IMPLIED WARRANTIES
ANY IMPLIED WARRANTIES INCLUDING THE IMPLIED WARRANTIES OF MERCHANTABILITY AND FITNESS FOR A PARTICULAR
PURPOSE ARE LIMITED IN DURATION TO ONE YEAR FROM DATE OF RETAIL PURCHASE. SOME STATES DO NOT ALLOW
LIMITATIONS ON HOW LONG AN IMPLIED WARRANTY LASTS SO THE ABOVE LIMITATIONS MAY NOT APPLY TO YOU.
To the extent any provision of this warranty is prohibited by federal, state or municipal law, which cannot be preempted, it shall not
be applicable. This warranty gives you specific legal rights and you may also have other rights, which vary, from state to state.
CROSMAN and BENJAMIN are registered trademarks of Crosman Corporation in the United States.
MUZZLE
PELLET
BREECH
ROD