Using the alarms, Setting the time and date manually, Operation guide 4343 – Casio 4343 User Manual
Page 6
Operation Guide 4343
6
The watch beeps for 10 seconds when the Timekeeping Mode time
reaches the currently set alarm time.
• The alarm will sound when the current time in your Home City
matches the alarm time.
• Press the C
C
C
C
C button to enter the Alarm Mode.
• If you are entering from the Chronograph Mode, the chronograph
must be reset first. See “Chronograph Reset” for more
information.
30
Alarm Setting
(24-hour Format)
Alarm Mode
ON or OFF
• To return to the Timekeeping Mode from the Alarm Mode,
press the B
B
B
B
B button. Note that you cannot return to the
Timekeeping Mode while in the alarm setting mode.
❚ To turn the alarm on or off
In the Alarm Mode, press the C
C
C
C
C button to toggle the alarm on
and off.
• When the alarm is turned on, a beeper sounds when the alarm
time is reached.
30
30
OFF
ON
❚ To stop the alarm
Pressing any button while the alarm is sounding stops it.
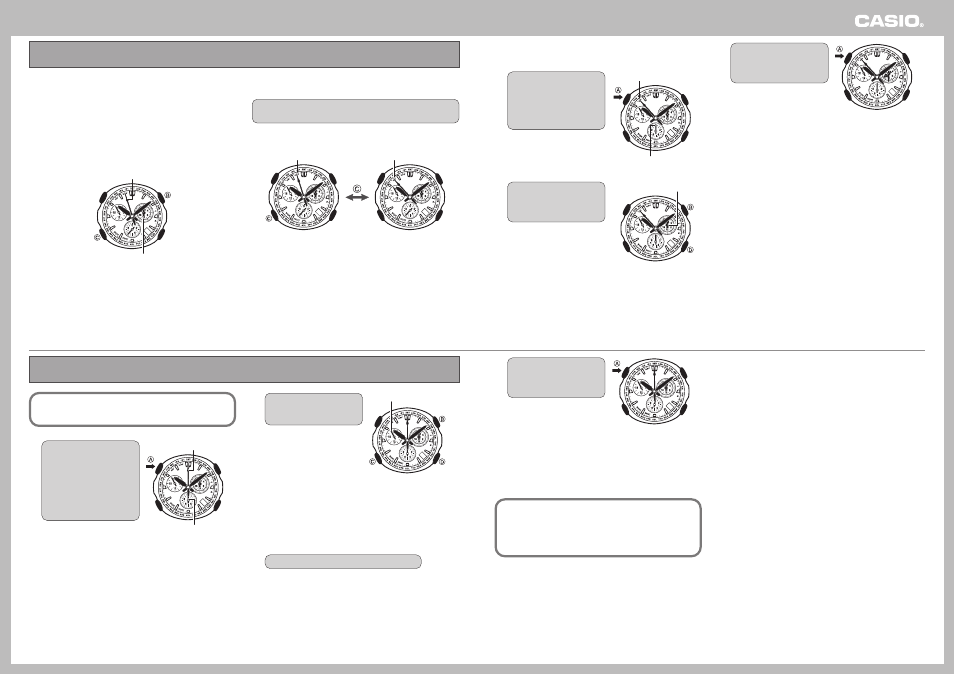
❚ To set the alarm time
Example: To change the alarm setting from midnight to 3:00 p.m.
1.
In the Alarm Mode, hold
down the A
A
A
A
A button for
about five seconds until
the indicator hand moves
to “ON” and the second
hand moves to zero.
• This indicates the setting
mode.
2.
Use the D
D
D
D
D (+) and B
B
B
B
B (–)
buttons to change the
alarm setting in one-
minute increments.
• Each press of either button
changes the setting by one
minute.
• Holding down either button
will cause the hands to move
at high speed. Once started,
high-speed hand movement
will continue even if you
release the button. To stop
high-speed hand movement,
press any button.
• The alarm time uses 24-hour timekeeping format.
3.
When everything is the
way you want, press the
A
A
A
A
A button to exit the alarm
setting mode.
• This will exit the alarm setting
mode and the second hand
will resume normal operation.
• The watch will exit the alarm
setting mode automatically if
you do not perform any button
operation for about two or
three minutes.
30
ON
0
30
(+)
(–)
Alarm time
30
Using the Alarms
You can perform the following procedures to adjust the time
and date when the watch is unable to receive a time
calibration signal for some reason.
1.
In the Timekeeping Mode
hold down the A
A
A
A
A button
until the indicator hand
completes the following
sequence of operations:
indicates the last signal
reception result, moves to
the “READY” position,
moves to 12 o’clock.
• This is the setting mode.
• Keep A button depressed
until the indicator hands stops
at 12 o’clock.
• The second hand also will
move to “0” at this time.
2.
Use the D
D
D
D
D (+) and B
B
B
B
B (–)
buttons to change the
hour and minute setting.
• Each press of either button
changes the setting by one
minute.
• Holding down either button
will cause the hands to move
at high speed. Once started,
high-speed hand movement
will continue even if you
release the button. To stop
high-speed hand movement,
press any button.
• When setting the time, make sure you also watch the 24-hour
hand so the time is set properly (1:00 a.m. = 1 o’clock, 1:00
p.m. = 13 o’clock).
3.
Use the C
C
C
C
C button to change the day setting.
• Each press of the C button advances the day by one.
30
Indicator Hand
Second Hand
30
Hour,
Minute
(+)
Hour, Minute
(–)
Date
(+)
24-hour Hand
Setting the Time and Date Manually
4.
When everything is the
way you want, press the
A
A
A
A
A button to exit the
setting mode.
• The second hand will resume
normal operation.
• Pressing A to restart
timekeeping on a time signal
on the TV or radio ensures
precise setting.
• The watch will exit the setting
mode automatically if you do
not perform any button
operation for about two or
three minutes.
When you are using the watch in an area that supports time
calibration signal reception, it will adjust the date automatically
for month lengths and leap years. If you use it in an area that
does not support signal reception, you will have to make
adjustments for month lengths and leap year manually.
30