Casio DQ-542B User Manual
Casio Clock
Operation Guide DQ-542/542B
1
MA0508-EB
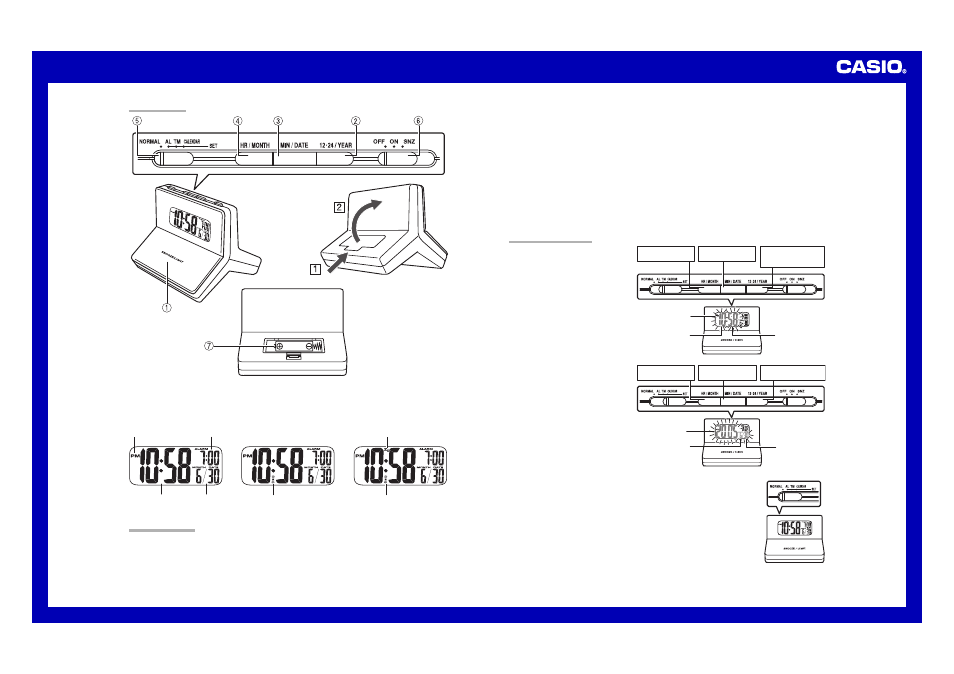
ILLUSTRATION
•
A sticker is affixed to the glass of the clock when you purchase it. Be sure to remove the sticker before using the
clock.
•
Depending on the clock model, its configuration may differ somewhat from that shown in the illustration.
Current time
(Hour, minutes)
Date
(month – day)
PM indicator
Alarm time
Alarm on indicator
Alarm Off
Snooze Alarm On
Alarm On
Snooze on indicator
Alarm on indicator
GENERAL GUIDE
1
1
1
1
1 SNOOZE/LIGHT button
•
Press this button to illuminate the display for about three seconds.
•
Pressing this button while the alarm is sounding stops the alarm.
2
2
2
2
2 12 • 24/YEAR button
•
Press this button to toggle between 12-hour and 24-hour timekeeping.
•
Pressing this button while “CALENDAR” is selected by the
Mode switch
5
advances the year setting.
3
3
3
3
3 MIN/DATE button
•
Pressing this button while “TM” is selected by the
Mode switch
5
advances the minute setting.
•
Pressing this button while “CALENDAR” is selected by the
Mode switch
5
advances the day setting.
4
4
4
4
4 HR/MONTH button
•
Pressing this button while “TM” is selected by the
Mode switch
5
advances the hour setting.
•
Pressing this button while “CALENDAR” is selected by the
Mode switch
5
advances the month setting.
5
5
5
5
5 Mode switch
NORMAL: For normal use
AL: For adjusting the alarm setting
TM: For adjusting the time setting
CALENDAR: For adjusting the date setting
6
6
6
6
6 Alarm Mode selector
SNZ: Snooze alarm on
ON: Alarm on
OFF: Alarm off
7
7
7
7
7 Battery
SETTING THE CLOCK
1. Slide the
Mode switch
5
to “TM”. This
causes the current time to flash on the
display.
2. Use the
12 • 24/YEAR button
2
,
MIN/
DATE button
3
, and
HR/MONTH
button
4
to set the time. Holding down
the
MIN/DATE button
3
or
HR/
MONTH button
4
changes the
corresponding setting at high speed.
•
Make sure you set the correct am/pm
time if you are using 12-hour
timekeeping. The PM indicator indicates
PM times, while nothing is indicated for
AM times.
•
The seconds count reverts to 00
automatically whenever you finish
adjusting the minute setting.
3. Slide the
Mode switch
5
to
“CALENDAR”. This causes the current
date to flash on the display.
4. Use the
12 • 24/YEAR button
2
,
MIN/
DATE button
3
, and
HR/MONTH
button
4
to set the date. Holding down
any button advances the corresponding
setting at high speed.
•
You can set the year in the range of 2004
to 2039.
5. Slide the
Mode switch
5
to “NORMAL”. This will cause the figures on the display to
stop flashing.
PM indicator
Hour Minutes
Press to toggle between
12-hour and 24-hour
timekeeping.
Press to advance the
minute setting.
Press to advance the
hour setting.
Year
Month Day
Press to advance the
year setting.
Press to advance the
day setting.
Press to advance the
month setting.