Feature overview, To operate the oven lights, To replace the oven light – Kenmore 790.99019 User Manual
Page 34: Oven lights, General care & cleaning
Attention! The text in this document has been recognized automatically. To view the original document, you can use the "Original mode".
FEATURE OVERVIEW
• Removing & Replacing Warmer Drawer
General Care & Cleaning
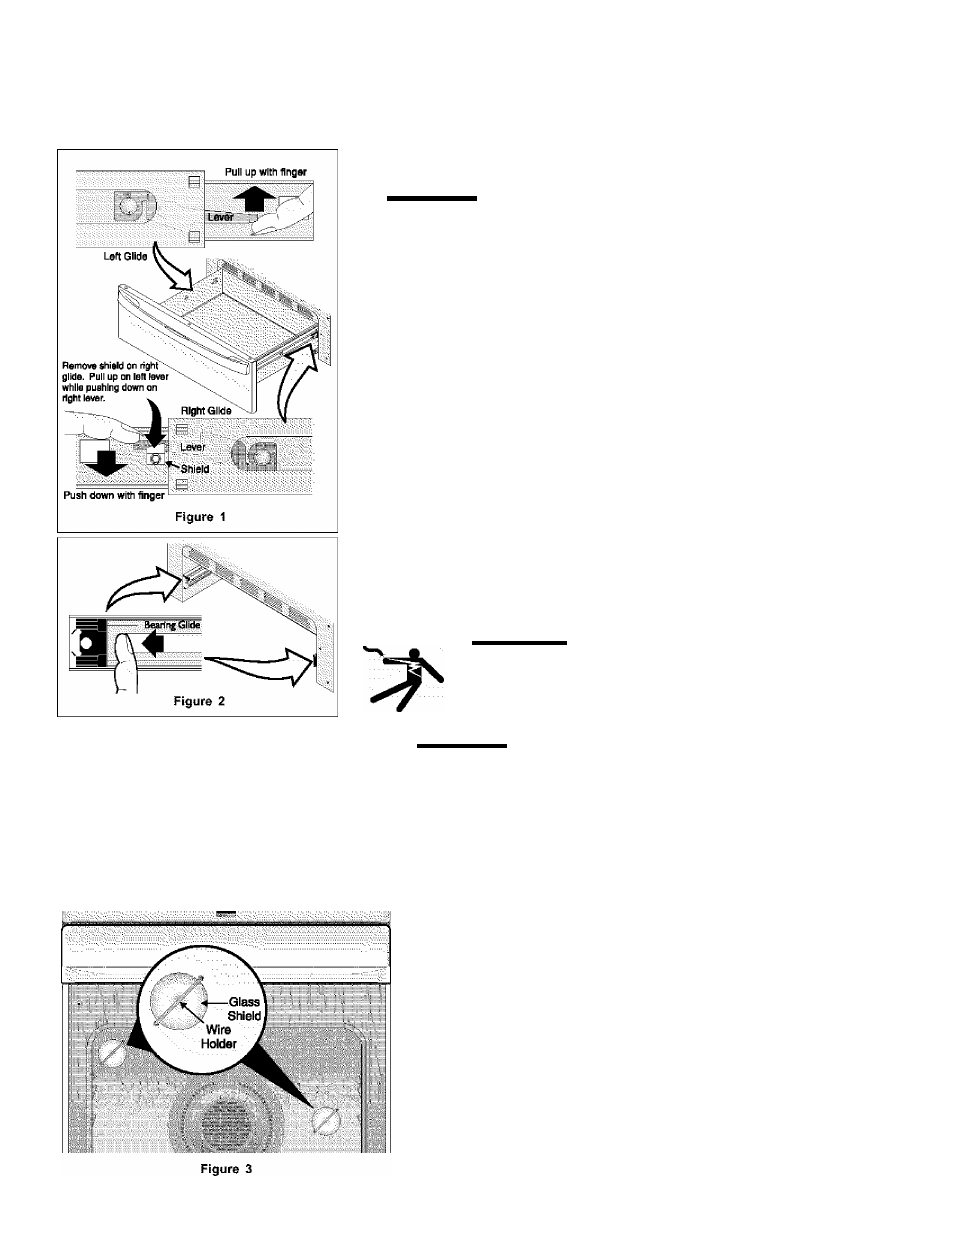
To Remove and Replace Warmer {Warm & Ready™) Drawer
To Remove Warmer Drawer:
^CAUTION
Turn power off before removing the warmer drawer.
2. Open the drawer to the fuiiy opened position.
3. On the right glide you will find a shield attached with a hex-head screw
(see figure 1). Using a 1/4” socket and ratchet remove the shield.
4. Locate glide lever on each side of drawer, puli up on the left glide lever
and push down on the right glide lever.
5. Pull the drawer away from the range.
To Replace Warmer Drawer:
1
.
2
.
3.
4.
Replace shield on the right glide of the drawer body.
Puli the bearing glides to the front of the chassis glide (see figure 2).
Align the glide on each side of the drawer with the glide slots on the
range.
Push the drawer into the range until levers “click” (approximately 2”).
Pull the drawer open again to seat bearing glides into position.
If you do
not hear the levers “click” or the bearing glides do not feel seated
remove the drawer and repeat steps 2-4. This will minimize possible
damage to the bearing glides.
NOTE: The Warmer Drawer will NOT operate while
IMlidiithMiisBiiiiiiiiiiiiiiiiiiiiiiiil-.:
A WARNING
Electrical Shock Hazard can occur and result
In serious injury or death. Disconnect appliance from electric
power before cleaning and servicing the warmer drawer.
Oven Lights
FEATURE OVERVIEW
•
Operating Oven Lights
•
Replacing Oven Light
CAUTION
Be sure the range is unplugged and all parts are COOL
before replacing oven iight(s). Wear a leather-faced glove for protection
against possible broken glass.
To Operate the Oven Lights
Both of the interior oven lights automatically turn on when the oven
door is opened. Press to turn the lights ON and OFF when the
oven door is closed. Each oven light is located at the rear wall of the
oven interior and is covered with a glass shield held by a wire holder
(See Figure 3). The Glass Shields must be in place whenever the oven
is in use.
To Replace the Oven Light:
1. Turn electrical power off at the main source and unplug the range.
2.
Press Wire Holder to one side to release the glass shield.
3. Replace the old bulb with a new 40 watt appliance bulb.
4.
Replace Glass Shield over bulb and snap Wire Holder into place.
5. Turn power back on again at the main source (or plug in the range).
6. The clock will then need to be reset. To reset, see
Setting the
Clock in this Use & Care Guide.
34