GE JD750SFSS User Manual
Installation instructions, 30" electric drop-in ranges, Important
Attention! The text in this document has been recognized automatically. To view the original document, you can use the "Original mode".
Installation
Instructions
30" Electric
Drop-In Ranges
ryi Questions? Call 800.GE.CARES (800.432.2737) or Visi
' In Canada, call 1.800.551.3344 or visit .
BEFORE YOU BEGIN
Read these instructions carefully and completely.
.IMPORTANT
— Save these instructions for
local inspector's use.
.IMPORTANT
— Observe all governing
codes and ordinances.
. Note to Installer - Be sure to leave these
instructions with the consumer.
Note to Consumer - Keep these instructions for
future reference.
Skill level - Installation of this appliance requires a
qualified installer or electrician.
Proper installation is the responsibility of the installer.
Product failure due to improper installation is NOT
covered under the warranty.
ATTENTION INSTALLER:
All electric drop-in ranges must be hard wired (direct wired) into on
opprovedjunction box. A plug and receptacle is NOT permitted on these products.
FOR YOUR SAFETY
A WARNING
Before beginning the installation, switch power off at the service panel and lock the
service disconnecting means to prevent power from being switched on accidentally. When the service
disconnecting means cannot be locked, securely fasten a prominent warning device, such os a tog, to the service
panel.
A WARNING
The information in this manual must be followed to minimize the risk of fire, electric shock,
or to prevent property damage, personal injury or loss of life.
A.
A WARNING
Tip-Over Hazard
A child or adult can tip the range and be killed.
Verify the anti-tip bracket has been properly installed
and engaged.
Ensure the anti-tip bracket is re-engaged when the range
is moved.
Do not operate the range without the anti-tip bracket in
place and engaged.
Failure to follow these instructions can result in death or
serious burns to children or adults.
MATERIALS YOU MAY NEED
TOOLS YOU MAY NEED
Junction Box
1/8" Drill Bit and Electric Drill
Phillips Screwdriver
Wire Nuts
Level
Flathead Screwdriver
Strain Relief Clamp for 1/2" Conduit
Tape Measure
1/4" Nut Driver
Straight edge or Square
Hammer
Hand or Saber Saw
Safety Glasses
Pencil
31-10829-1
07-12 GE
Document Outline
- Installation
- Instructions
- 30" Electric Drop-In Ranges
- BEFORE YOU BEGIN
- FOR YOUR SAFETY
- IT] REMOVE PACKAGING MATERIALS
- IT] PREPARING THE OPENING (FOR INDOOR USE ONLY)
- - -2Sii36»"
- IT] PREPARING THE OPENING (Continued)
- |T| WHEN INSTALLING RANGE IN COUNTERTOP CUT OUT TO THE WALL
- 5^ ELECTRICAL REQUIREMENTS
- A WARNING Electric Shock Hazard
- A WARNING Fire Hazard
- 5B MAKE ELECTRICAL CONNECTIONS
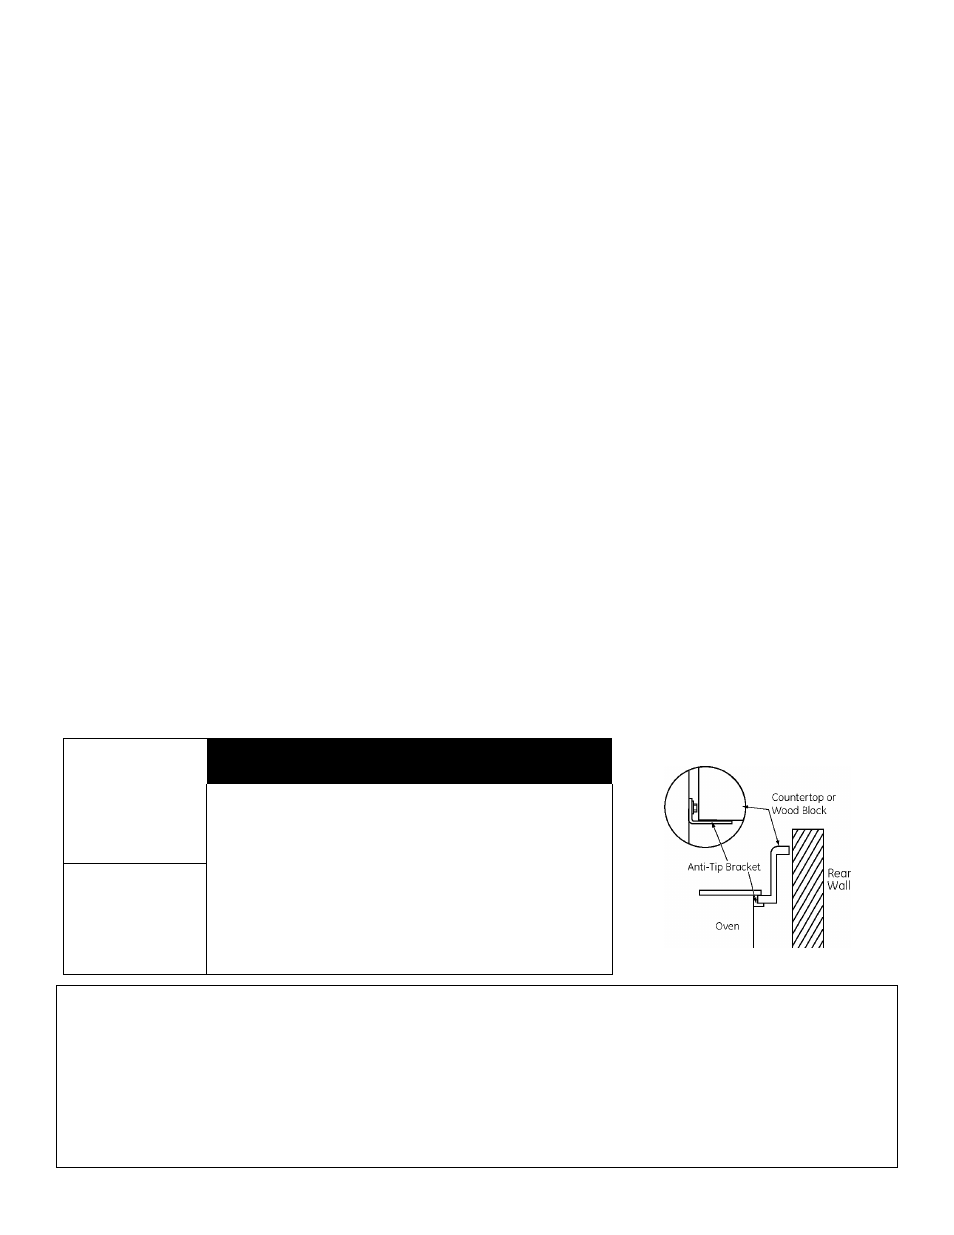
- 6 ANTI-TIP DEVICE INSTALLATION
- [T\ INSTALL THE RANGE
- [T\ INSTALL THE RANGE (Continued)
- 8 REPLACING THE OVEN DOOR
- ^ FINAL CHECKLIST
- 10 OPERATION CHECKLIST
- 30" Electric Drop-In Ranges
- Instrucciones de instalación
- Cocinas encastrables de 30"
- ANTES DE COMENZAR
- PARA SU SEGURIDAD
- IT] QUITE LOS MATERIALES DE EMPAQUE
- |T] PREPARE LA ABERTURA (SÓLO PARA USO EN EL INTERIOR)
- |T] PREPARE LA ABERTURA (Continuación)
- |T| CUANDO INSTALE LA COCINA EN UN MOSTRADOR QUE TIENE UN RECORTE EN LA PARED
- 5B REALICE LAS CONEXIONES ELECTRICAS
- 6 INSTALACION DEL DISPOSITIVO ANTI-VOLCADURAS
- H INSTALALACIÓN DE LA COCINA (Continúa)
- 8 REEMPLAZO DE LA PUERTA DEL HORNO
- 8 REEMPLAZO DE LA PUERTA DEL HORNO (Continúa)
- ^ LISTADO DE CONTROL FINAL
- 10 LISTA DE CONTROL DE FUNCIONAMIENTO
- Cocinas encastrables de 30"