Broiling tips, Broiling with models bgc430w and bgp430w, Adjusting the oven temperature control – Whirlpool BGS470W User Manual
Page 9: Model bgs470w, Warning
Attention! The text in this document has been recognized automatically. To view the original document, you can use the "Original mode".
Broiling tips
■ Use the broiler pan and grid for
broiling. They are designed to drain
excess liquid and fat away from the
cooking surface to help prevent
spatter, smoke or fire.
■ If you broil small quantities, you
may want to use a small broiler pan.
They are available in the
housewares section of many
department stores.
■ For best broiling results, preheat at
BROIL for 5 minutes. Do not preheat
with broiler pan in place.
■ Broiling rack position determines
how the burner cooks your food.
The lower the position, the more
broiler grid area covered. See
"Broiling rack position chart" in
next column for more information.
■ To sear meat, place broiler pan at
one of the higher rack positions so
that meat is very near the flame.
■ Small steaks may be broiled in the
higher rack positions.
■ To cook large steaks and other thick
cuts of meat well done, move them
to a lower rack position after
searing.
■ Refer to a broiling chart in a reliable
cookbook for correct broiling times.
■ After broiling, remove the broiler
pm from the oven when you
remove the food. Drippings will
bake on the pan if it is left in the
heated oven.
^WARNING
Fire Hazard
■
Place meat the correct distance
from the burner. Meat placed too
close to the burner may spatter,
smoke, bum or catch fire during
broiling.
■
To ensure adequate grease
drainage, do not use cookie
sheets or similar pans for broiling.
Also, covering the broiler grid
with foil is not recommended.
Poor drainage of grease may
result in fire.
o
&-
0-
o-
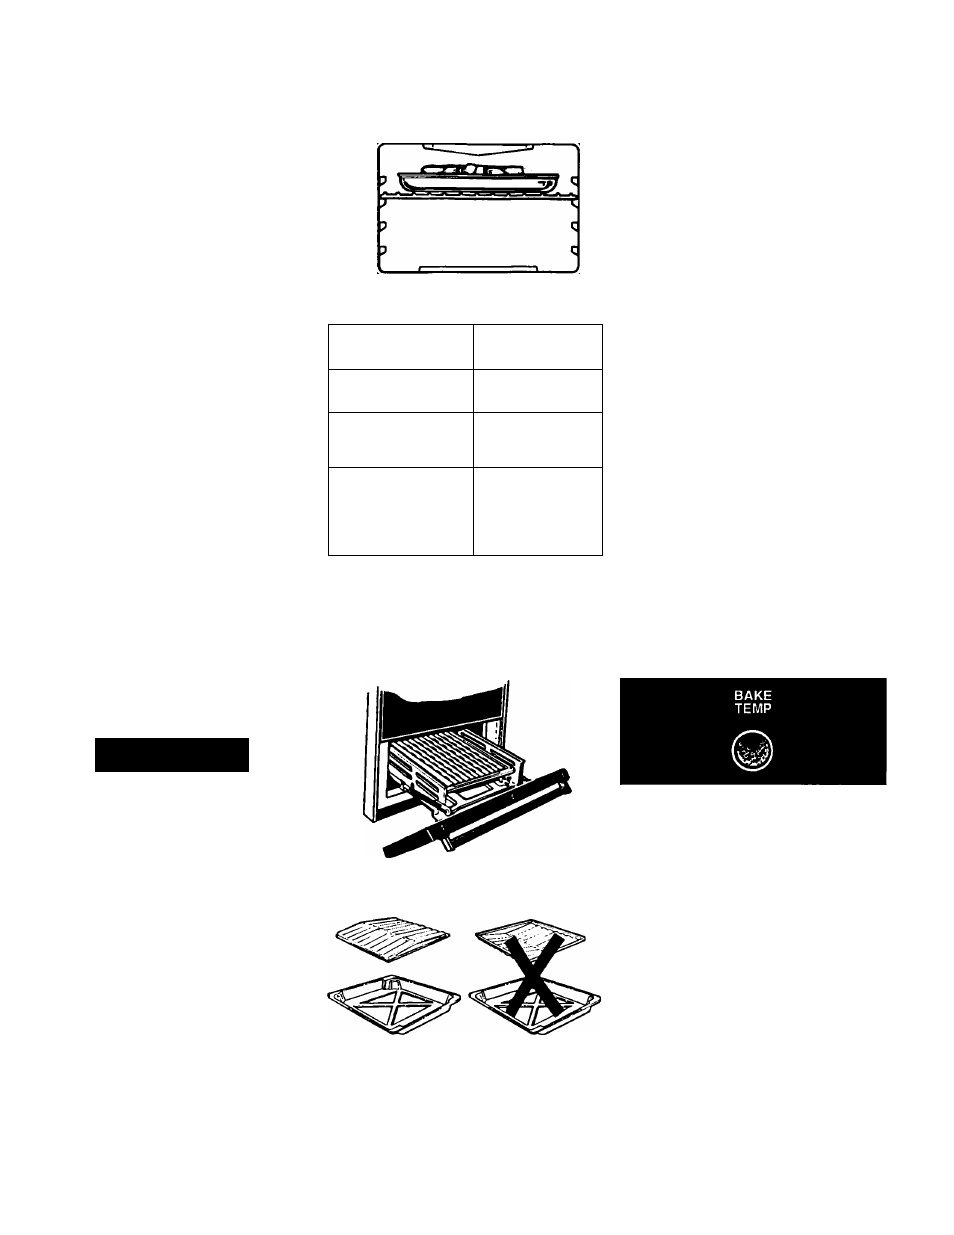
Broiling rack position chart
RACK POSITION
FROM BOTTOM
FOOD
3
Rare steaks
2
Medium steaks,
fish and
hamburgers
1
Well-done foods
such as chicken,
lobster, ham
slices and pork
chops
Broiling with Models
BGC430W and BGP430W:
The broiler drawer is located below the
oven door. Always broU with the oven
door closed.
1. Pull the broiler drawer open and tilt
the door panel down.
3. Before the broiler is turned on,
place food on broiler pan and
position the broiler pan at one of
the three levels. Refer to a reliable
cookbook for broiling chart.
4. Set the Oven Temperature Control
to BROIL. The broiler will
automaticaUy light in 50-60
seconds.
5. When broiling is done, turn the
Oven Temperature Control to OFF.
NOTE: Do not preheat the broiler before
using. Completely close the broiler
drawer during broiling.
Adjusting the oven
temperature control
Does your oven seem hotter or colder
than your old oven? The temperature of
your old oven may have shift^
gradually without you noticing the
change. Your new oven is properly
adjusted to provide accurate
temperatmes. But, when compared to
your old oven, the new design may give
you different results.
If, after using the oven for a period of
time, you are not satisfied with the
temperature settings, they can be
adjusted by following these steps:
Model BGS470W:
1. Push and release the Bake Temp
button.
2. Turn the Time/Temp Set Knob until
550°F appears on the small display.
3. Within two seconds, push and hold
the Bake Temp button until the
special two-digit display appears.
Release the Bake Temp button.
The display now indicates the
amount of degrees offset between
the original factory temperature
setting and the current temperature
setting. If the oven control has the
original factory setting, the display
will read “00”.
2. Place broiler pan grid so grease can
drain down sides into lower part of
broiler pan. See picture.
continued on next page
Page 9