Coleman Garden Gazebo 14'x12' User Manual
14’x12’ garden gazebo, Pole & hub assembly
14’x12’ GARDEN GAZEBO
1
2
3
4
When You Are Ready To Set Up Your
Shelter
–Select a level area clear of rocks,
branches and other hard or sharp objects.
–Do not assemble your shelter under trees.
–For easier set up, two or more people
are recommended.
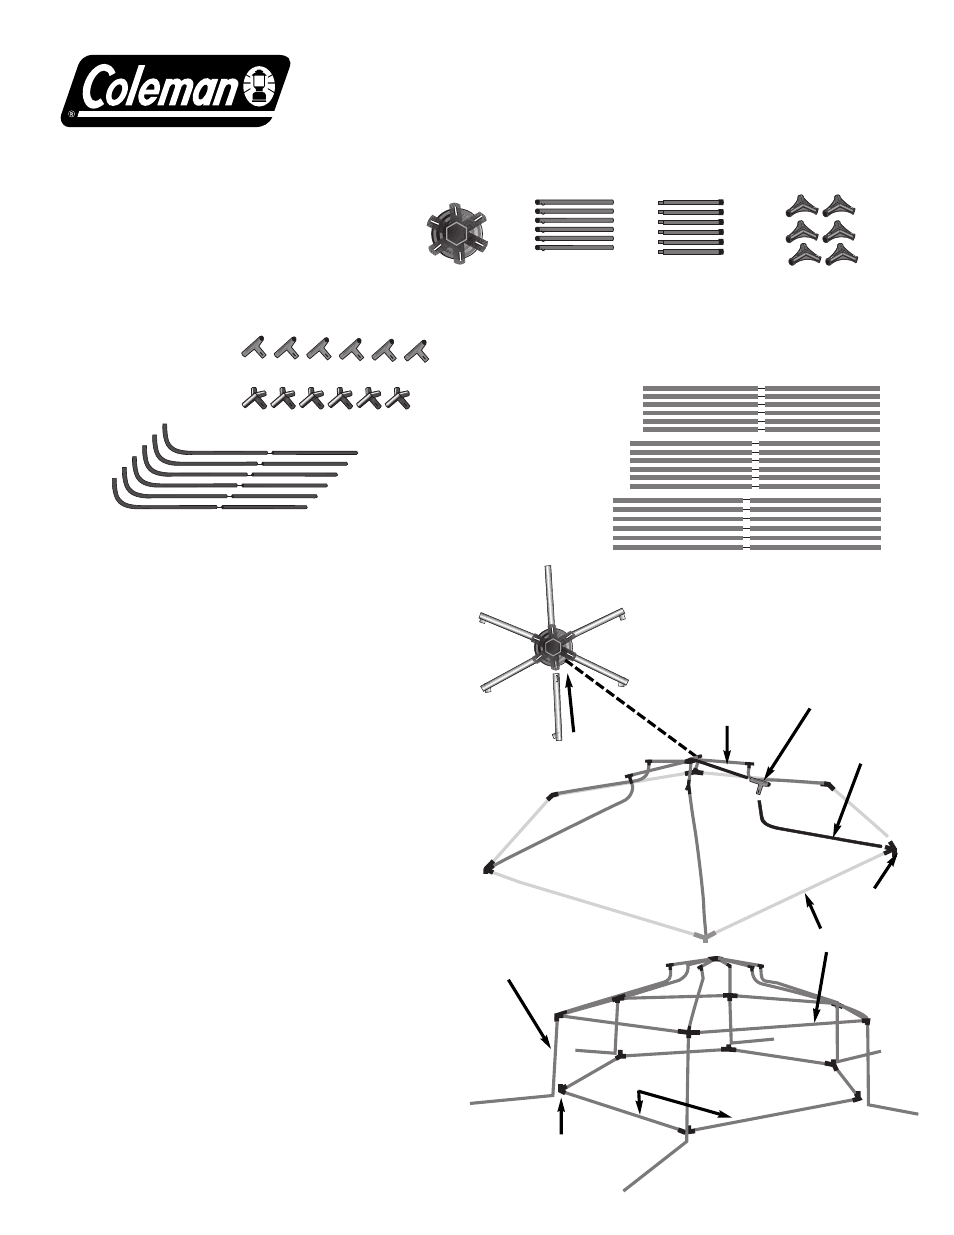
ASSEMBLY PARTS
Instructions apply to Part Number 9392-642
Leg Poles (6)
Part No. 9392-3151
Ground Poles (Green) (6)
Part No. 9392-3101
Eave Poles (6)
Part No. 9392-3111
Eave Hub (6)
Part No. 9392-3021
Corner Hub (6)
Part No. 9392-3031
Cupola Top
Pole (6)
Part No.
9392-3131
Cupola Eave
Pole (6)
Part No.
9392-3121
Ground Pole
Hub (6)
Part No.
9392-3011
Center Hub(1)
Part No.
9392-2351
Overhead Poles (6)
Part No. 9392-3141
Illus. 1
Cupola Top Poles
inserted into Center Hub
Cupola
Top Pole
Overhead
Pole
Eave Hub
Eave Pole
Corner Hub
Leg Pole
Ground Pole Hub
Ground Pole
Illus. 2
Cupola and Eave
assembly
Illus. 3
Ground poles assembled
under partially assembled
frame structure.
Pole & Hub Assembly
–Begin with the Center Hub and Cupola Top Poles.
–Insert the clip end of Cupula Top Poles into the
center hub and connect one pole at a time to the
hub. (illus. 1)
–Attach the Eave Hub to the open end of the
Cupola Top Pole (illus. 2)
–Assemble shock-corded Eave and Overhead poles.
–Connect the Overhead poles to the
bottom opening of the Eave Hub. (illus. 2)
–Attach Corner Hubs to Overhead Poles. (illus. 2)
–Connect the Eave Poles to Corner Hub. This will
make a six sided hexagon shape. (illus. 2)
–Insert one end of the Leg Pole into bottom of the
Corner Hub. Do not fully assemble the Leg Pole.
Leave the lower section laying on the ground.
(illus. 3).
–Repeat for remaining Leg Poles.
–Assemble the shock-corded Ground Poles.
–Working under the partially assembled frame,
insert one end into the 3 sided Ground Pole Hub.
The center opening should be pointing up. (illus. 3)
–Insert the other end into a second Ground Pole
Hub. Continue by adding another Ground Pole to
the open side of the Ground Pole Hub until you
can close the loop, forming a hexagon shape.
(illus. 3)