Installation, English – COP-USA CD55-SDI User Manual
Page 6
4.INSTALLATION
4.INSTALLATION
Video Cable
coaxial cable with 75
impedance with copper conductor at center conductor, and
shielded with 95% copper. The following table shows different cable type and its
maximum length:
Ω
The values are for reference only.
Depends on the cable quality and
environmental condition, the
transmission distance might be less.
Cable standard
100m / 300 ft
Max. Distance (m /ft )
RG 59 /U
If the cable length is more than 100 m, it is recommended to use optional
accessories, such as Video Amplifier or Fiber Trassmission Converter,
for boost the Video Signal.
Fiber receiver
(optional)
Real time
HD-SDI DVR Center
(optional)
HD-SDI Monitor
(optional)
HD-SDI High Speed Dome
Up to 20km, Fiber cable
Extend connection distance with
Fiber Transmission
Fiber transmitter
(optional)
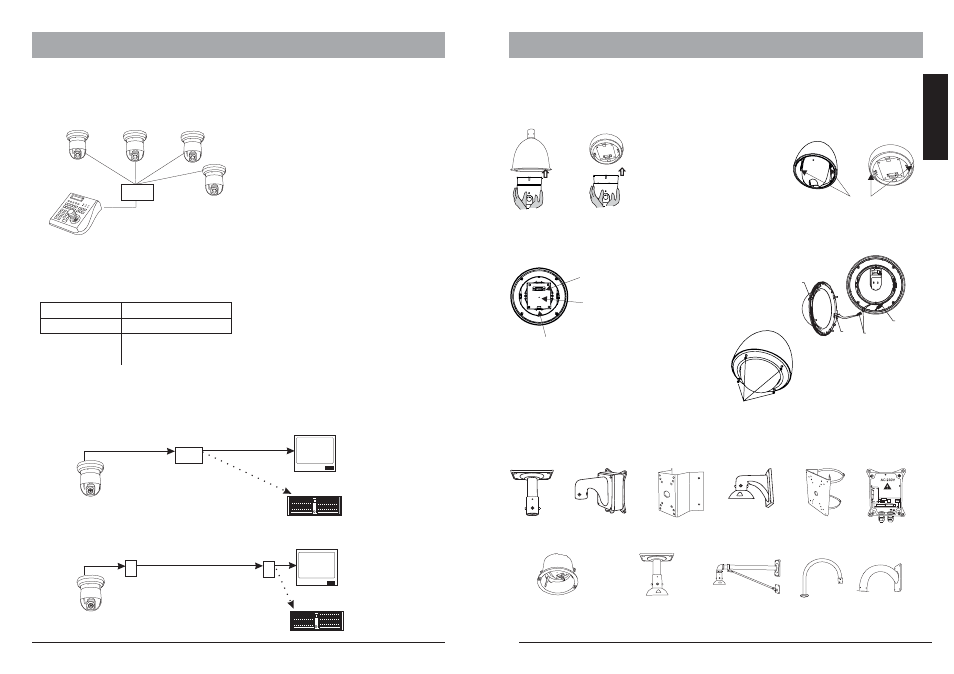
Star-Connection
The star-form connection is mostly used. it enables the connection of different dome
cameras in longer distance. It is recommended to use RS-485 distributor to ensure
the telemetric data transmission:
The advantage of star-connection is
that every channel can work
independently and take a cable
length up to 1000 meters( depends
on cable quality). In case more
dome camera are installed, the star-
connection can be extended with
additional RS-485 distributors.
Some products may not be available in your country, please contact our distributor for more details
Some products may not be available in your country, please contact our distributor for more details
7
8
ENGLISH
RS-485
Distributor
RS-485 cable
up to 1000m
per channel
Termination
activated on
every end.
Video Amplifier
(optional)
Real time
HD-SDI DVR Center
(optional)
HD-SDI Monitor
(optional)
HD-SDI High Speed Dome
Up to 100m, coaxial cable
Extend connection distance with
Video Amplifier
Optional bracket accessories
The Indoor and Outdoor Model can be equipped with various bracket accessories for indoor
and outdoor installation. Please contact your distributor for further details.
Corner
Mount
Pole
Mount
Wall mount and
Power box
Ceilling
mount
Indoor Wall
mount
Outdoor
Power Box
Indoor ceilling
mount
Extended wall
mount
Swan-Neck
Mounting
bracket
Wall
mount
Installing the core unit to base board.
The HD-SDI HSD Series core unit and base board are packed seperatly, in order to be
protected through the transportation. After unpaking and during the installation, the
core unit should be installed as following:
Installing the core unit by
pushing into the
housing.please note the
position of connector. For
releasing, please press the
lever-lock to core and pull off
the unit.
Lever-
Lock
Connector
Interface
Power
LED
Metal
Clip
WARNING:
Do not pull or hold the connector interface with force. It
is design only to connect the core unit and the base
board. Any presure on connector will cause damage and
avoids the warranty.
Safety spring
Rubber ring
cable
Heater connector
Once the base board is connected to power,
the power LED will light.
Heater connector
on outdoor
housing
Outdoor
housing cover
Screws
Indoor
embedded
mount