Checkline TELC System User Manual
Page 6

-6-
2.5 Checking the Adjustment
For general information, refer to section 2.2.
Requirements:
1. The sensors must be installed at the measuring location. Connect the sensor
with the supplied or existing display unit.
NOTE: The pin assignment of the 8-pin connector located on the rear side of
the sensor is described in section 4.0. Wait approx. 10 minutes for the sensor to
warm up.
Checking procedure:
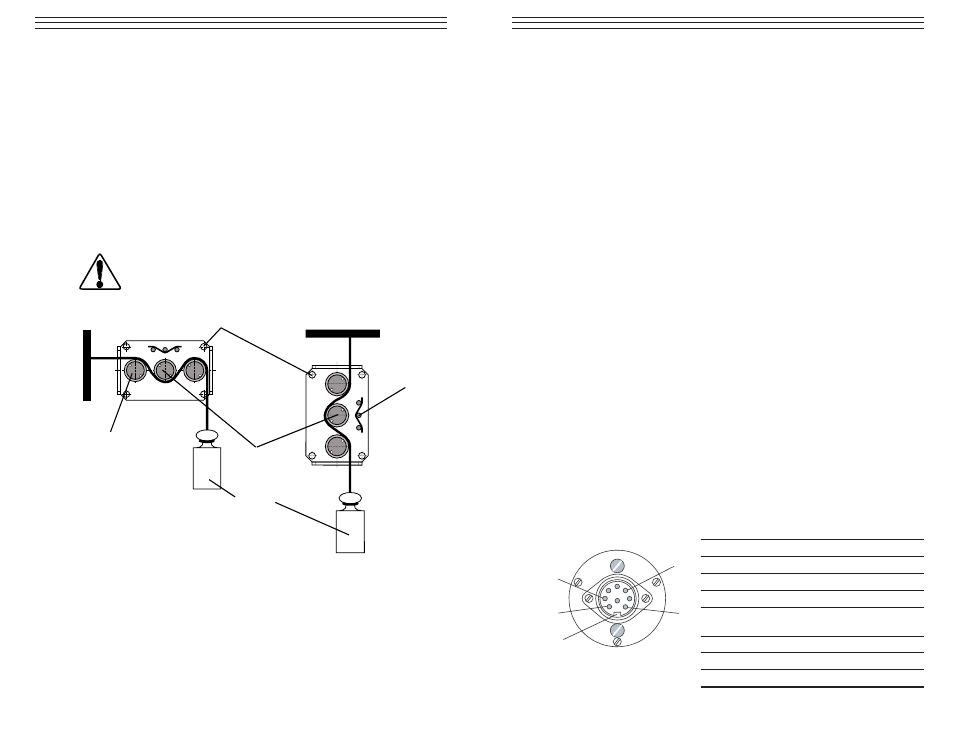
1. Thread the process material through the measuring rollers, following the
red marking on the front of the sensor.
2. Suspend a weight that corresponds to the tension to be measured (pay
attention to the correct unit of measure) from the measured material,
vertically, as shown above. (Always use a fresh portion of the material to
be measured.)
3. The tension value on the connected display unit should be equal to the value
of the suspended weight. If this procedure shows a deviation beyond the
allowable tolerance and a reliable operation is no longer allowed, the instru-
ment has to be readjusted, following the directions in sections 2.3 and 2.4
Mounting holes 4 x
W
eight
Material path
symbol
Measuring
roller
Guide rollers 2x
When threading the process material through the rollers,
follow the material acquisition symbol on the front of the
sensor. If force is applied to the middle sensing roller in
the incorrect direction, damage could result.
WARNING
-7-
3.0 S
PECIFICATIONS
Calibration
According to factory procedure Suitable for 95% of
applications. PA = Polyamide Monofilament. If the
material to be measured differs significantly from the
facctory calibration material in diameter, rigidity,
shape, etc., we recommend calibration using customer
material. For this purpose, a material sample of at least
5 m should be supplied. International unit for tension
force:1 cN = 1.02 g = 0.01 N 1 daN= 1.02 kg = 10 N
Accuracy
For 10% to 100% of range: ±1% full scale
Remainder of range and
other calibration material
±3% full scale or better
Overload protection
100% of range
Measuring principle
Strain gauge bridge
Measuring roller deflection
0.5 mm, max.
Natural frequency of
measuring spring
Approx. 500 Hz, depending on tension range
Signal processing
Analog
Temperature coefficient
Zero point: less than ±0.05% full scale / °C
Output signal
0 - 1 V DC Impedance: > 5 kOhm (standard) Option
Option DC
0 - 10 V DC
Option MA
4 - 20 mA
Damping (f g)
Standard: approx. 30 Hz (other values on request)
Temperature range
10 - 45 °C Air humidity: 85% RH, max.
Power supply
Standard: 12 to 18 V DC (21mA) (regulated)
Housing
Aluminium
4.0 P
IN
A
SSIGNMENTS
1
6
5
7
Shield
Pin No.
Signal
Description
1
GND
Ground - analog signal
2 Not
assigned
3 Not
assigned
4
Not assigned
5
+12 to 24 VDC
Supply voltage
regulated
6
GND
Ground - analog signal
7 0–1
VDC
8 Not
assigned
