Connections – Rane SL 1 Quick Start with keyboard shortcuts (200k) User Manual
Page 2
RANE SL 1 FOR SERATO SCRATCH LIVE • QUICK START 2.4
2
TURnTABle connecTIon
1. Connect your turntables to INPUTS 1
and 2 of the SL 1 interface. Note: When
connected properly, circles will be
displayed within the scope view of the
setup screen while playing the control
records (see CALIBRATING SCRATCH
LIVE in the manual for more info).
2. Connect the turntable ground wires to
the ground post of your mixer.
3. Connect the LINE OUTPUTS of the
SL 1 to the line inputs (sometimes
called CD or AUX) on your DJ mixer —
check that those inputs are switched to
line level. Note: If Scratch Live audio is
excessively loud or distorted, the LINE
OUTPUTS have been connected to
phono level inputs by mistake.
4. Connect the USB cable from the SL 1
to your computer as described in the
previous section.
cD PlAyeR connecTIon
1. Connect your CD players to INPUTS
1 and 2 of the SL 1 interface. Note:
When connected properly, circles will be
displayed within the scope view of the
setup screen while playing the control
records (see
calibrating Scratch live
in the manual for more info).
2. Connect the LINE OUTPUTS of the
SL 1 to the line inputs on your DJ mixer,
check that those inputs are switched to
line level. Note: If Scratch Live audio is
excessively loud or distorted, the LINE
OUTPUTS have been connected to
phono level inputs by mistake.
3. Connect the USB cable from the SL 1
to your computer as described in the
previous section.
oPTIonAl connecTIonS
To play normal records, connect the
THRU OUTPUTS of the SL 1 to the
mixer’s phono inputs, then select Phono
on your mixer for normal vinyl playback.
This plays “thru” without disconnecting
any wires.
To play normal CDs, connect the THRU
OUTPUTS to a set of line inputs on the
mixer when using CD players (when
using Scratch Live with CD players you
will need a mixer with a total of four line
inputs). This plays normal CDs “thru”
without disconnecting any wires. Note:
power is required, either from the USB
port or an external 9 VDC power supply
when using the THRU outputs.*
Connect a dynamic microphone to the
MIC INPUT of the SL 1 to be able to
scratch your own mic recordings. See
RECORDING in the manual.
Connect a ¼” to ¼” cable from the
MIC THRU jack on the SL 1 to the
microphone input on your DJ mixer to
allow normal mic use independent of
Scratch Live. Note: power is required,
either from the USB port or an external
9 VDC power supply.*
* Connect an external power supply to
the SL 1 to power the THRU channels
when USB power is not present. This
allows you to play vinyl or CDs when
the laptop is not present, useful for
permanent installations or when using
more than one laptop. The power
supply is 9 VDC, 300 mA (or more)
using a P6 type barrel plug. Radio
Shack carries a compatible supply.
Use model 273-1770 or 273-1768 with
Adaptaplug N. See OPTIONAL POWER
SUPPLY on page 3 of the manual.
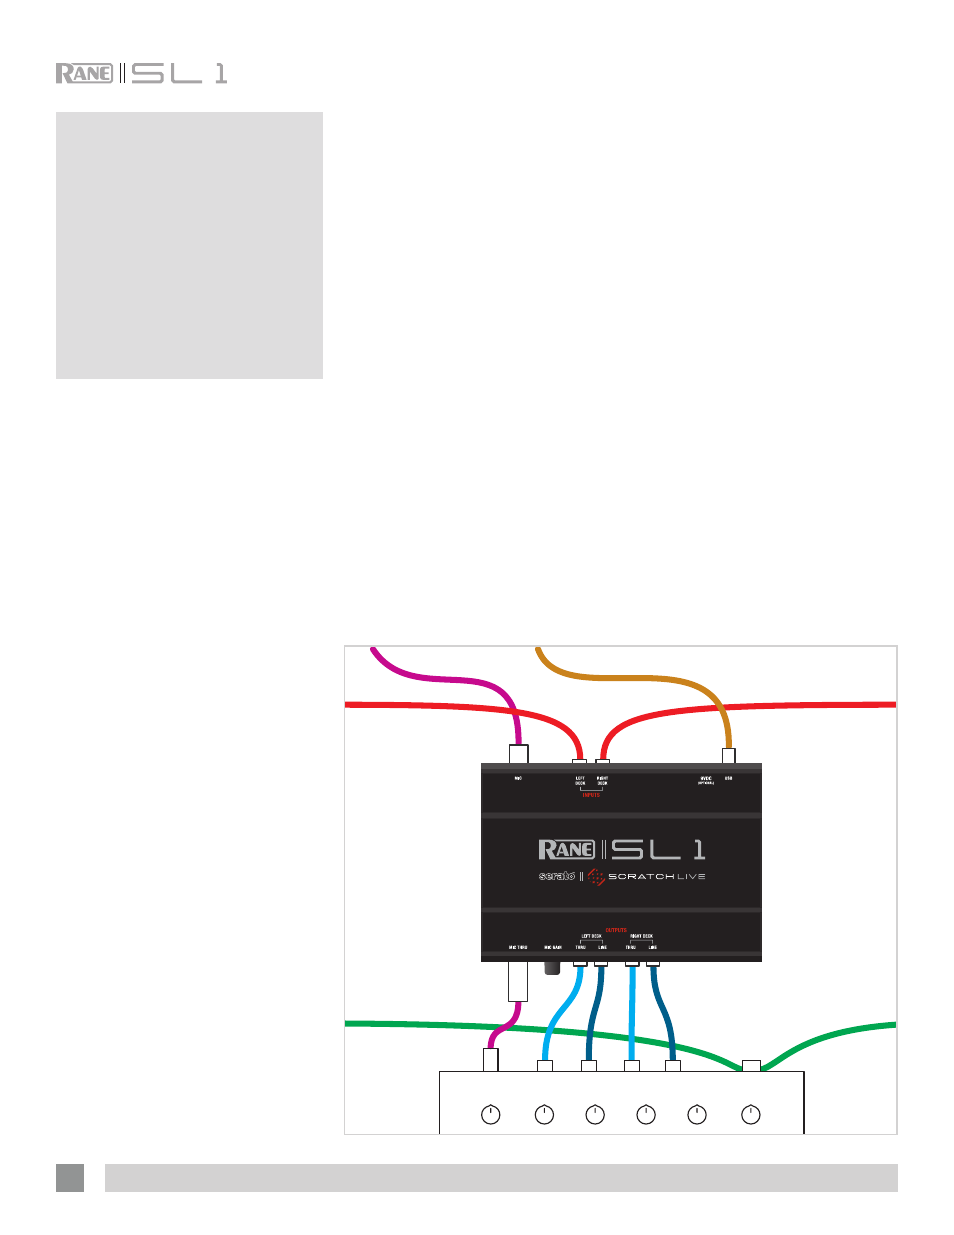
Connections
MIC IN
TO MIC
PHONO
LINE
PHONO
LINE
FROM TURNTABLE
OR CD PLAYER OUT
FROM TURNTABLE
OR CD PLAYER OUT
FROM TURNTABLE GROUND
FROM TURNTABLE GROUND
GROUND
USB TO COMPUTER