Rane RPM 26 User Manual
Page 6
Manual-6
RANEWARE MENUS
There are three RaneWare pull-down Menus.
The
System menu for “system-level” controls that apply to
the computer or all connected RW 232 devices. The
Device
menu for device-specific control and the
Help menu for on-
line help.
SYSTEM MENU
These menu commands apply to all connected RW 232
devices and contain the following menu items:
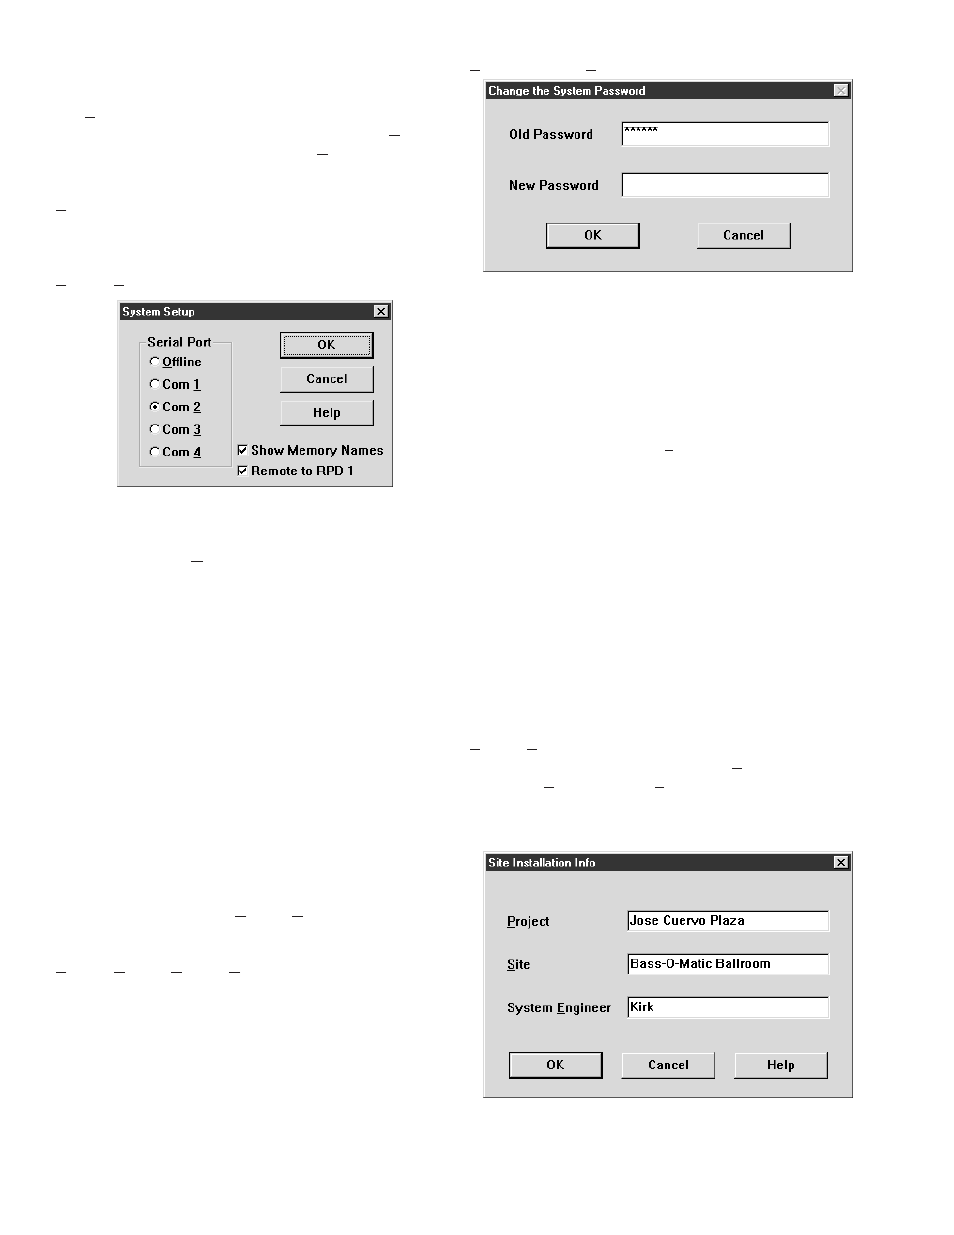
System|System Setup displays this screen:
The
Serial Port radio buttons on the left tell the computer
which Com port is being used to “speak” to the connected
RW 232 unit(s). The
Offline radio button permits use of the
software without connecting a unit. To operate an RW 232
unit, you must select the Com (serial) port that is physically
connected to the unit. This screen is also displayed the first
time you start RaneWare or after erasing the RW232.INI file
from your Windows directory.
Most laptop computers have a built in mouse. If you use
an external mouse with your laptop, you may need to use the
built in mouse if your laptop does not have two serial ports—
one for the mouse and a second for the RW 232 unit.
Check the
Show Memory Names check box to display the
Memory names in the RaneWare Button Bar whenever the
mouse is on top of a Memory recall button. Memory names
are edited in the
Site Control Panel Setup window. (See Site
Control Panel Setup below.)
The
Remote to RPD 1 check box is only used with
Rane’s RPD 1 product. Check this box only if you are using
an RPD 1 to remotely communicate with an RW 232 system.
When this box is checked, no communication with local RW
232 devices is possible. See
Dial and Hang up below for more
RPD 1 details.
System|Dial and System|Hang up
These selections are only used with Rane’s RPD 1
product. The RPD 1 is a telephone interface which, when
used with an external modem, allows remote diagnostics of
RW 232, AMX or Crestron systems. Thus, from the office, a
system designer can call a properly equipped remote system
to view and control that system’s RW 232 settings.
System|Change Password displays this screen:
This window allows you to change the password. The
default password set by the factory at the time the software
ships is please. Passwords are case insensitive, therefore,
PlEASe, pLEasE, PLEASE and please are all equivalent. Type
the old password in the Old Password edit box, then type the
new one in the New Password box. Click OK. Then be sure to
note the new password somewhere, preventing future embar-
rassment.
Certain commands such as
Lock Device (see page
Manual-9) or exiting from the
Site Control Panel require the
correct password before they will execute.
Important Note: The computer stores the password, not
the units. Therefore, it is wise to think of the RW 232 pass-
word as the computer’s password, not as each individual
system’s password. This makes it easier to remember the
password since it will be the same for every installation where
you remove the computer once the system is set up. This also
provides the flexibility to have unique passwords for those
installations where a dedicated computer is left on site to
operate the system. If you return to an installation with locked
devices, and do not have the same computer used to initially
lock the devices, you will only need to know the computer’s
password, not the original password used to lock the devices.
System|Edit Installation Info
This selection allows you to enter the
Project name,
installation
Site and System Engineer for a given project. All
of these are printed on the Device Report printouts. Click in
the edit box or hold the Alt key and press the underlined
character to type new names.
Similar to the password, the
Site Installation Info is stored
in the computer, not in each unit. The
Site Installation Info is
also stored with backup memories when you save a unit’s
memories to a file.