Ii. front panel description – Rane AD 13 User Manual
Page 4
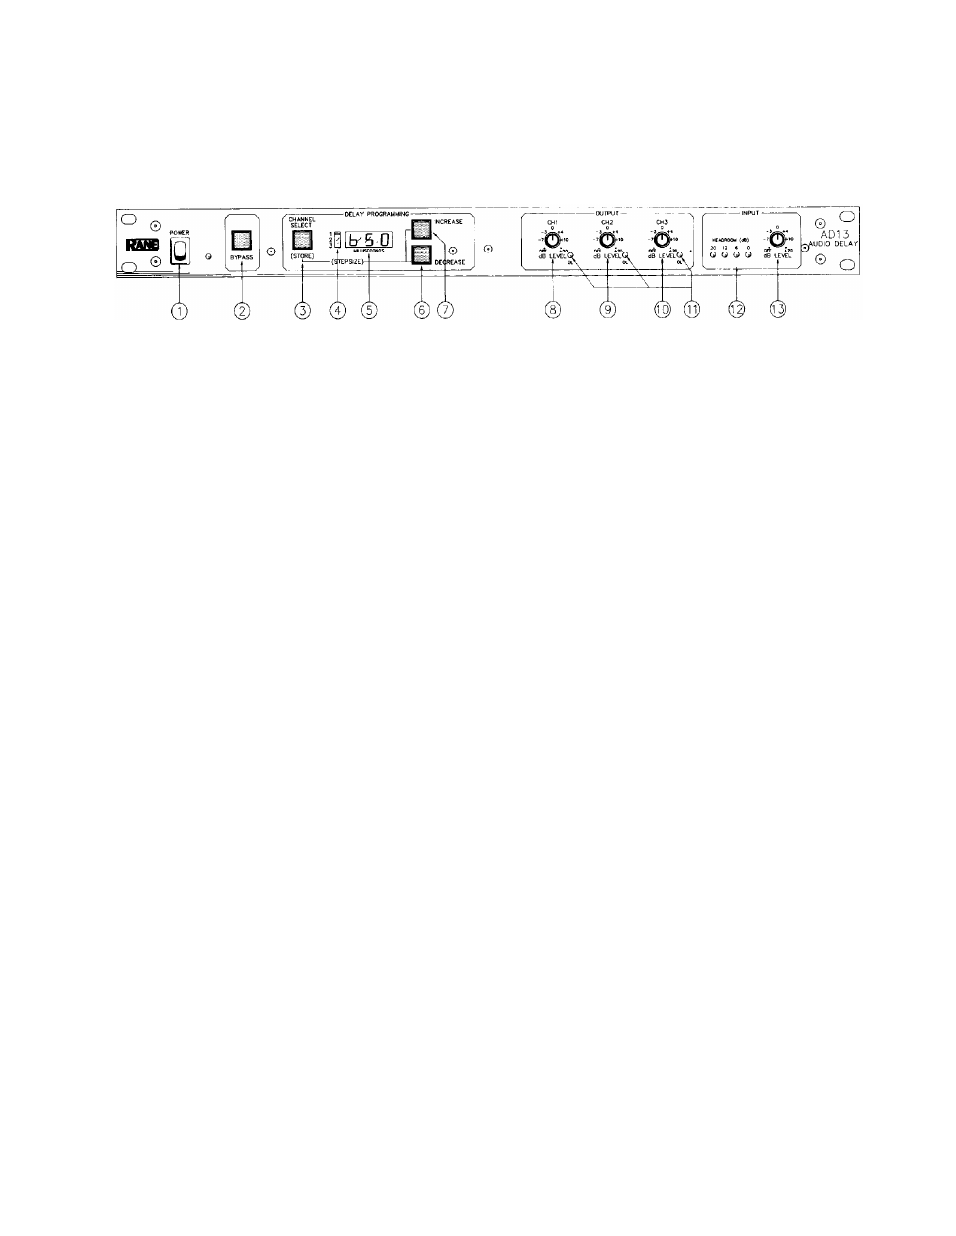
II. FRONT PANEL DESCRIPTION
1. POWER SWITCH: Pressing the top half of this switch will cause the mechanism contained
within to connect power to the circuitry of the unit causing it to operate (ON). Pressing the
bottom half will snap the switch into the opposite operating mode (OFF).
2. BYPASS SWITCH: Pressing this momentary pushbutton toggles all of the outputs of the AD
13 between the active and bypass mode. Bypass is indicated on the LED display by an “OFF”
indication.
3. CHANNEL SELECT SWITCH: Pressing this momentary pushbutton advances the output
channel pointer by one increment which simultaneously displays the delay setting of the
selected channel on the LED display. THIS BUTTON ALSO CAUSESTHE DELAY SETTING OF
THE PREVIOUSLY SELECTED CHANNELTO BE STORED IN THE NON-VOLATILE MEMORY
OF THE AD 13.
4. OUTPUT CHANNEL POINTER: This LED pointer alerts the operator to the channel number
currently being displayed by the LED display.
5. LED DISPLAY: The primary purpose of this display is to inform the user as to the amount of
delay currently applied to any of the three outputs, these outputs being selected by the
channel select switch and pointed to by the LED channel pointer to its left. The display also
indicates overall bypass by an “OFF” indication and can be used to display the software
revision of the system while in the bypass mode by holding the channel select button down
and pressing the “DECREASE” switch.
6. DECREASE BUTTON: Pressing this button will decrease the amount of delay on the selected
channel. PRESSING THE CHANNEL SELECT BUTTON WHILE THE DECREASE BUTTON IS
HELD WILL TOGGLE BETWEEN THE 20 MICROSECOND DELAY STEPS AND 1 MILLI-
SECOND DELAY STEPS.
7. INCREASE BUTTON: Pressing this button will increase the amount of delay on the selected
channel. Pressing the channel select button while the increase button is held will toggle
between 20 microsecond delay steps and 1 millisecond delay steps.
8. CHANNEL 1 OUTPUT LEVEL CONTROL: This rotary control varies the output level of
channel 1 from “off” at its full counterclockwise position to unity at its center detent “12:00”
position to +20 dB at its full clockwise position.
3