Operation – Ryobi AP4500 User Manual
Page 2
2
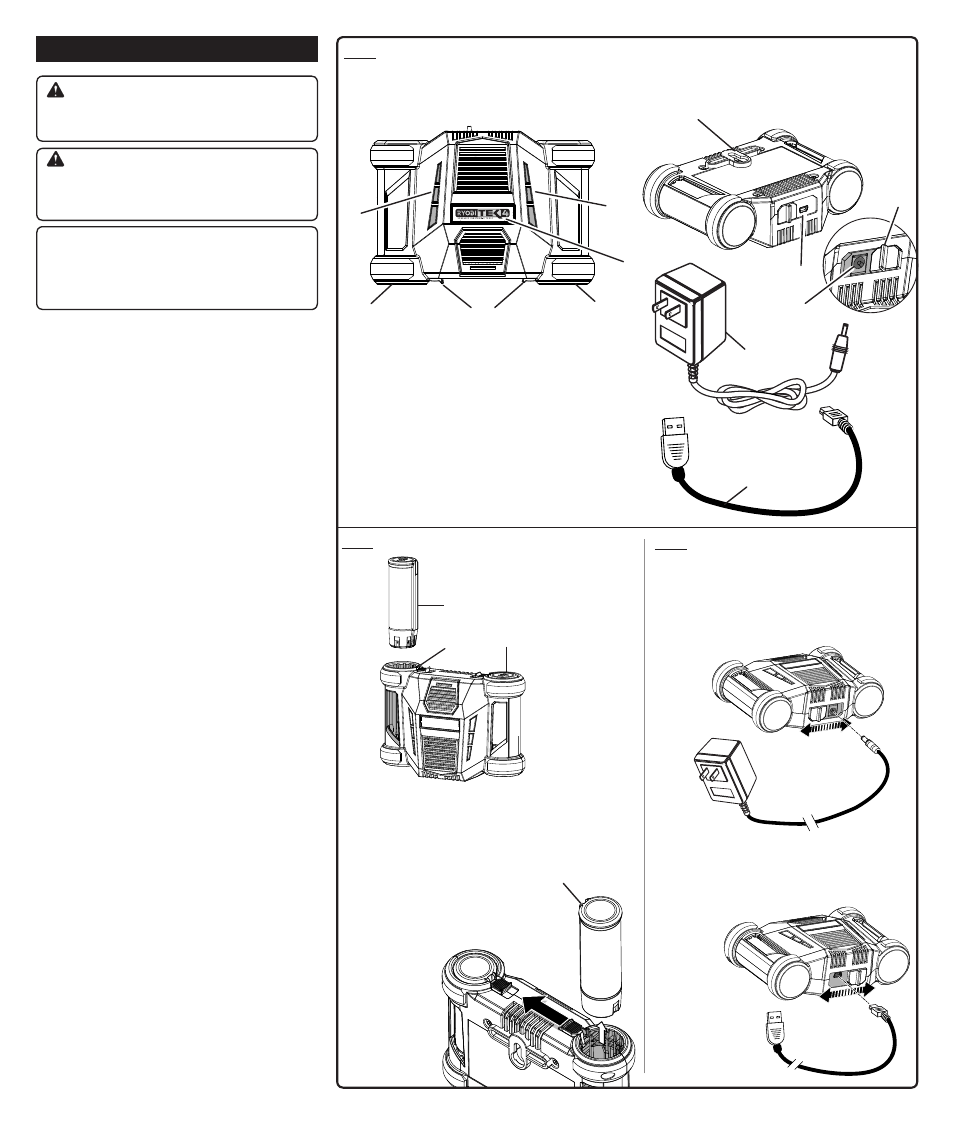
A - Battery ports (Logements des piles, puertos de baterías)
B - Fuel gauge LEDs
(indicateur de charge, indicador de carga)
C - Latches (loquets, pestillos)
D - Tek4
®
logo LED (Tek4
®
logo, Tek4
®
logo)
E - 12 V DC port (port d’alimentation c.c. de 12 v, puerto de
alimentación de cc de 12 v)
F - USB port (port USB, puerto de USB)
G - Slide cover (couvercle coulissant, cubierta deslizante)
H - Keyhole hanger (« trous de serrure » pour la suspension,
“bocallave” para colgar
I - 12 V DC adaptor (adaptateur de 12 V c.c., adaptador
para CC de 12 V)
J - USB adaptor (adaptateur USB, adaptador USB)
A - Battery pack (bloc-pile, paquete de baterias)
B - Battery port (logements des piles, puertos de baterías)
C - Battery pack in charger (bloc-piles dans le chargeur, el
paquete de baterías aparece en el cargador)
D - Raised rib (épaulements surélevés, costillas realzadas)
Fig. 1
Fig. 2
Fig. 3
A
C
A
I
J
F
E
G
B
D
B
TOP VIEW OF CHARGER
VUE DU DESSUS DU CHARGEUR
VISTA SUPERIOR DEL CARGADOR
REAR/BOTTOM VIEW OF CHARGER
VUE ARRIÈRE ET DU DESSOUS DU CHARGEUR
VISTA POSTERIOR E INFERIOR DEL CARGADOR
12V DC ADAPTOR TO DC POWER PORT
ADAPTATEUR DE 12 V c.c. RELIÉ À UN PORT
D’ALIMENTATION c.c.
ADAPTADOR DE CC DE 12 V PARA PUERTO DE
ALIMENTACIÓN DE CC
USB ADAPTOR TO USB PORT
ADAPTATEUR DE USB RELIÉ À UN PORT USB
ADAPTADOR DE USB PARA PUERTO DE USB
ALIGN RIB ON BATTERY PACK WITH
GROOVE IN CHARGER
NERVURE DU BLOC-PILES EST ALIGNÉE
AVEC LA RAINURE DU CHARGEUR
REBORDE ELEVADO DEL PAqUETE ESTÉ
ALINEADO CON LA RANURA DEL
CARGADOR
PRESS LATCH TO RELEASE
BATTERY PACK
APPUYER SUR LE LOqUET POUR
RETIRER LE BLOC-PILES
PRESIONE EL PESTILLO PARA LIBERAR
EL PAqUETE DE BATERÍAS
H
A
B
C
OPERATION
WARNING:
Always wear eye protection marked to comply with ANSI
Z87.1. Failure to do so could result in objects being thrown
into your eyes resulting in possible serious injury.
WARNING:
Do not use any attachments or accessories not recommended
by the manufacturer of this product. The use of attachments
or accessories not recommended can result in serious
personal injury.
CAUTION:
If at any point during the charging process none of the LEDs
are lit, remove the battery pack from the charger to avoid
damaging the product. DO NOT insert another battery.
Return the charger and battery to your nearest service
center for service or replacement.
CHARGING A BATTERY PACK
See Figure 2, page 2.
If the charger does not charge the battery pack under
normal circumstances, contact Customer Service at
1-800-525-2579.
Use only with the recommended battery pack.
Connect to only one power source at a time.
Connect the charger to a power source using only the
adaptors provided with the product.
If connecting the charger to a wall outlet, make sure the power
supply is normal household voltage,
120 volts, AC only,
60 Hz. Connect the adaptor to the charger first, then connect
to the wall outlet.
If connecting the charger to a power source using the USB
adaptor, connect the USB adaptor to the charger, and then
plug the USB adaptor into the power source.
Do not place the charger and battery pack in an area of
extreme heat or cold. They will work best at normal room
temperature.
NOTE: The charger and battery pack should be placed in a
location where the temperature is more than 50°F but less
than 94°F.
When inserting a battery pack into the charger, make sure
the raised rib on the battery pack aligns with the groove in
the charger. Press on the battery pack to be sure contacts
on the battery pack engage properly with contacts in the
charger. The battery pack will click into place.
The charger will make a clicking sound when it begins to
evaluate the battery pack. This is normal and does not indicate
a problem.
The battery pack will become slightly warm to the touch while
charging. This is normal and does not indicate a problem.
After charging is complete, the LEDs will remain on until
the battery pack is removed from the charger or charger is
disconnected from the power supply.
When batteries become fully charged, unplug the charger
from the power supply and remove the battery pack from
the charger.
To remove a battery pack from the charger, press the latch
next to the battery port.
CHARGING A HOT BATTERY PACK
The battery pack will not begin to charge if it is above normal
temperature range. When the battery pack cools down to
approximately 120°F, the charger will automatically begin fast
charge mode.
CHARGING A COOL BATTERY PACK
The battery pack will not begin to charge if it is below normal
temperature range. When the battery warms to a temperature
of more than 32°F - 50°F (slow charge mode) or > 50°F (normal
charge mode), the battery pack will begin charging.
DUAL PORT CHARGING
See Figure 3, page 2.
The charger will accept two rechargeable Tek4 battery packs
at one time. However, both battery packs cannot be in charge
mode at the same time.
The LEDs for each battery port operate independently. When
you insert one battery pack, then a second, the first battery
pack will charge. The second battery pack’s charge status will
be indicated by the LEDs.
D