Ab c d, Ab c c – Workrite Willow Dual Assembly Instructions User Manual
Page 2
2
Workrite Ergonomics 800.959.9675 www.workriteergo.com
Verify that you have all the hardware and tools needed for the assembly
2
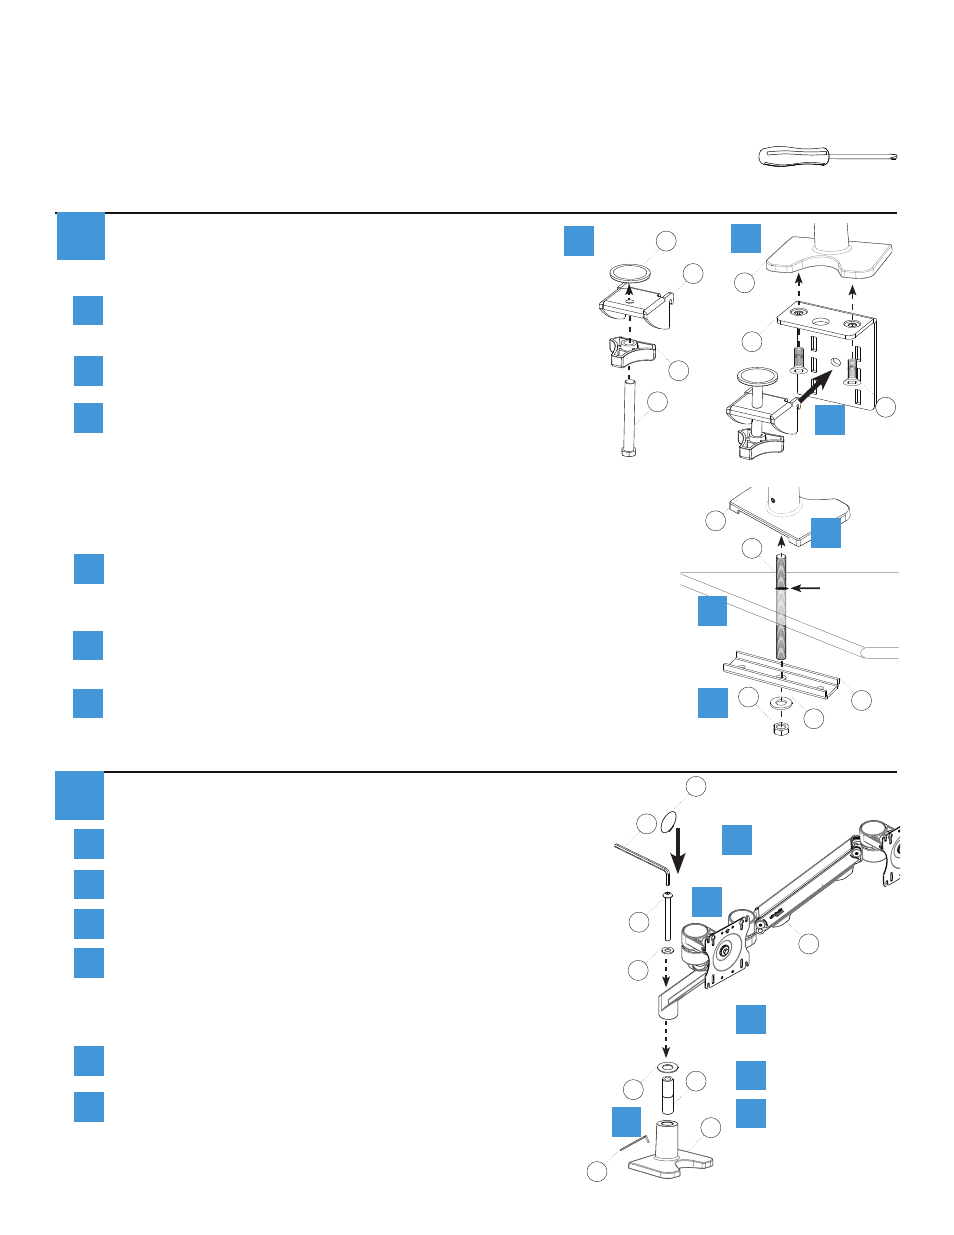
Attach Willow Arms to Desk Base
Insert Pivot Pin (W) into Desk Base Assembly (I).
a
a
b
c
d
Clamp Mount:
WA2200-C-S only
Assemble Clamp - Thread Hex Bolt (M) through Knob (N)
and Upper Clamp Bracket (J) and tighten securely. Press
the Plastic Clamp Pad (O) onto the end of the Bolt.
Assemble Base
1
a
a
b
Put Desk Base assembly onto work surface then slide
teeth of Clamp into Bracket slots. Use the highest slots
possible for best clamping. Turn knob to tighten.
c
Mount Lower Clamp Bracket (K) to Desk Base (I) with
Screws (L) and tighten using a #3 Phillips Screw Driver.
b
c
O
J
N
M
I
K
L
f
Grommet Mount:
WA2200-G-S only
Drill bolting hole in worksurface if needed. Put Desk Base (I)
directly on the bolting hole of worksurface and insert and tighten
the ⅜" x 16 x 4½" threaded Stud (P).
Place the U-Bracket (S) onto the Threaded Stud with the flat bottom
of the U facing down.
Place the ⅜" Steel Washer (Q) followed by the ⅜" x 16 Hex Nut (R)
onto the Threaded Stud and tighten securely.
a
b
Bolting
hole >⅜"
a
b
c
c
R
Q
S
P
I
OR
G
U
T
X
Y
W
I
#3 tip Phillips screwdriver
Check your packages against the parts list
on page 1 to verify that you have all the
parts needed.
You will also need the following tools:
e
V
Put Plastic Pivot Washer (T) over Pivot Pin.
b
Put Arm Assembly (A) onto Pivot Pin.
c
Place Steel Washer (Y) onto Button Head Allen Bolt (X) and
install into the Arm assembly and base. Tighten with
7
/
32
" Allen
Wrench (U) – be sure the arm is snug but rotates freely.
d
Tighten Set Screw in back of Desk Base with ⅛" Allen Wrench
(V).
e
Snap Pivot Cover Cap (G) into top of Arm Assembly.
f
A