Blue, Reverse flush exchange – Symtech VFX 1 User Manual
Page 12
11
REVERSE FLUSH EXCHANGE (
BLUE
)
Connection Possibilities
Reverse Flush exchanges entail opening the cooling system up at either end of the upper radiator hose connection via
step adapters and adapter hoses of the appropriate size, connect the VFX 1 new and used coolant lines to the installed
adapters and flush the used coolant out via new coolant being introduced. There are three possible connection scenarios
to achieve the proper flow direction to successfully perform the exchange and each scenario must be tried in the
following order:
1.
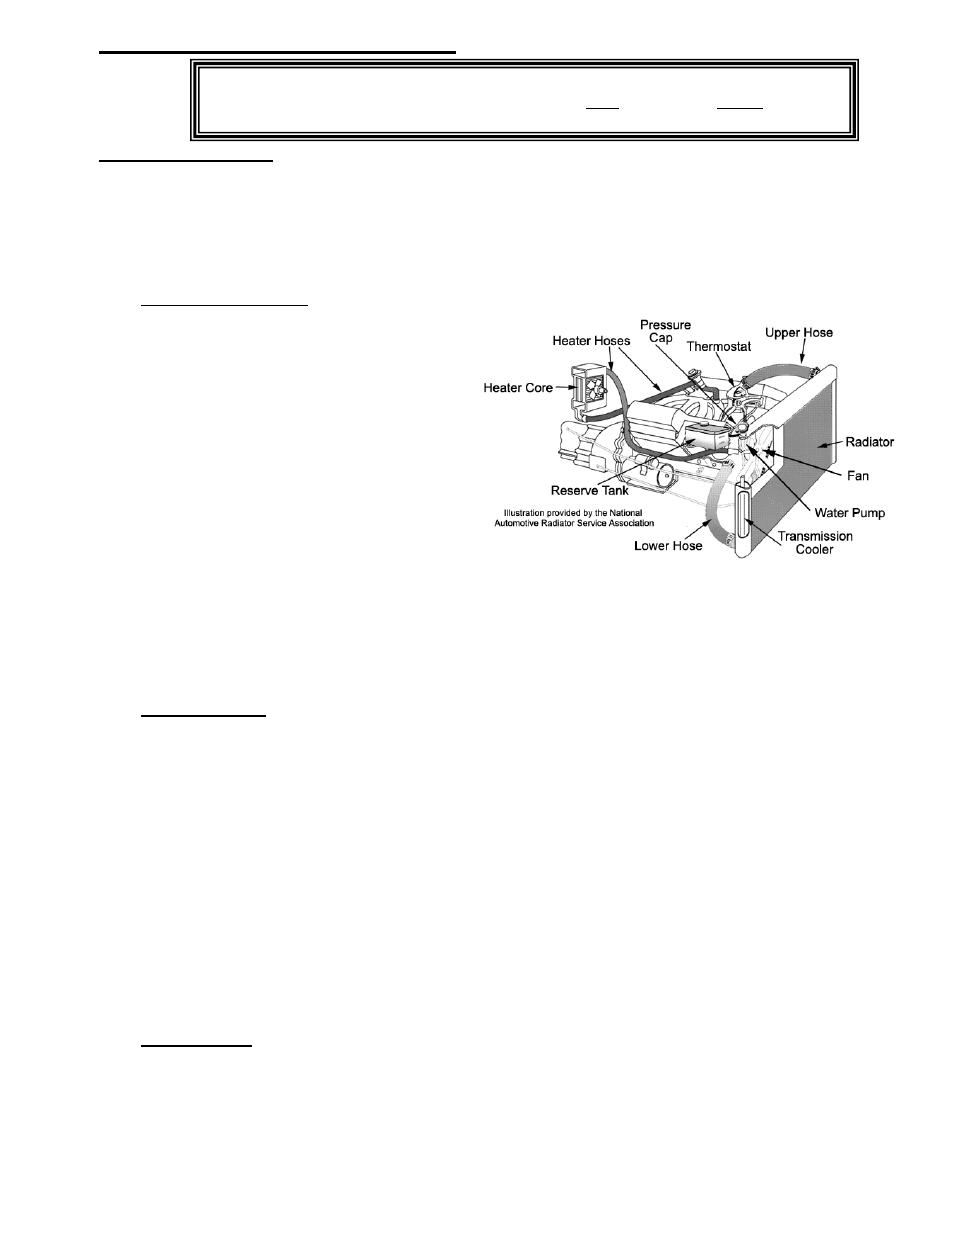
TRADITIONAL FLOW - Most vehicles have
traditional coolant flow – coolant flows downward
through the radiator, pulled by the water pump
through the lower radiator hose, pushed through the
engine block water jacket, upward through the heads
and intake, out the thermostat (if engine is to normal
operating temperature) and back to the radiator to
repeat the process via upper radiator hose. Please
refer to diagram.
To Reverse Flush this type system, the upper radiator
hose is disconnected, and new coolant is introduced
via adapters and adapter hoses against the “backside”
of the thermostat. The pressure of the new coolant
forces open the thermostat and flows backwards from
normal flow “pushing” the used coolant and debris
through the cooling system and out the upper radiator
hose into the used fluid tank of the VFX 1.
NOTE: After connecting unit for Traditional Flow, if new coolant pump DOES NOT pulsate and used coolant IS NOT
flowing from radiator to unit, RECHECK all connections, control panel valves, and flow control valves for
correctness and RETRY. IF problem persists, the vehicle’s cooling system is a REVERSE FLOW SYSTEM
or THE THERMOSTAT WILL NOT OPEN FROM THE BACK SIDE.
2.
REVERSE FLOW – Reverse Flow cooling systems circulate in the opposite direction of traditional systems,
because the thermostat is located in the bottom of the engine block. This means coolant flows up through the
radiator, through the upper radiator hose connection, into the top of the engine block, downward through the
engine block, through the thermostat (if the engine is at operating temperature), and back to the lower radiator via
lower radiator hose for re-circulation.
To Reverse Flush these vehicles follow the same procedures as a Traditional Flow flush, LOWER LEVEL,
ADAPTER SET-UP, However reverse the connection of the coolant flow control valves. Connect the
RED/NEW coolant flow control valve to the upper radiator hose adapter and the BLACK/USED coolant
flow control valve connected to the engine block outlet adapter.
PRESSURE TEST, DISCONNECTING, and TOPPING OFF procedures remain the same once the fluid
exchange is complete.
IF Reverse Flow connection is attempted and new coolant pump STILL DOES NOT pulsate and used
coolant IS NOT flowing from engine block to unit, RECHECK all connections, control panel valves, and
flow control valves for correctness and RETRY. IF problem persists, refer to third connection procedure
below.
3.
THERMOSTAT – The third connection option is utilized only when TRADITIONAL and REVERSE methods
do not work. The third option does not allow for a reverse flush, but does allow a coolant fluid exchange. Follow
the same procedures as a Traditional Flow flush, LOWER LEVEL, ADAPTER SET-UP, however reverse the
connection of the coolant flow control valves as described in Reverse Flow (#2), with the RED/NEW coolant
NOTE: Before Starting, Control Panel Descriptions and Functions must be read and
understood. If vehicle is hot, Pressure Relief procedures must be performed before attempting
a Reverse Flush exchange!! The vehicle remains OFF during the entire Reverse Flush