Drain and fill exchange – Symtech VFX 1 User Manual
Page 10
9
DRAIN AND FILL EXCHANGE (
RED
)
Draining Cooling System
1)
Verify Pressure Relief Procedure described above has been performed.
2)
Verify adequate capacity for used fluid with used fluid sight gauge. Refer to
EMPTY USED coolant section to empty used coolant tank.
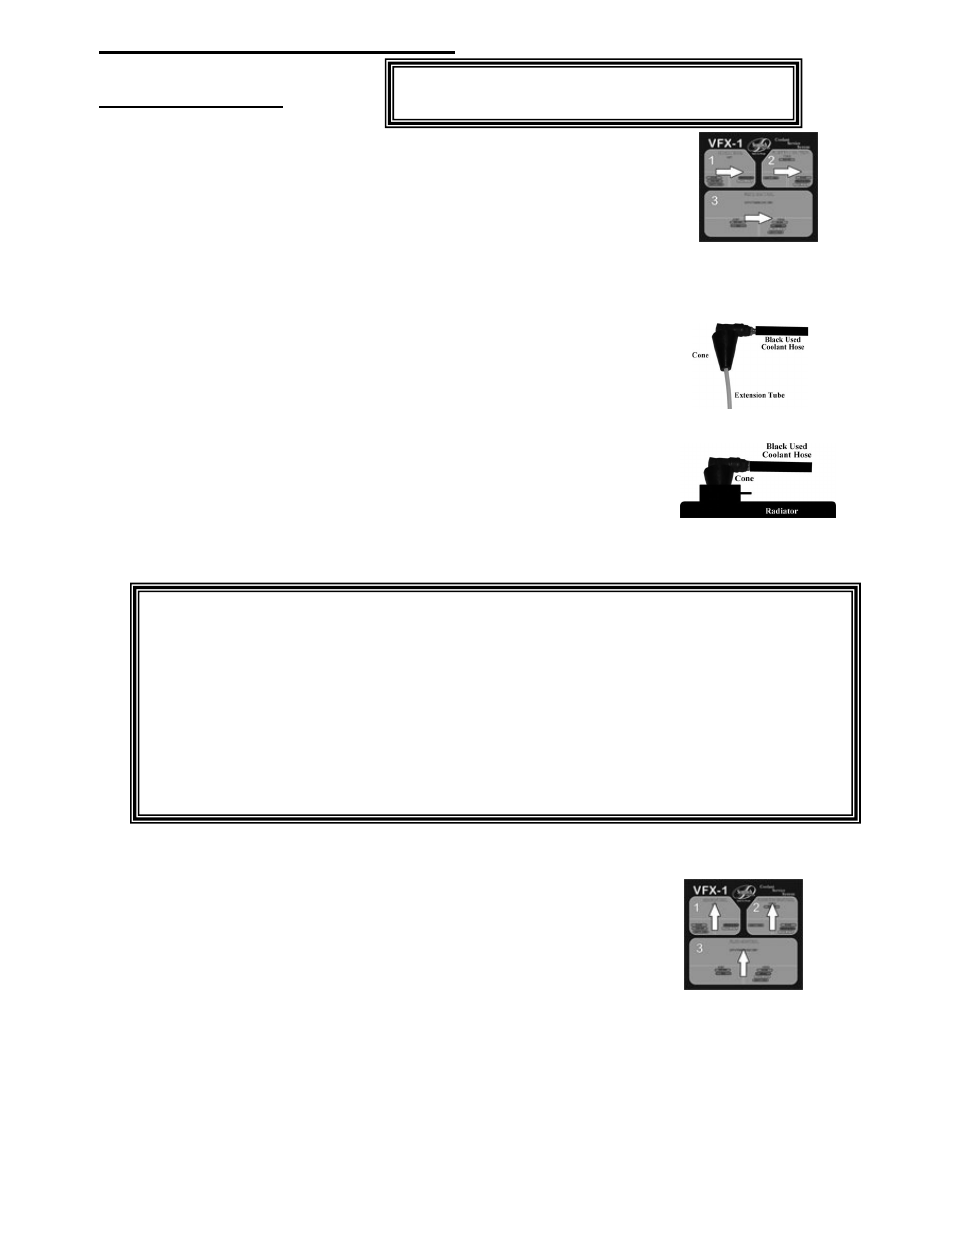
3)
Turn AIR CONTROL valve (#1)
FUNCTION CONTROL valve (#2) to the
right, DRAIN-N-FILL (
RED
), and FLUID CONTROL valve (#3) to the
right, DRAIN (
RED
). Vacuum will begin to build on the compound gauge.
(Fig 2)
4)
Insert longest nylon tube extension into small cone opening. Connect cone
assembly to BLACK/USED coolant hose. (Fig 2)
5)
Insert extension tube into overflow tank. The extension tube should reach
the bottom of the overflow tank. Do not allow cone to seat on plastic
overflow tanks.
6)
Open BLACK/USED coolant flow control valve. Used coolant will be
removed. Completely empty the overflow tank.
7)
Close BLACK/USED coolant flow control valve.
8)
Insert cone tip into radiator neck or coolant reservoir tank opening (see note
below) and open BLACK/USED coolant flow control valve. The vacuum
will securely seat and seal the cone into the opening and used coolant will
begin to be extracted from the cooling system. (Fig 3)
9)
Once cone is securely seated, start vehicle and observe used coolant
hose and vacuum gauge. When fluid stops flowing and the vacuum
gauge has reached at least 20in vacuum, turn off vehicle!
WARNING; be careful not to overheat the vehicle by running
the vehicle too long!!
WARNING; Fittings can become extremely hot during
DRAIN / FILL exchange.
10)
Do not remove cone from system!! Vacuum reached in cooling
system is used to “pull in” new coolant. If cone is removed, or seal is
lost, the vacuum must be restored to remove air from system and
allow new coolant to be pulled into the vehicle’s cooling system.
11)
Return AIR CONTROL valve #1 and FLUID CONTROL valve #3
to OFF position. Turn FUNCTION CONTROL valve #2 to HOLD
position. ( Fig 4)
Note: For better exchanges, insert the longest possible nylon tube extension into the radiator or
coolant reservoir tank, being extremely careful not to force the tube or damage the internals of
the radiator or coolant reservoir tank. Once the longest possible nylon tube extension has been
determined insert the extension securely into the cone. This “longer dip-tube assembly” will
allow more of the used coolant to be removed from the system versus no dip-tube assembly.
Note: Some radiator neck openings are shallow – internal components such as the core or
supports are in close proximity to the opening. The neck may be so shallow that the
cone will bottom out on the core or internal supports preventing the cone to seal on
the radiator neck. Trimming or cutting back the narrow end of the cone to the
required diameter may be necessary to acquire a leak proof seal.
NOTE: The RED/NEW coolant hose is not used to perform
a DRAIN AND FILL (RED) coolant exchange.
Figure 1
Figure 3
Figure 2
Figure 4