Notice, Warning, 1l6) luxur y-lift – La-Z-Boy Luxury-Lift Power Recliner User Manual
Page 6
(1L6) Luxur y-Lift
®
Power Recliner with
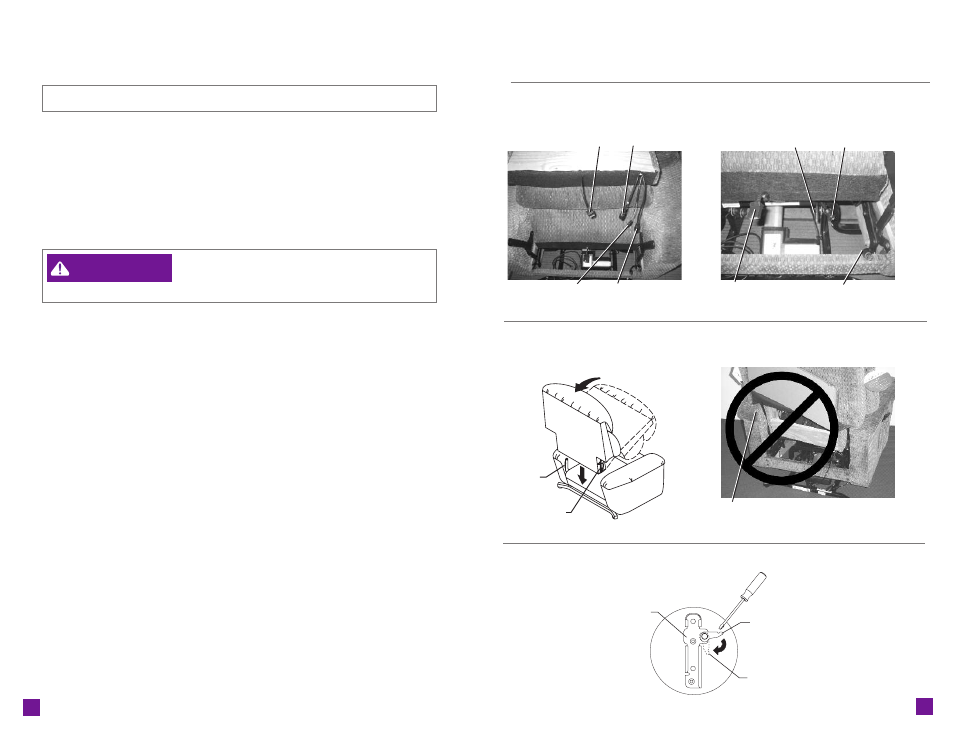
6-Motor Massage & Heat Assembly Details:
F
I G U R E
4
F
I G U R E
3
F
I G U R E
2
F
I G U R E
1
Power Supply
Connector
Massage Motor
Connector
Massage Motor
Connector
Hand Wand
Connector
Hand Wand
Connector
Lift Motor
Connector
Power Supply
Connector
Lift Motor
Connector
F
I G U R E
5
11
10
NOTICE:
Do not plug the transformer in until instructed.
1. Locate and identify the connector s . Do not connect until instr ucted.
•
Lay the back across the ar ms of the body (F
I G U R E
1).
•
Locate the eight wires with connector s . Four wires come from the lower
back, one from the rear of the seat, one from the ar m and two from
under the seat near the motor (F
I G U R E
1 and F
I G U R E
2).
•
The two large round connector s identified with yellow ta pe are for the
Hand Wand connection.
•
The other two large round connector s are for the Lift Motor connection.
•
The two small round connector s are for the Power Supply connection.
•
The two rectangular connector s are for the Massage Motor connection.
-
To reduce the risk of injur y:
•
Do not operate the unit until the back is installed and locked.
2. Install the back.
•
With the back across the ar ms of the body, lift the back at a slight angle
and align the brackets on the back with the brackets on the body (F
IGURE
3).
•
Lower the back onto the body, making sure the back and body brackets
are completely engaged.
•
To make sure the back is proper ly installed with both sets of back and
body brackets engaged, stand behind the chair and twist the back from
side to side. If one or both sides move out of position the brackets are
not engaged (F
I G U R E
4). Remove the back and repeat the steps a bove.
•
If you are una ble to install the back proper ly contact your La-Z-Boy
®
dealer for assistance.
•
Lock the brackets using a screwdr iver to push down the locking lever s
(F
I G U R E
5).
3. Connect the Hand Wand.
•
Align the w hite dots on the Hand Wand connector s . The Hand Wand
connector s are identified with yellow ta pe. Push the connector s together
until they are secured with no ga p between them.
4. Connect the Lift Motor.
•
Align the w hite dots on the Lift Motor connector s . Push the connector s
together until they are secured with no ga p between them.
5. Connect the Power Supply.
•
Align the connector s and push together until they are secured with no
ga p between them.
6. Connect the Massage Motor s .
•
Align the clips for the Massage Motor connection. Push the connector s
together until they lock.
(Assembly Instructions Continued)
(1L6) Luxur y-Lift
®
Power Recliner with
6-Motor Massage & Heat Assembly Instr uctions:
Body
Bracket
Back Bracket
Back and body brackets on this side are not
engaged. Remove the back and reinstall.
Back
Bracket
Locking
Lever
Locked
Position
WARNING