Replacement of filter cartridges and membrane – Environmental Water Systems RO4-UV User Manual
Page 14
14
www.ewswater.com O: 702.256.8182; M-F 8:30am-4:30pm PST E: [email protected]
Step 1 Close inlet water supply to the system.
Step 2 Open dispenser/faucet. Lock handle in the up position and/or allow water to flow (water should stop in a short time) and
keep open to relieve pressure.
CAUTION:
WATER WILL BE PRESENT WHEN FILTERS ARE CHANGED.
A pan, towel, etc. should be placed under the system to catch any water.
Step 3 Turn cartridge counterclockwise until it stops. Pull down (Hint: it may benefit from a little “wiggle”)
Step 4 Remove cartridge and dispose, preferrably by recycling the cartridge.
Step 5 Locate the filter cartridges and single membrane. Starting from the left or “FEED” side, Stage 1 insert the Orange pre-filter, next
(the middle) Stage 2 insert the Blue membrane (note drain connection at bottom) and lastly Stage 3 insert Green post-filter.
Applicable for 4-Stage units only: Inline 5 micron pre-sediment filter is clipped onto the Orange pre-filter cartridge inserted into Stage 1.
WARNING:
PLACING FILTERS AND MEMBRANE IN THE WRONG ORDER WILL ADVERSELY EFFECT THE OPERATION OF THE RO SYSTEM
Note: Inserting the all cartridges: At the blue top of each cartridge find the side with two (2) notches. Line the notches up and insert
cartridge into the head assembly. Once cartridge is fully inserted into the head turn clockwise and completely lock into position.
CAUTION:
Inspect o-rings at cartridge top. Make sure they are clean, free of any debris and not damaged or kinked. Make
sure it is correctly seated into the channel before replacement.
Step 6 Follow system start-up procedures and make sure all tubing connections are correct.
WARNING:
NOT FOLLOWING SYSTEM START-UP PROCEDURES WILL ADVERSELY EFFECT SYSTEM OPERATION
Replacement of Filter Cartridges and Membrane
Familiarize yourself with the system, its’ replacement filters and maintenance.
To Register, take note of the Model # found on the unit’s bracket,
Understand your system’s capabilities
See your options in water treatment, for you , your family and your home by EWS, Inc.
Register Your System
Register this Product - It is a Requirement for Warranty
It is recommended that filters be changed at least annually or more frequently based on usage and
local water conditions. The quantity and quality of the water processed effects the life of the filters.
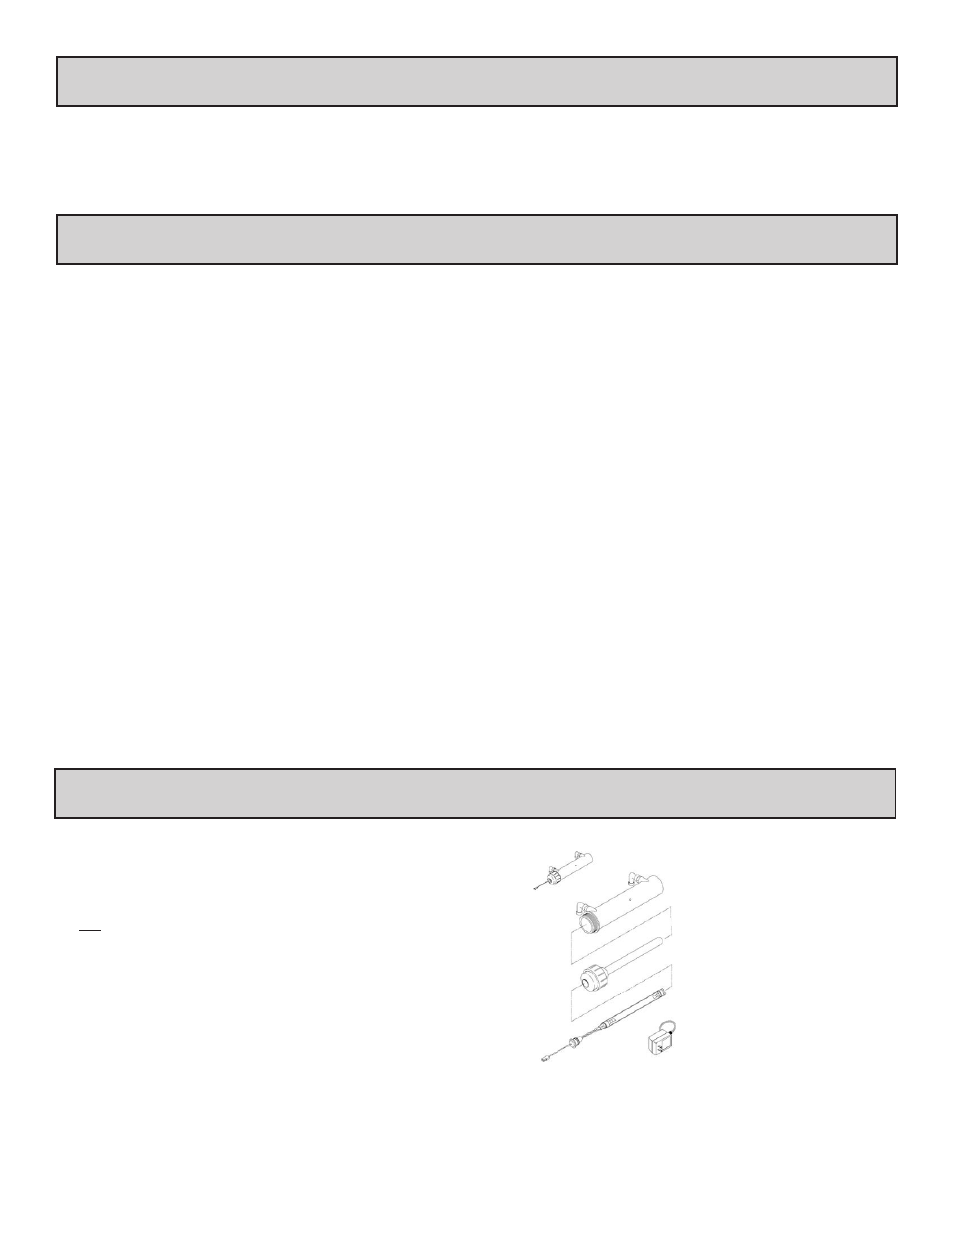
Annual Replacement of UV Lamp (Model No. RO3-UV or RO4-UV Only)
Step 1:
Unplug the transformer. Then disconnect the UV lamp cord.
Step 2:
Pull firmly on the UV lamp tail only to remove the lamp.
Do Not remove cap at top of UV Module
Step 3:
Insert and firmly press new UV lamp into the top of the cap.
Reconnect UV lamp cord.
Step 4:
Reconnect UV lamp cord. Plug in unit transformer.
WARNING:
DO NOT DISCONNECT UV MODULE FROM THE FACTORY
CONNECTIONS AND DO NOT OPEN UV CAP FROM UV
MODULE FOR TYPICAL UV LAMP REPLACEMENT.
Caution - Please take note:
Complete UV Housing replacement is recommended by manufacturer every 3 years.
The part with lamp included can be purchased with filter replacements when applicable.
1 - Fully Assembled UV Module
2 - UV Module Housing
3 - UV Cap with Quartz Glass Sleeve
4 - UV Lamp with Lamp Cord
5 - Transformer
(connects to lamp cord)
1
4
3
2
SCHEMATIC FOR ILLUSTRATION PURPOSES
5