Selecting flash patterns, Warning – Code 3 Solex User Manual
Page 4
Selecting Flash Patterns
Use the following instructions for lightbars without programmable light head pairs.
Note: For lightbars equipped with programmable light head pairs refer to the following:
If the lightbar has all single color light heads, please see supplement T16406 (800Series
Software).
If the lightbar has any multi-color light heads, please see supplement T54006 (950Series
Software).
STEP 1
Select the desired 3-Level mode to program by applying +power to the appropriate wire in the 16 conductor cable.
There are seven possible 3-Level modes (see Table 1). The factory default is different for each of the 3 -Level modes. The standard progressive
switch will use the Level-1, Level-2 and Level-3 modes. The defaults for Level-1, Level-2 (L1 + L2) and Level-3 (L1 + L2 + L3) are identified in Table
1A. When using individual switches, make sure to select patterns for all switch combinations.
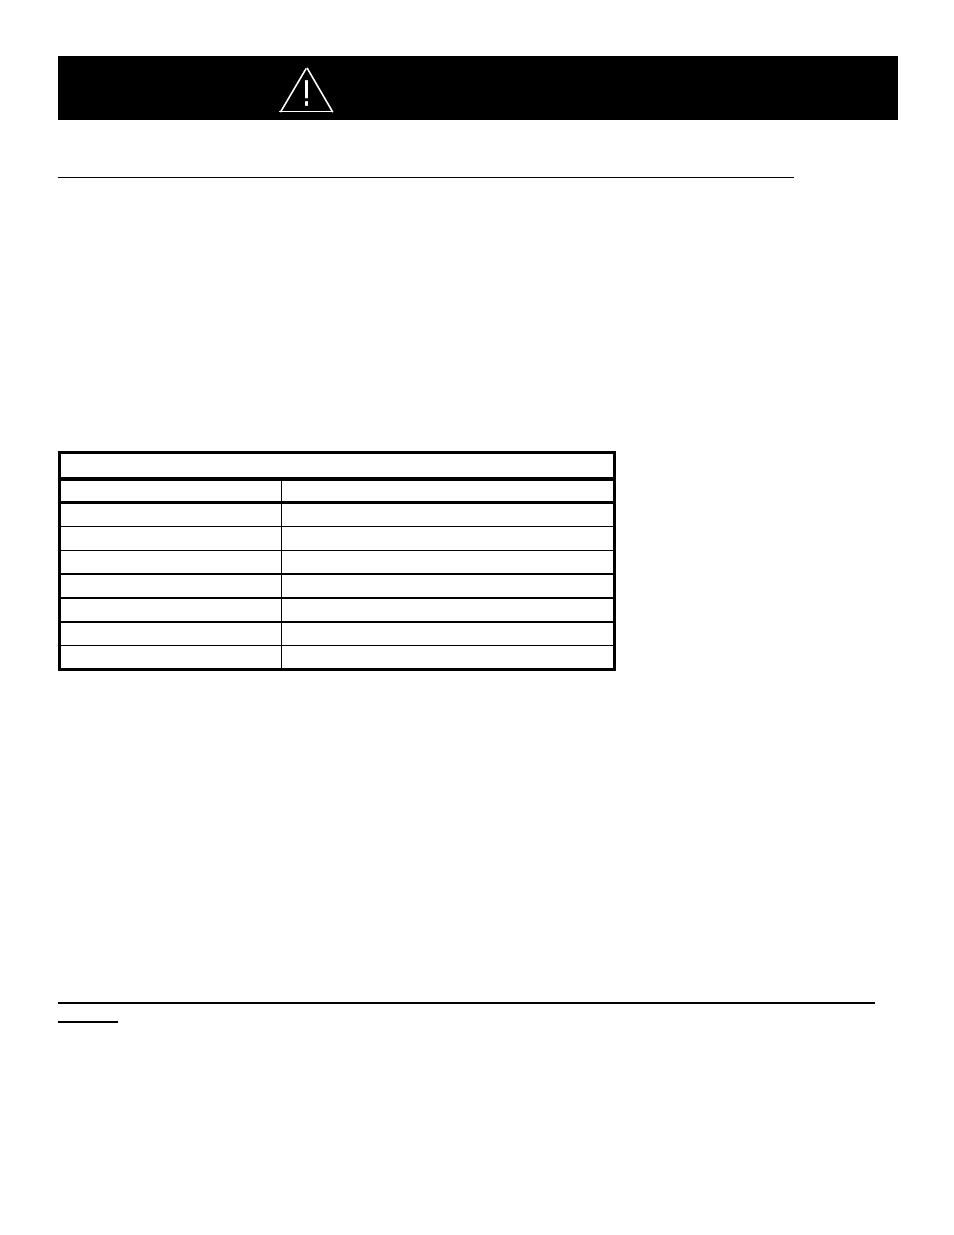
3-LEVEL MODES OF OPERATION
MODE NUMbER
wIRES ACTIVATED
L1
GRN/BLK (LEVEL-1)
L2
WHT/BLK
L1 + L2
GRN/BLK & WHT/BLK (LEVEL-2)
L3
RED/BLK
L1 + L3
GRN/BLK & RED/BLK
L2 + L3
WHT/BLK & RED/BLK
L1 + L2 + L3
GRN/BLK, WHT/BLK, & RED/BLK (LEVEL-3)
Table
1
STEP 2
Observe the flashing pattern operation and determine which pattern is in operation. Refer to Table 1A. This table shows the available flash pat-
terns. Note: the Factory Default is different and identified in the table for each of the flash mode Levels (L1, L2, L3). Once the flash pattern has been
determined, proceed to Step 3
.
STEP 3
Scroll to the next flash pattern by momentarily holding the Pattern Select wire (BLK/RED) to +power for ~1 sec. The light bar will stop flashing when
the wire is connected to +power. Release the wire and the next pattern as listed in Table 1A will begin to flash. The new pattern is automatically
stored each time. Repeat this procedure for each of the seven possible 3-level modes.
NOTE: To restore the Factory Default Emergency Warning Flash Patterns (see Table 1A), hold the pattern select
wire to +power for ~four (4) seconds.
SEE FLASh PATTERN SELECTION NOTES ON FOLLOwINg PAgES
Make sure +12v is only applied to the function you are trying to program - otherwise program function will not
operate.
This Product contains high intensity LED powered devices. To prevent eye damage,
DO NOT stare into light beam at close range.
wARNINg!