Alumax WC 66 User Manual
Page 12
5b
INSTRUCTION MANUAL
12
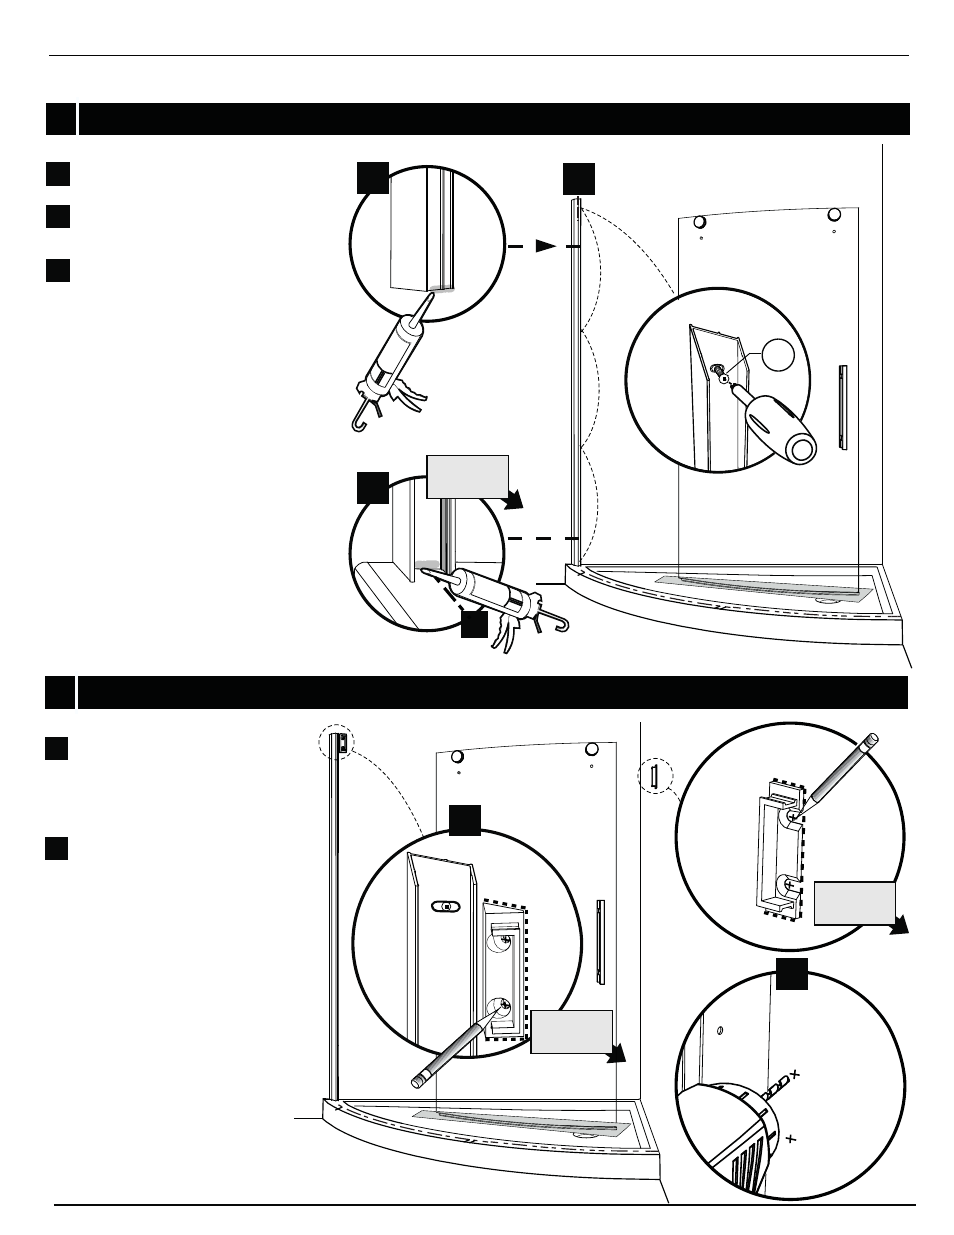
WALL BRACKET BACK PLATE
5
WALL JAMB INSTALATION (CONTINUED)
4
Add silicone to the exterior bottom edge of
the wall jamb.
Fasten the wall jamb to the wall with 1-1/4”
screws (24) through the previously installed
wall plugs. (x4)
Add silicone to interior bottom edge of
wall jamb
4f
4g
4h
4g
Align the back plates of the wall
brackets to previously traced
mark lines on the wall. Trace
the holes centers to determine
drilling location (x2). Remove the
back plates.
Drill marked holes in walls by
using the 1/4” drill bit.
5a
5b
5a
INTERIOR
SHOWER SIDE
INTERIOR
SHOWER SIDE
4f
24
7a
INTERIOR
SHOWER SIDE
4h
See also other documents in the category Alumax For Home:
- 300c (9 pages)
- 300cv (8 pages)
- 300d (9 pages)
- 338 (9 pages)
- 340 (9 pages)
- 340 Deluxe (9 pages)
- 390c Supplement (5 pages)
- 390cv Supplement (4 pages)
- 391 (12 pages)
- 392 (11 pages)
- 393 (11 pages)
- 394 (11 pages)
- 640S (8 pages)
- 640 (8 pages)
- 640D (7 pages)
- 641 Side Panel (6 pages)
- 694 (6 pages)
- 700c (7 pages)
- 733 (8 pages)
- 738 (8 pages)
- 738 Towel Bar (1 page)
- 740D (8 pages)
- 790c Supplement (4 pages)
- 791 (11 pages)
- 792 (12 pages)
- 793 (12 pages)
- 793 Buttress Supplement (1 page)
- 794 (11 pages)
- 794s (9 pages)
- 795 (10 pages)
- 890 (9 pages)
- 890c (8 pages)
- 1040 (9 pages)
- Deluxe Towel Bar (1 page)
- Transportation Latch (1 page)
- DesignLine Hinge (5 pages)
- P-DR1W-48-60 (14 pages)
- P-DR1W-72 (15 pages)
- P-DR1WT-60 (14 pages)
- P-DR2W-48-60-CRP (18 pages)
- P-DR2W-48-60-CW (19 pages)
- P-DR2W-72-CRP (19 pages)
- P-DR2W-72-CW (19 pages)
- P-DR3W-60 (32 pages)
- P-DRA1Y (16 pages)