16 wall jamb installation, Capri, Ø 1/8’’ drill bit 1a 1b – Alumax M-PD93X User Manual
Page 6
1
6
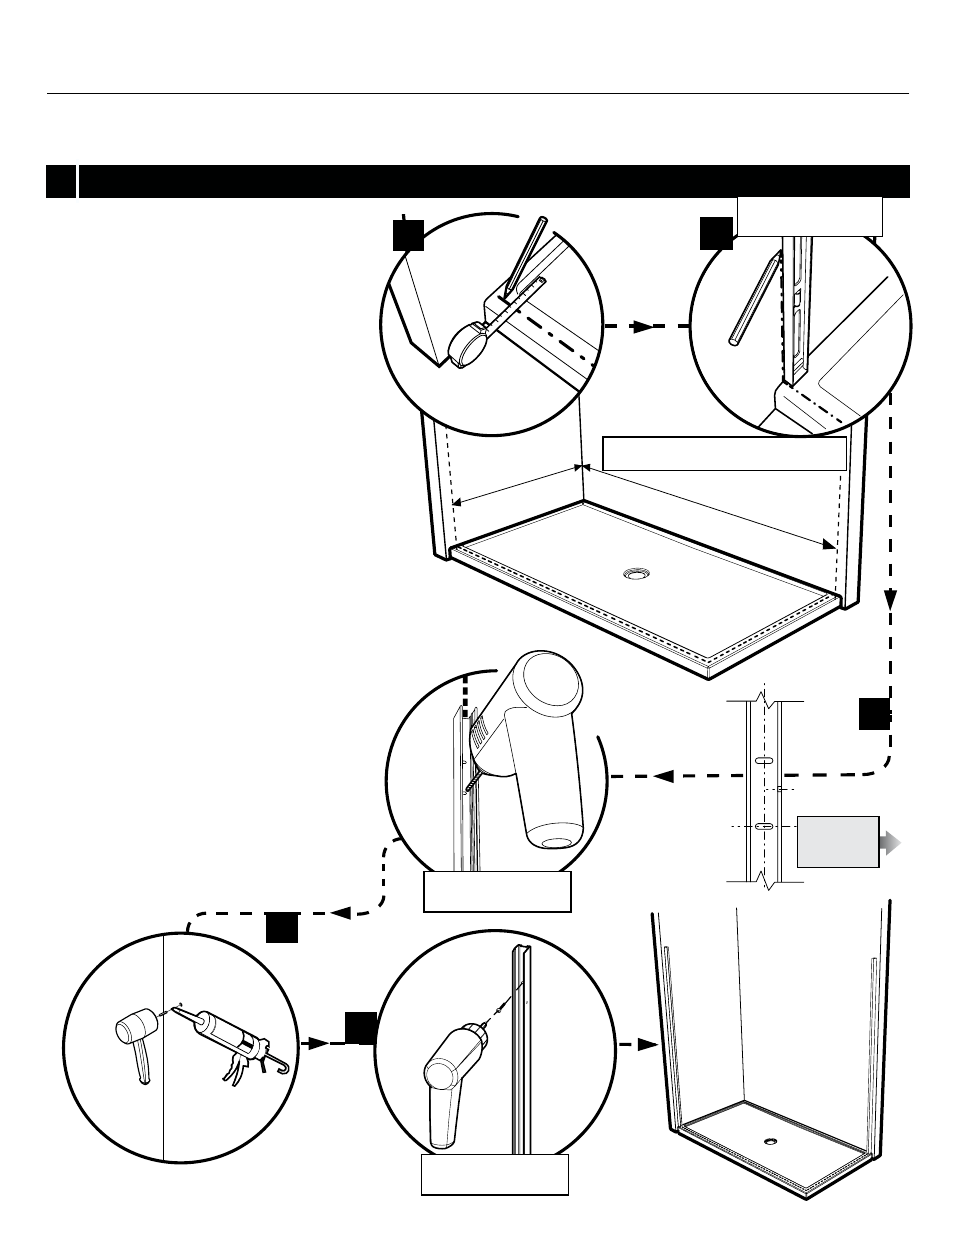
WALL JAMB INSTALLATION
INSTALLATION MANUAL
CAPRI
INTERIOR
SHOWER SIDE
Determine dimensions A & B on the threshold
of the base. (Refer to chart on page 2 for the
recommended minimum & maximum dimen-
sions)
Run a second line up the wall using a level.
Center the opening of the wall jamb on the line
marked previously. Drill holes with a Ø1/8’’ drill
bit by using the wall jamb holes as reference.
Insert one drop of silicone in each hole bored in
the wall before inserting there wall plug on both
side.
Screw the two wall jambs in the wall plugs
already installed in the wall by using screws 1
3/8’’ (3). Ensure verticality with the level.
1a.
1b.
1c.
1d.
1e.
Front
opening
Side opening
Repeat on opposite side
Ø 1/8’’
DRILL BIT
1a
1b
Repeat on opposite side
Repeat on opposite side
1d
1e
1c
(DIM B)
(DIM A)
See page 2 for Min & Max dimensions
- 300c (9 pages)
- 300cv (8 pages)
- 300d (9 pages)
- 338 (9 pages)
- 340 (9 pages)
- 340 Deluxe (9 pages)
- 390c Supplement (5 pages)
- 390cv Supplement (4 pages)
- 391 (12 pages)
- 392 (11 pages)
- 393 (11 pages)
- 394 (11 pages)
- 640S (8 pages)
- 640 (8 pages)
- 640D (7 pages)
- 641 Side Panel (6 pages)
- 694 (6 pages)
- 700c (7 pages)
- 733 (8 pages)
- 738 (8 pages)
- 738 Towel Bar (1 page)
- 740D (8 pages)
- 790c Supplement (4 pages)
- 791 (11 pages)
- 792 (12 pages)
- 793 (12 pages)
- 793 Buttress Supplement (1 page)
- 794 (11 pages)
- 794s (9 pages)
- 795 (10 pages)
- 890 (9 pages)
- 890c (8 pages)
- 1040 (9 pages)
- Deluxe Towel Bar (1 page)
- Transportation Latch (1 page)
- DesignLine Hinge (5 pages)
- P-DR1W-48-60 (14 pages)
- P-DR1W-72 (15 pages)
- P-DR1WT-60 (14 pages)
- P-DR2W-48-60-CRP (18 pages)
- P-DR2W-48-60-CW (19 pages)
- P-DR2W-72-CRP (19 pages)
- P-DR2W-72-CW (19 pages)
- P-DR3W-60 (32 pages)
- P-DRA1Y (16 pages)